View Single Post in: Real Vaulted Ceilings Tutorial - updated with peaked roof tut
#30
 17th Sep 2013 at 9:43 AM
17th Sep 2013 at 9:43 AM
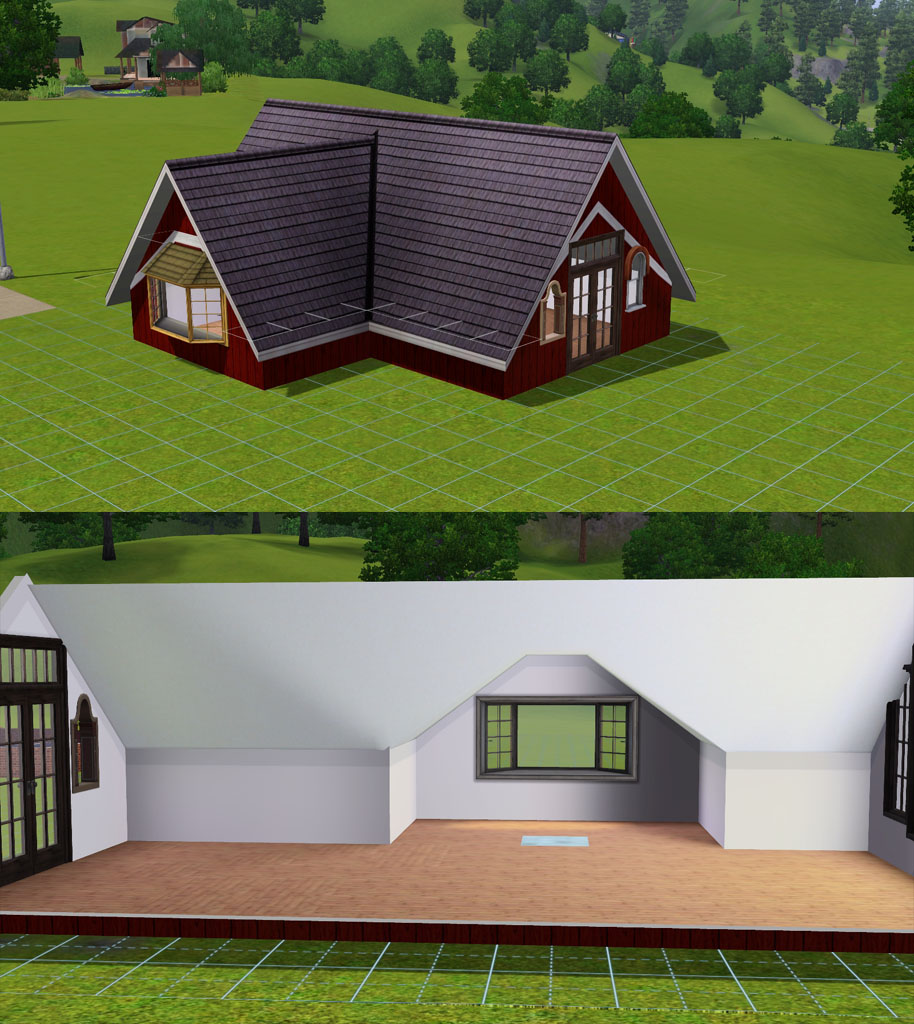
Aeval99 asked me if I was ever going to finish the peaked roof tut. It’s been something I’ve been meaning to do far a long time now but I never seem to get around to it. So, this is a quick tut add-on for Aeval that I‘ll maybe one day get around to re-doing on something that's not the ugliest house known to man! 
NOTE: Peaked roofs will only work on rooms that are an even number of tiles wide. Odd numbers will give you a flat central column.
Armiel taught me a few tricks about CFE in her CFE video tuts. I mentioned the “Exact terrain height method” earlier but I’ll also be using her steps method of lowering roofs.
Placing the roof
CFE False
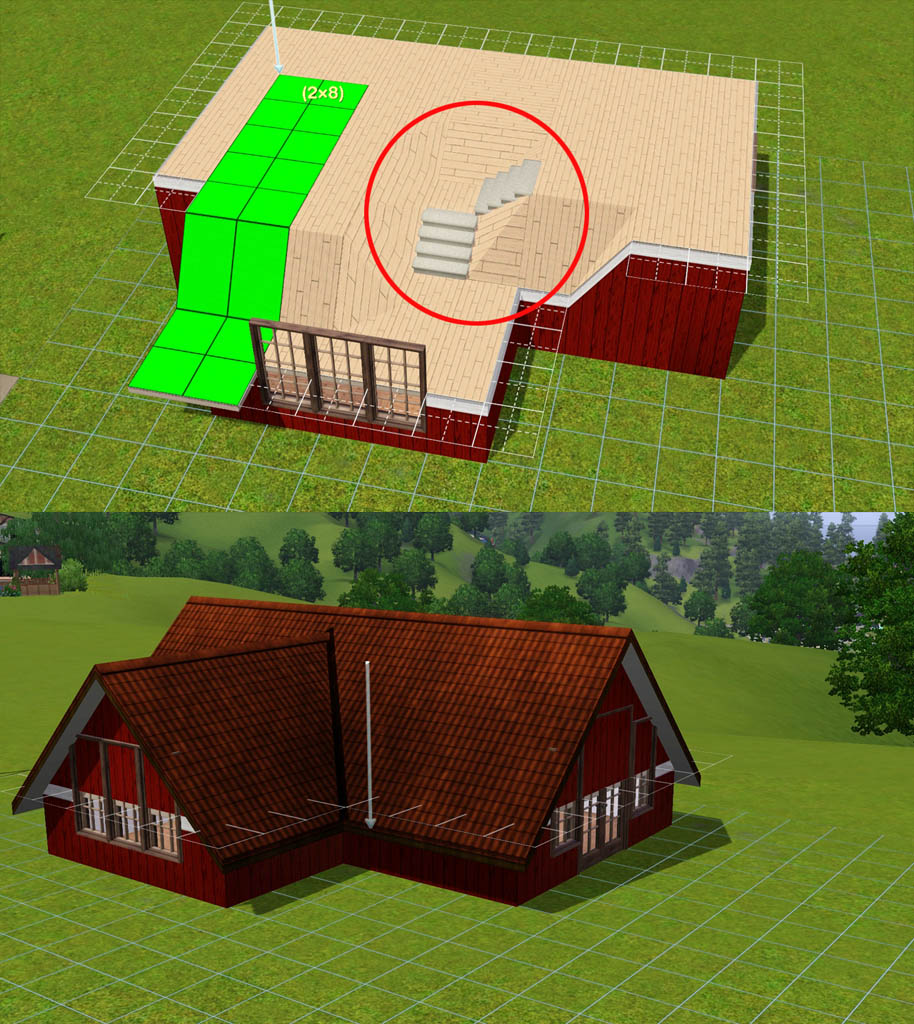
1. Place a set of steps on top of your floor-tile roof so that the roof sinks 4-steps. Repeat this step so that you have an 8-step high drop in your roof. Level the whole tile roof to that new height. This storey of your building is now exactly half of a full wall height (or 8-steps high).
2. Place your roof (inc dormer roof).
Gaining height for your peaked roof
Unless you’re making a special dummy floor specifically for the peaked roof, or you don’t mind having very low side walls, you’re going to need to make the highest point of your peak higher than a normal height wall. For my example I’m going to make the highest point 1 1/4 x wall height (or 20 steps high). I’ll be using Armi’s exact terrain height method which you can also see in her CFE video tuts.
CFE true
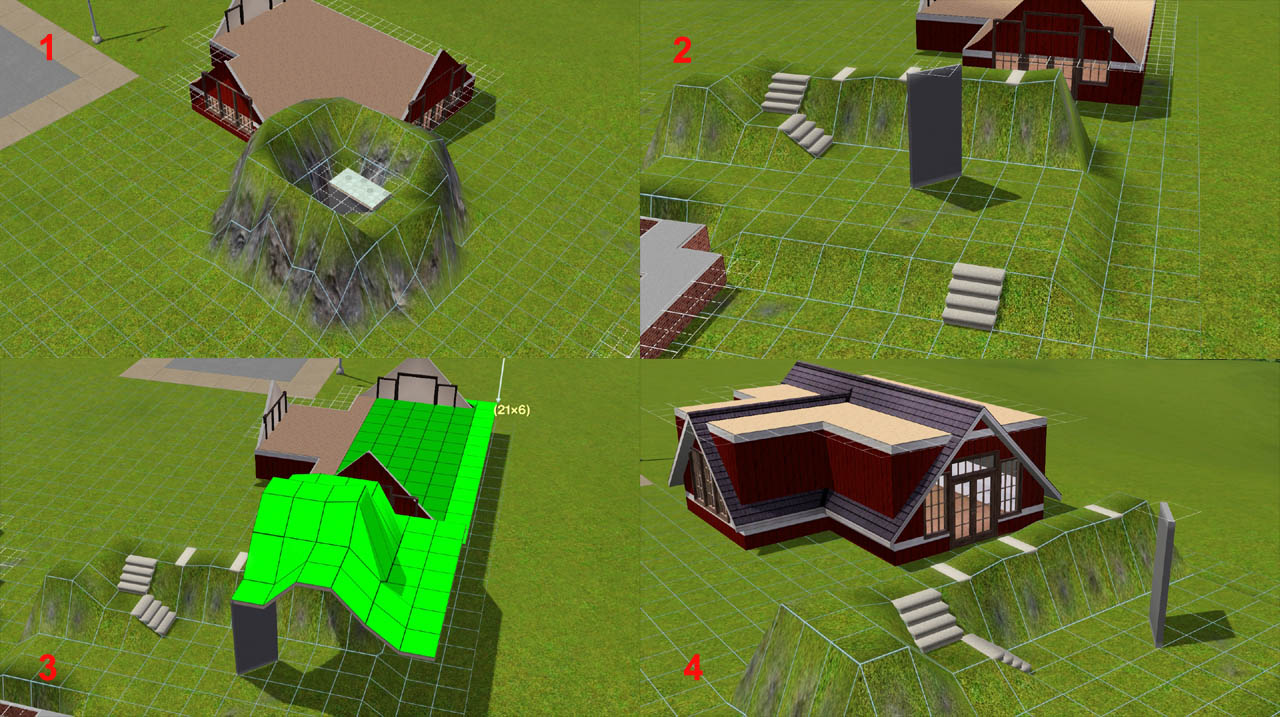
1. Place one piece of wall on the ground somewhere. Raise the terrain around it. Place a piece of floor tile on top of it. This will level the ground around it to one step short of full wall height or 15 steps (if you have patch 1.55 or higher – prior to that patch it will lower the terrain to ¾ wall height).
2. I want my terrain to be exactly 4 steps high so I placed 11 total steps down the terrain. You can test you’ve done this correctly by placing 4 steps down to the original ground level.
3. Place one tile of guide wall. Now with the full height guide wall and 4-step high raised terrain my guidewall (and therefore the highest peak of my roof) is one and a quarter walls high or 20 steps high.
CFE False
4. Stretch that across your roof. Now you have the highest point of your peak, we can work down from here using the step method.
Making Slopes
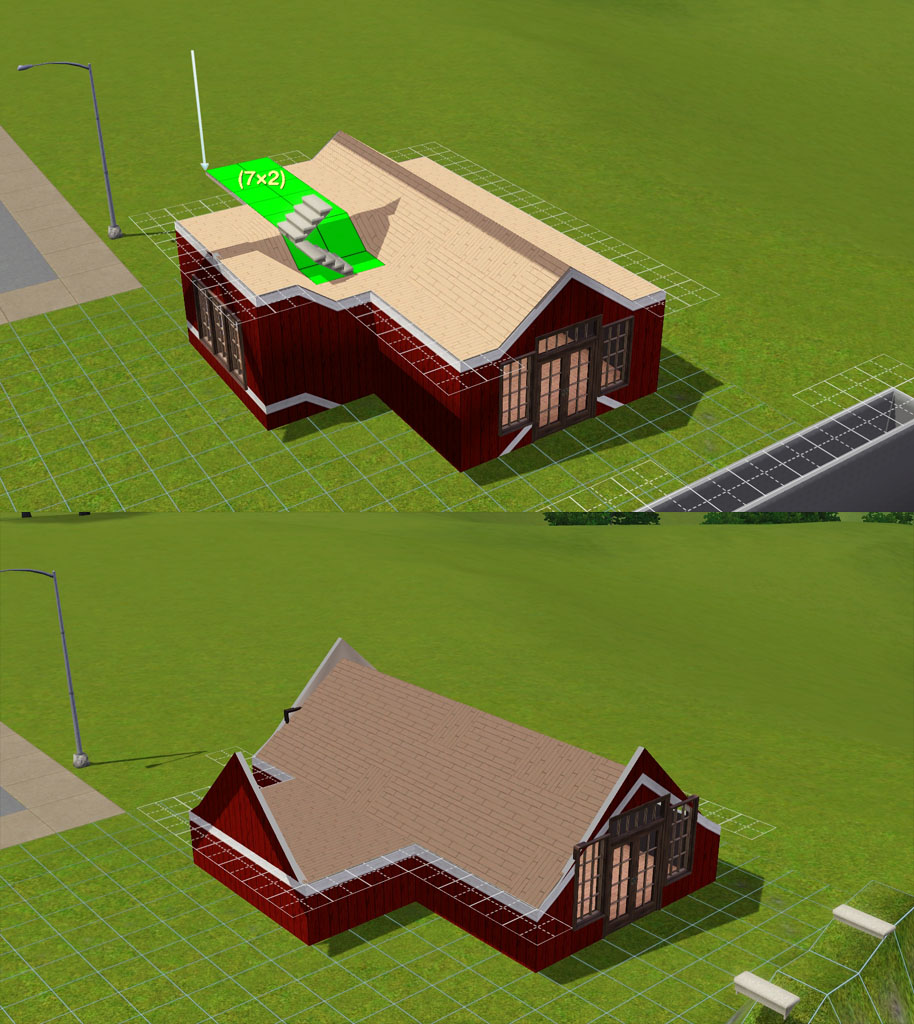
1. Place a set of steps directly on the roof to lower part of it by 4-steps. Level the roof leaving only the central line down the middle of the roof at the highest peak.
2. Repeat the above step until the main part of your roof is sloped on both sides, each time leaving another column untouched in the centre. If you have trouble placing steps or find doing both sides too fiddly just make a guide wall at the end of your building.
Wide dormers
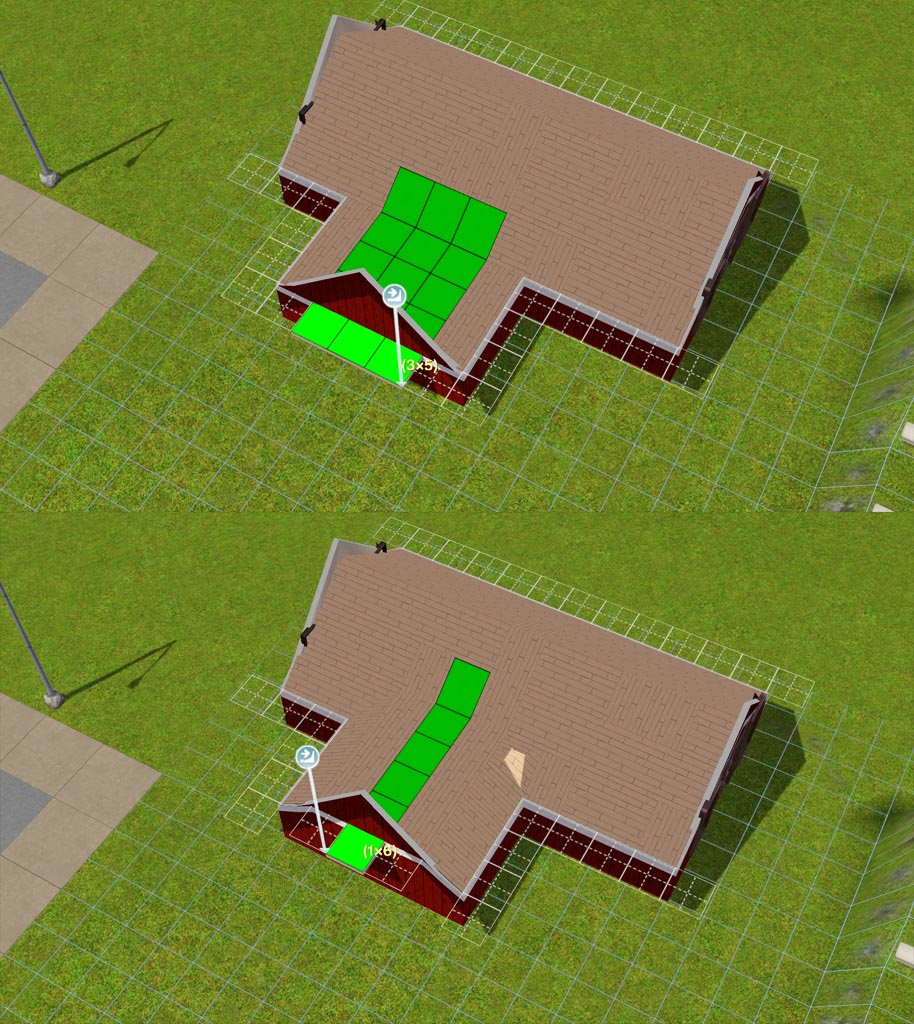
With a 5-tile wide dormer I want to have one flat tile in the centre and two sloping tiles either side.
1. Take your level tool and drag from the lowest sloping tile on the main roof and take it over your dormer leaving a one-tile wide column on each side untouched.
2. Repeat but this time go up to the next lowest point on the sloped main roof and drag over the centre of your dormer. You should now have a gradual slope either side of the dormer and a flat centre. You can probably have a peaked dormer too but who has time for that? :p
Finishing touches
1. Don’t forget to touch the ceiling with a floor tile!
2. Play with the roof height slider to try to fix any little dormer joint issues.
3. Depending on the lowest point of slope that you went for, you may have to re-think your window placement and/or window type.
You can of course alter this to suit your own needs. For example, if your house is 10 tiles wide then you might want to make the highest point of your peak 1 ¾ x normal wall height (or 28 steps) so that your slope reaches both sides. When you’re more confident with CFE you can freestyle it and make fancy curved slopes instead of using steps... but it’s probably best to try this method first
ETA: oops, I had two different heights written down as my aim for the peak height. Ive ammended this so it now says 1 1/4 wall height. Sorry for any confusion caused.
Guys, rules are good! Rules help control the fun. ~ Monica E. Geller

NOTE: Peaked roofs will only work on rooms that are an even number of tiles wide. Odd numbers will give you a flat central column.
Armiel taught me a few tricks about CFE in her CFE video tuts. I mentioned the “Exact terrain height method” earlier but I’ll also be using her steps method of lowering roofs.
Placing the roof
CFE False
1. Place a set of steps on top of your floor-tile roof so that the roof sinks 4-steps. Repeat this step so that you have an 8-step high drop in your roof. Level the whole tile roof to that new height. This storey of your building is now exactly half of a full wall height (or 8-steps high).
2. Place your roof (inc dormer roof).
Gaining height for your peaked roof
Unless you’re making a special dummy floor specifically for the peaked roof, or you don’t mind having very low side walls, you’re going to need to make the highest point of your peak higher than a normal height wall. For my example I’m going to make the highest point 1 1/4 x wall height (or 20 steps high). I’ll be using Armi’s exact terrain height method which you can also see in her CFE video tuts.
CFE true
1. Place one piece of wall on the ground somewhere. Raise the terrain around it. Place a piece of floor tile on top of it. This will level the ground around it to one step short of full wall height or 15 steps (if you have patch 1.55 or higher – prior to that patch it will lower the terrain to ¾ wall height).
2. I want my terrain to be exactly 4 steps high so I placed 11 total steps down the terrain. You can test you’ve done this correctly by placing 4 steps down to the original ground level.
3. Place one tile of guide wall. Now with the full height guide wall and 4-step high raised terrain my guidewall (and therefore the highest peak of my roof) is one and a quarter walls high or 20 steps high.
CFE False
4. Stretch that across your roof. Now you have the highest point of your peak, we can work down from here using the step method.
Making Slopes
1. Place a set of steps directly on the roof to lower part of it by 4-steps. Level the roof leaving only the central line down the middle of the roof at the highest peak.
2. Repeat the above step until the main part of your roof is sloped on both sides, each time leaving another column untouched in the centre. If you have trouble placing steps or find doing both sides too fiddly just make a guide wall at the end of your building.

Wide dormers
With a 5-tile wide dormer I want to have one flat tile in the centre and two sloping tiles either side.
1. Take your level tool and drag from the lowest sloping tile on the main roof and take it over your dormer leaving a one-tile wide column on each side untouched.
2. Repeat but this time go up to the next lowest point on the sloped main roof and drag over the centre of your dormer. You should now have a gradual slope either side of the dormer and a flat centre. You can probably have a peaked dormer too but who has time for that? :p
Finishing touches
1. Don’t forget to touch the ceiling with a floor tile!
2. Play with the roof height slider to try to fix any little dormer joint issues.
3. Depending on the lowest point of slope that you went for, you may have to re-think your window placement and/or window type.
You can of course alter this to suit your own needs. For example, if your house is 10 tiles wide then you might want to make the highest point of your peak 1 ¾ x normal wall height (or 28 steps) so that your slope reaches both sides. When you’re more confident with CFE you can freestyle it and make fancy curved slopes instead of using steps... but it’s probably best to try this method first
ETA: oops, I had two different heights written down as my aim for the peak height. Ive ammended this so it now says 1 1/4 wall height. Sorry for any confusion caused.
Guys, rules are good! Rules help control the fun. ~ Monica E. Geller