 Sign in to Mod The Sims
- Site Map >
- Modding and Creation >
- Sims 4 Creation >
- CAS Parts >
- [Solved] Is possible edit the UV1 Morph Data in some parts of one mesh?
- Site Map >
- Modding and Creation >
- Sims 4 Creation >
- CAS Parts >
- [Solved] Is possible edit the UV1 Morph Data in some parts of one mesh?
Replies: 5 (Who?), Viewed: 4305 times.
#1
 21st May 2017 at 12:09 AM
Last edited by Velorem : 23rd May 2017 at 1:38 AM.
21st May 2017 at 12:09 AM
Last edited by Velorem : 23rd May 2017 at 1:38 AM.
21st May 2017 at 12:09 AM
Last edited by Velorem : 23rd May 2017 at 1:38 AM.
Posts: 22
Advertisement
#2
21st May 2017 at 12:35 PM
Last edited by CmarNYC : 21st May 2017 at 10:31 PM.
21st May 2017 at 12:35 PM
Last edited by CmarNYC : 21st May 2017 at 10:31 PM.
l'm happy to see someone else working on this! 
Different vertex formats can't be combined in one mesh, so exactly what you're asking about can't be done. However, you have two choices - either give the part UV1 coordinates of 0, 0 which will prevent any deformations, or make it as a separate mesh. If you make a separate mesh you have to modify the ymBottomNude CASP to have two mesh parts but that can be done with CAS Tools. Modifying the UV1 can also be done with CAS Tools if you have Milkshape. Or maybe you could make the extra part as a separate mesh without the UV1 assigned and then use CAS Tools to combine it with the main bottom.
If you need help or more information please ask.
Moving to CAS Parts.
Please do not PM me with mod, tutorial, or general modding questions or problems; post them in the thread for the mod or tutorial or post them in the appropriate forum.
Visit my blogs for other Sims content:
Online Sims - general mods for Sims 3
Offline Sims - adult mods for Sims 3 and Sims 4
#3
21st May 2017 at 4:35 PM
21st May 2017 at 4:35 PM
Posts: 11,682
Thanks: 9680 in 11 Posts
What's all this deformation in the genitals? EA didn't put that in, did they? :D
"You can do refraction by raymarching through the depth buffer" (c. Reddeyfish 2017)
"You can do refraction by raymarching through the depth buffer" (c. Reddeyfish 2017)
#4
22nd May 2017 at 4:44 AM
22nd May 2017 at 4:44 AM
Posts: 22
Quote: Originally posted by CmarNYC
|
l'm happy to see someone else working on this! Different vertex formats can't be combined in one mesh, so exactly what you're asking about can't be done. However, you have two choices - either give the part UV1 coordinates of 0, 0 which will prevent any deformations, or make it as a separate mesh. If you make a separate mesh you have to modify the ymBottomNude CASP to have two mesh parts but that can be done with CAS Tools. Modifying the UV1 can also be done with CAS Tools if you have Milkshape. Or maybe you could make the extra part as a separate mesh without the UV1 assigned and then use CAS Tools to combine it with the main bottom. If you need help or more information please ask. Moving to CAS Parts. |
Thanks Cmar! I try with two mesh parts, but dosen't works fine. I edit the mesh and the texture for create one solid piece avoiding missing poligons betwin the body and the genital area for get a natural look, for this reason I want fix only the morphs without make more modifications to the mesh.
It looks perfect for a thin sim, but if I want edit the hips the legs or the belly, this deform the genitals.
How I can edit the UV1 on mikshape or in S4CAStool?
Sorry Inge for don't explain well. I say "genital area" for don't say "I have done a new penis for sim" But yeah. I did that
 The thing is smashed by the morphs.
#5
22nd May 2017 at 3:00 PM
Last edited by CmarNYC : 22nd May 2017 at 9:03 PM.
22nd May 2017 at 3:00 PM
Last edited by CmarNYC : 22nd May 2017 at 9:03 PM.
Inge was joking, I'm pretty sure. :D
Here's what I would try:
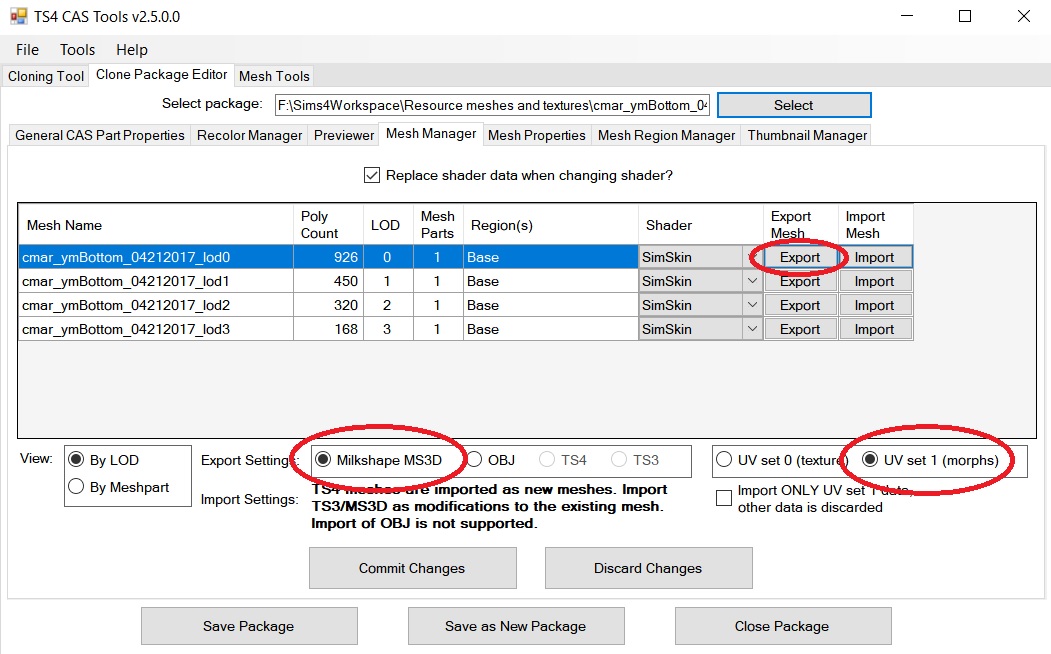
Open your package with CAS Tools and go to the Mesh Manager tab. In the Export Settings, select Milkshape MS3D and UV Set 1 (morphs). Export the mesh and save it as a .ms3d file.
Open the .ms3d in Milkshape. Select the mesh in the Groups tab, select the MaleBodyCompleteUV1.jpg I've attached in the Materials tab, and click Assign. Then click the Window menu and Texture Coordinate Editor. Select only the vertices of the penis part of the mesh. (This may be very hard to do.) Scale and move the penis in the Texture window to make it as small as you can and place it away from the rest of the body. Keep it on the right half of the image. (The left side is mirrored to the right in the morphs so it's just clearer that way.)
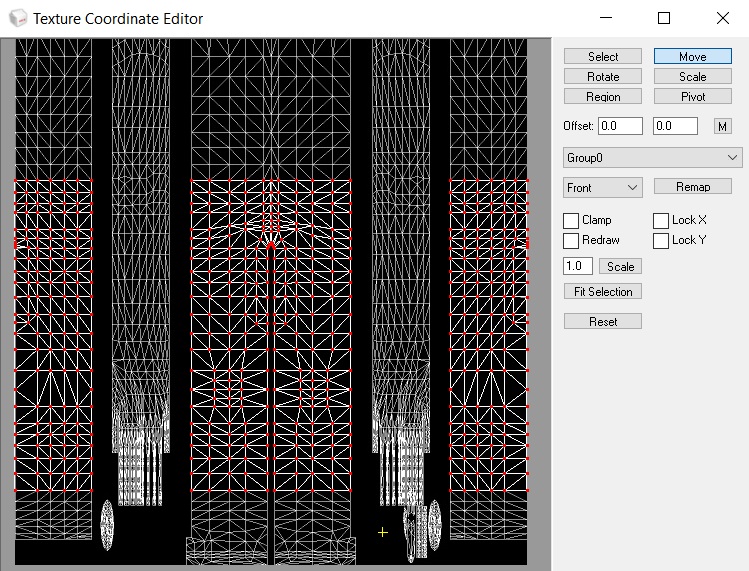
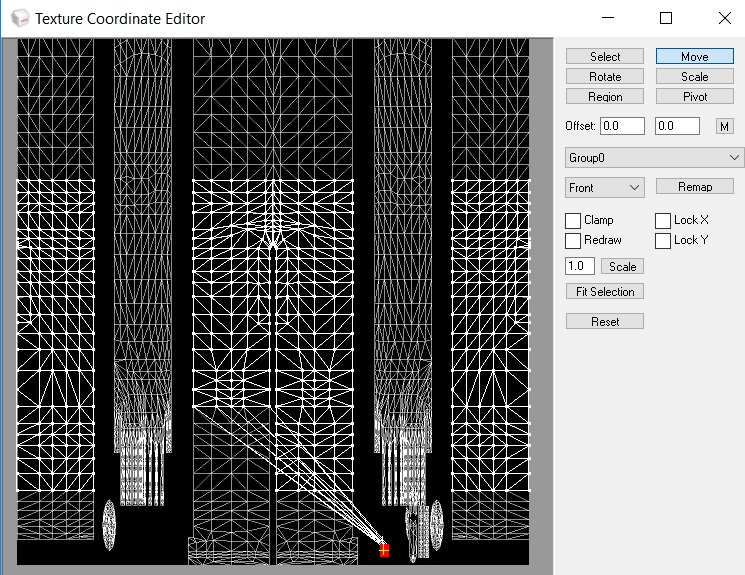
I used part of the leg to illustrate.
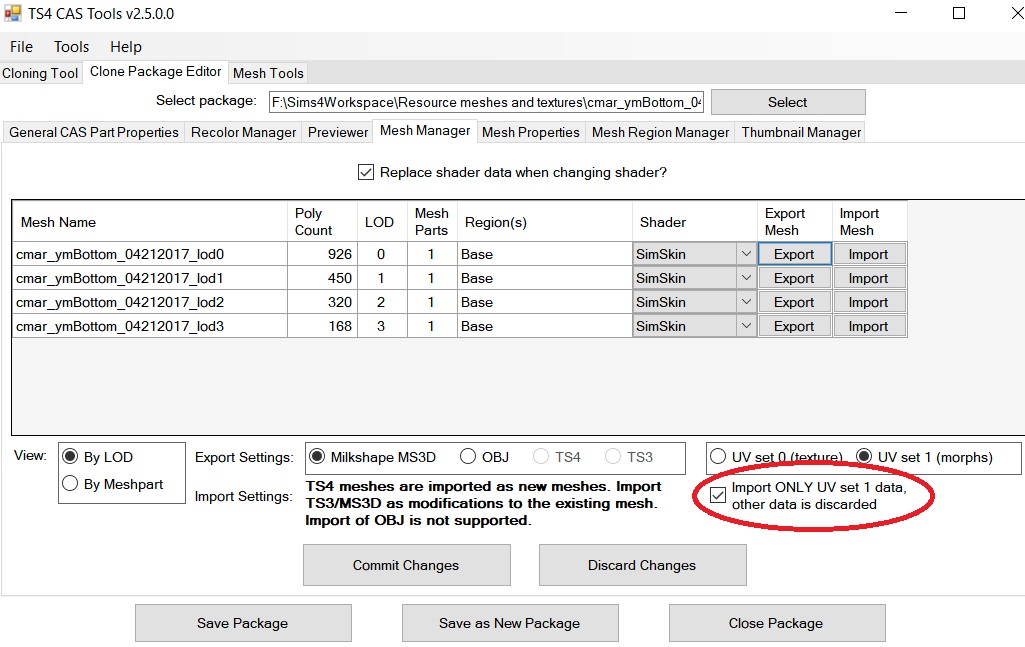
Close the Texture window and save the .ms3d mesh. In CAS Tools, in the Import Settings, check the box for Import ONLY UV set 1 data, and import the modified .ms3d mesh.
If all that works, the penis should not be affected by the body morphs.
Please do not PM me with mod, tutorial, or general modding questions or problems; post them in the thread for the mod or tutorial or post them in the appropriate forum.
Visit my blogs for other Sims content:
Online Sims - general mods for Sims 3
Offline Sims - adult mods for Sims 3 and Sims 4
Here's what I would try:
Open your package with CAS Tools and go to the Mesh Manager tab. In the Export Settings, select Milkshape MS3D and UV Set 1 (morphs). Export the mesh and save it as a .ms3d file.
Open the .ms3d in Milkshape. Select the mesh in the Groups tab, select the MaleBodyCompleteUV1.jpg I've attached in the Materials tab, and click Assign. Then click the Window menu and Texture Coordinate Editor. Select only the vertices of the penis part of the mesh. (This may be very hard to do.) Scale and move the penis in the Texture window to make it as small as you can and place it away from the rest of the body. Keep it on the right half of the image. (The left side is mirrored to the right in the morphs so it's just clearer that way.)
I used part of the leg to illustrate.
Close the Texture window and save the .ms3d mesh. In CAS Tools, in the Import Settings, check the box for Import ONLY UV set 1 data, and import the modified .ms3d mesh.
If all that works, the penis should not be affected by the body morphs.
Attached files:
| MaleBodyCompleteUV1.zip (332.3 KB, 14 downloads) - View custom content | ||
343447 2017-03-25 23:24 MaleBodyCompleteUV1.jpg --------- ------- 343447 1 file |
||
Please do not PM me with mod, tutorial, or general modding questions or problems; post them in the thread for the mod or tutorial or post them in the appropriate forum.
Visit my blogs for other Sims content:
Online Sims - general mods for Sims 3
Offline Sims - adult mods for Sims 3 and Sims 4
#6
23rd May 2017 at 1:37 AM
23rd May 2017 at 1:37 AM
Posts: 22
Quote: Originally posted by CmarNYC
|
Inge was joking, I'm pretty sure. :D Here's what I would try: Open your package with CAS Tools and go to the Mesh Manager tab. In the Export Settings, select Milkshape MS3D and UV Set 1 (morphs). Export the mesh and save it as a .ms3d file. Open the .ms3d in Milkshape. Select the mesh in the Groups tab, select the MaleBodyCompleteUV1.jpg I've attached in the Materials tab, and click Assign. Then click the Window menu and Texture Coordinate Editor. Select only the vertices of the penis part of the mesh. (This may be very hard to do.) Scale and move the penis in the Texture window to make it as small as you can and place it away from the rest of the body. Keep it on the right half of the image. (The left side is mirrored to the right in the morphs so it's just clearer that way.) I used part of the leg to illustrate. Close the Texture window and save the .ms3d mesh. In CAS Tools, in the Import Settings, check the box for Import ONLY UV set 1 data, and import the modified .ms3d mesh. If all that works, the penis should not be affected by the body morphs. |
Thank you so much! I'll do my best. This will help me alot.
Who Posted
|
|