 Sign in to Mod The Sims
- Site Map >
- Modding and Creation >
- Sims 3 Creation >
- Tutorials >
- Object Creation - Tutorial: Change EA Painting Image - For Those New to S3 Object Modification-Read the bold print
- Site Map >
- Modding and Creation >
- Sims 3 Creation >
- Tutorials >
- Object Creation - Tutorial: Change EA Painting Image - For Those New to S3 Object Modification-Read the bold print
#1
 20th Feb 2010 at 5:07 PM
Last edited by leefish : 20th Dec 2013 at 11:49 AM.
20th Feb 2010 at 5:07 PM
Last edited by leefish : 20th Dec 2013 at 11:49 AM.
20th Feb 2010 at 5:07 PM
Last edited by leefish : 20th Dec 2013 at 11:49 AM.
Posts: 2,932
Thanks: 15574 in 28 Posts
 The process for changing an EA painting image and making paintings with multiple images has changed with the introduction of the new Texture Tweaker Tool by Inge Jones.
 I have posted a new tutorial on the SimsWiki that uses the new tool to do both of these things as well as change default patterns on the ones with frames. This tutorial should be considered a replacement for the one below although I'm leaving this here in case it's needed for some reason I'm not thinking of. Please use the new tutorial and not this one.
The link is Tutorials:TS3_Add_Change_Object_Imageswiki
The new methods are easier and less time consuming. They can also be used on any object...not just paintings. I encourage everyone to use the new tutorial instead of this one.

I've been meaning to write an updated version of the painting tutorial ever since people seemed to start having trouble with or questions about the old one in the SimsWiki. This version has eliminated the steps that have been rendered unnecessary by the newer tool versions and has pictures of what the tools actually look like now. I modeled the format of it on tutorials by HL and cmo since their tutorials work so well for people. I hope people find it useful.
This tutorial is for people who are beginners to Sims 3 object modification. It assumes you already know how to use your graphics editor and will not teach you how to use one. If there are any questions about the tutorial please post them in the thread. If anyone spots a mistake in the tutorial please let me know in the thread.
To use this tutorial you will need:
1. The current version of S3OC Cloner (this tutorial uses version 0912-13-1531) http://www.modthesims.info/showthread.php?t=362413
2. The current version of S3PE Package Editor (this tutorial uses version 0912-13-1729) http://www.modthesims.info/showthread.php?t=362412
3. A graphics editor you know how to use (Photoshop, Paint.NET, GIMP or Paint Shop Pro (it has to be able to handle alpha layers)
4. Nvidia DDS-Utilities http://developer.nvidia.com/object/...ies_legacy.html
(Install the tools per the instructions in the respective threads.)
Tutorial: Change EA Painting Image - For Those New to S3 Object Modification
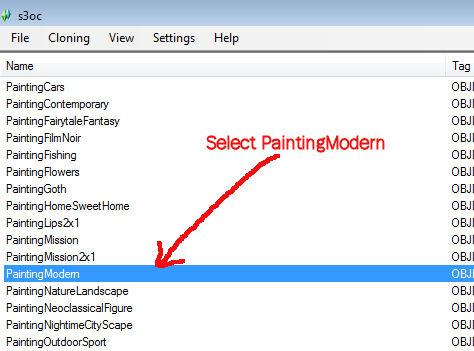
1. Create a working folder where you will put the painting clone package and the painting IMG. Open s3oc. Select Cloning in the top bar (left side). Select Normal objects from the dropdown menu.

2. Let the list generate and then select PaintingModern.
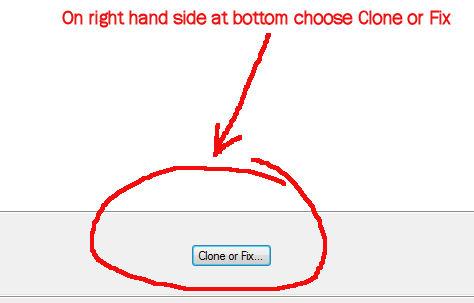
3. Click the Clone or Fix button on the right hand side at the bottom.
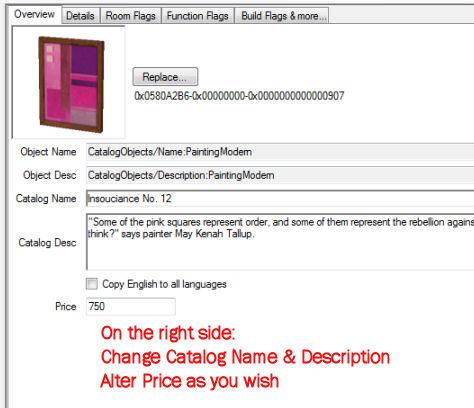
4. The view will show a split screen with a line down the middle dividing left and right.
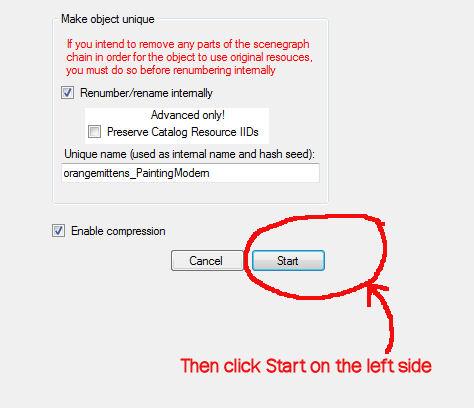
a. Your left side should look like the picture below. Make sure your checks are in the correct boxes. It is especially important to make sure the Renumber/rename internally box has a check mark in it. Double check that it does before going to the next step.

b. On the right hand side you can see a thumbnail of the painting. Change the name, description, and price now. Only change those 3 things. Don't change the thumbnail and don't click the replace button.
5. Click the Start button on the left side. Navigate to your working folder, name the package, and click Save. Click OK in the popup box which appears.
6. Close the S3OC - you will not need it anymore.
7. Open S3PE and in the top left hand corner pick File. From the dropdown pick Open.
8. Navigate to where you saved your painting package and click on it. Click the Open button.
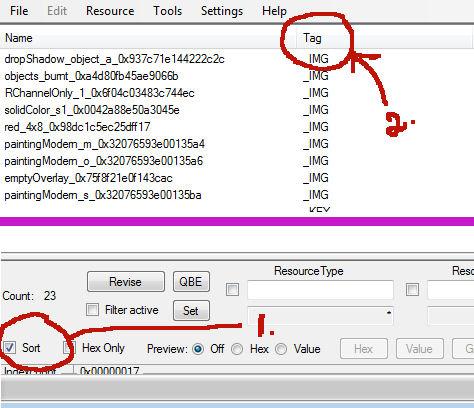
9. In the lower left corner put a check in the box by the word Sort. In the upper bar click the word Tag. This will reorganize your list by Tag name.
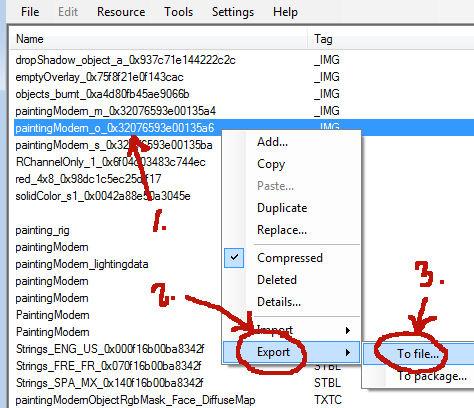
10. Right click on the line that starts PaintingModern_o_. Pick Export from the drop down menu. From the second menu pick To file. Navigate to your working folder and click Save. (See note at bottom about IMG names)
11. Minimize or close S3PE for now.
12. Open up the IMG (it will be a .dds) you exported in your image editor of choice. I use Paint Shop Pro but Photoshop, GIMP, or Paint.NET (among others) will work just as well. (See note about PSP below)
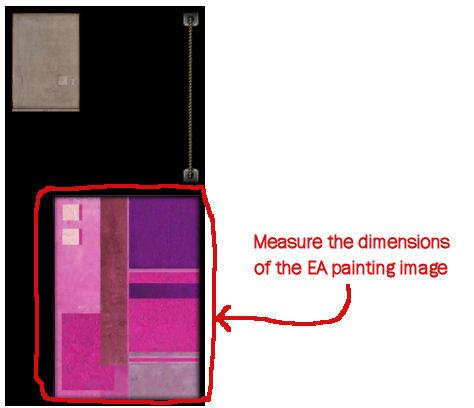
13. Figure out the size of the EA painting image by cutting out the part you want to replace. In this case the size is 189 x 263.
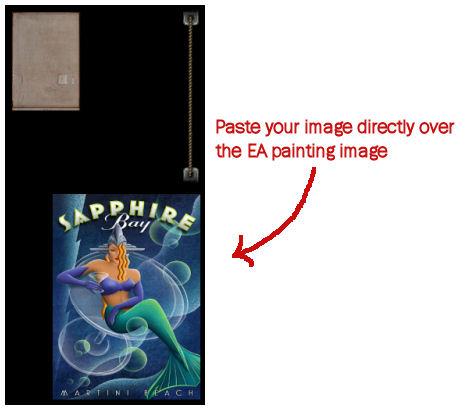
14. Resize your image so it is the exact same size and paste it onto the dds. Move it so it lies directly over the EA painting image.
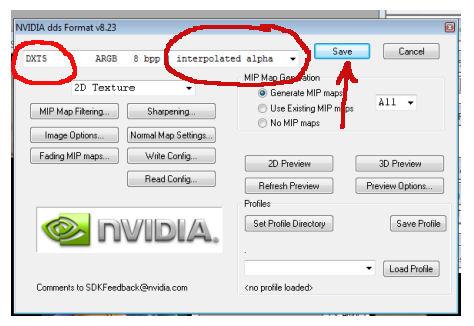
15. Merge all layers and save as an interpolated alpha (DXT5).
16. Open (or bring up your minimized) s3pe. If you closed it before open your painting package again.
17. Right click anywhere on the list. When the drop down menu appears choose Import. From the second drop down pick From file. Navigate to the folder where you saved your dds.
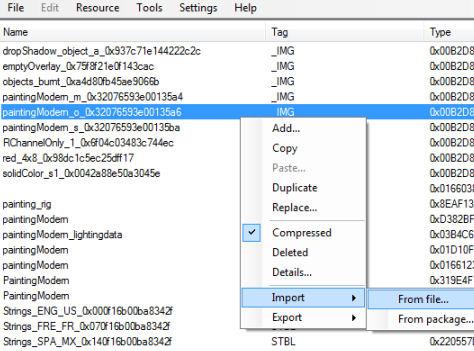
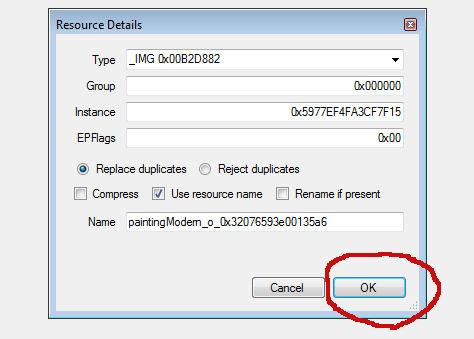
18. Select your dds and click Open. A popup box will appear. Make sure Replace duplicates is selected and that the Use resource name box has a check mark in it. Then click OK. Do NOT change any of the numbers. Just click OK.
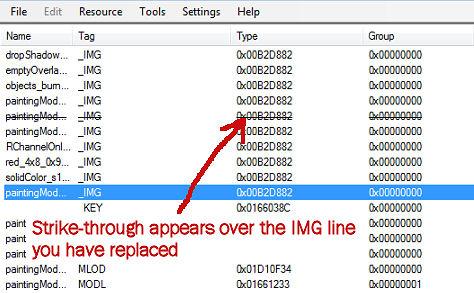
19. In the upper left hand corner select File and from the drop down pick Save. A strike-through line should appear through the IMG line of the IMG you exported before.
20. Put your new package in your Mods folder as you usually do and check it in the game.
Note: Eight of the twenty-eight original EA paintings have the _o_ in the name of the IMG you need to change. The other 20 have some (apparently) random name. I've listed the names for the other twenty IMG's in the attached text document although it isn't that hard to figure out which is what once you get used to the way the object list forms.
http://jaue.com/om/EAPaintings_IMGList.rar
If you're ready to add multiple painting choices to a single painting cmo's wonderful tutorial can show you how to do it. This isn't a beginner's tutorial but it is excellently written and very do-able. This tutorial will allow you to replace the multiple default images some of the paintings have with your own allowing you to have a single painting with multiple image choices in the game (like how Sims 2 paintings are). It's here:
http://www.modthesims.info/showthread.php?t=377737
A couple people now have posted that they've successfully used Paint.NET to manage dealing with alphas that are needed for paintings. I also use this tool to make my alphas and find it very simple to learn and easy to use. If you're interested in trying Paint.NET for this purpose Samelo gave excellent instructions on what you need (with links on where to get it) and how to use it here:
http://www.modthesims.info/showthread.php?t=377501
in post 18. This is where I learned how to finally manage alphas.
If you're trying to make paintings and the alphas are giving you trouble this is well worth trying. Paint.NET is free too
Note on PSP: If you want to use PSP to edit the dds you need to rename the dds before you try to open it with PSP. The name the dds comes out of s30c with is too long for PSP to handle. What I usually do is just make a copy of the dds, rename it something shorter, edit it, and then rename it back when I'm ready to import it back to the package.
17 users say thanks for this.
(Who?)
Thanks
Advertisement

#2
20th Feb 2010 at 7:27 PM
Last edited by leesester : 20th Feb 2010 at 7:43 PM.
20th Feb 2010 at 7:27 PM
Last edited by leesester : 20th Feb 2010 at 7:43 PM.
Hi OM - first - great tutorial. Nice and clear, I hope many people will be able to make cool things for their game using this.
The thing is, (speaking as a bit of a download addict) this particular method means that each painting made will be a FULL clone of the original. That's heavy on the game, and it will start to clutter the catalogue.
I saw that cmomoney had made a tutorial on changing the PICTURE inside an object - adding more pictures to one mesh. That seems like a really neat idea and keeps the catalogue clutter down. Its my personal preference to do it that way, and I think that uploads to MTS should ideally be made that way.
Here is the link to Cmos tutorial http://www.modthesims.info/showthread.php?t=377737 I have to warn new users - its NOT a walk in the park, but its well explained and totally doable.
However, we all have to start somewhere (my first TS3 object was a painting made using similar techniques as those in your tutorial) and I think that this is a great tutorial for helping new creators to get an understanding of the methods used to create and recolour objects. It will definitely help to deliver that unforgettable OMG I MADE THIS and its IN MY GAME moment.
More downloads by Leesester, BoilingOil and others at Leefish.nl | My Stuff at Leefish.nl | LeeFish RSS | Sims4 News Blog | TumblinLeefish
#3
20th Feb 2010 at 9:29 PM
20th Feb 2010 at 9:29 PM
Posts: 2,932
Thanks: 15574 in 28 Posts
Thanks for your post Leesester 
I made this tutorial because I had answered several people who were coming here asking questions about how to make a painting with a lot of confusion because of the outdated tutorial on the topic in the Wiki here. In particular one person new to S3 meshing and I spent quite awhile trying to fix her painting which had completely borked thumbnails. The problem turned out to be that she had followed an outdated MTS3 Wiki tutorial to the letter and screwed them up that way. At the end of that thread she suggested an update should be made and it's hard to argue her point...lol.
For some reason, one old tutorial has caused a few new people to end up with brown-fronted paintings (?) which they then post about trying to find answers. And lately, a couple more questions about how to easily make a painting spurred me to finally get a replacement made. If it seems to work out perhaps it could be linked in the old tutorial so people have something up to date to get started with?
This tutorial, as the title suggests, isn't meant for people who are ready to provide the forum with lots of great new uploads. It's meant for people who have just downloaded the tools and are wondering how to get started. It's also for people who have no interest in meshing at all but would like to add a few of their own personal paintings to their own game.
The thing of it is, many meshers, myself included, like to start out with something fairly easy and straight-forward to build confidence with and to get the general principles down. I think that's why a lot of people, like you, started out by making a simple painting texture replacement. People like us are heading to MTS looking for a tutorial and finding this outdated thing with lots of unnecessary steps and views of the tools which are imtimidating and obsolete. That's why I made this tutorial.
Anyway, thanks again for your post. I think for people who want to upload items to share your point is well-taken.

#4
21st Feb 2010 at 2:51 PM
21st Feb 2010 at 2:51 PM
Which tutorial on the wiki is outdated, orangemittens?
Story books are full of fairy tales, of Kings and Queens, and the bluest skies.
Story books are full of fairy tales, of Kings and Queens, and the bluest skies.
#5
21st Feb 2010 at 3:19 PM
Last edited by orangemittens : 21st Feb 2010 at 3:46 PM.
21st Feb 2010 at 3:19 PM
Last edited by orangemittens : 21st Feb 2010 at 3:46 PM.
Posts: 2,932
Thanks: 15574 in 28 Posts
The one linked to from Xanathon's tutorial page here:
http://www.modthesims.info/showthread.php?t=359314
recently updated to indicate that the tutorial is now outdated.
This one:
http://www.sims2wiki.info/wiki.php?...nge_the_Texture
Although now that I look at it more closely I'm confused...is this a MTS Wiki? The main page for Sims 3 modding there looks the same as the one here and the names of people posting there are familiar to me from here but other things are different...but it's linked to from Xanthon's thread here at MTS.
I apologize if I've made a mistake in thinking this is a MTS Wiki page.
eta: also, if I use the Search wiki in the navigation bar here and type in painting tutorial the list that pops up includes the Xanathon tutorial but it looks like a different page...so now I'm really confused...lol.
Oops...forgot the link:
http://www.modthesims.info/wiki.php...nge_the_Texture
Test Subject
#6
21st Feb 2010 at 7:11 PM
21st Feb 2010 at 7:11 PM
Posts: 9
I agree with Leesester, great tutorial. Only thing I might add would be about using the "view dds" option. It's pretty easy, and you can see your image before you export it. Your list will work too, it's just an option.
#7
21st Feb 2010 at 7:25 PM
21st Feb 2010 at 7:25 PM
Posts: 2,932
Thanks: 15574 in 28 Posts
Thank you for your input Flora. If you would like to write a clear step-by-step explanation of how to use the dds viewer with pictures showing the new tools I'd be glad to add that with credit to you at the bottom of the tutorial for people who would like to try it.
I don't use that tool and it isn't necessary to the painting alteration process so I didn't include it. But it wouldn't be a bad addition if someone's willing to do the work. If not, the list I've included removes all trial and error from the process of selecting the right dds to export.
If you would like to write a clear step-by-step explanation of how to use the dds viewer with pictures showing the new tools I'd be glad to add that with credit to you at the bottom of the tutorial for people who would like to try it.I don't use that tool and it isn't necessary to the painting alteration process so I didn't include it. But it wouldn't be a bad addition if someone's willing to do the work. If not, the list I've included removes all trial and error from the process of selecting the right dds to export.
Test Subject
#8
21st Feb 2010 at 7:36 PM
21st Feb 2010 at 7:36 PM
Posts: 9
Point taken.  I'm just one of those freaks that has to LOOK at everything.
Lab Assistant
#9
22nd Feb 2010 at 2:05 PM
22nd Feb 2010 at 2:05 PM
Posts: 94
Thank you for updating the tutorial and for providing the images which need to be changed.
Is it possible to clone paintings such as the Mission at Noon, Lance Ng (PaintingMission2x1) which also has another DDS underlay with a greyed-out image of the painting (paintingMission2x1__0x79656471ed323eee)? Would that greyed-out underlay image also need to be changed? And if so, how? This DDS image (paintingMission2x1__0x79656471ed323eee) does not seem to appear in either Paint.NET or GIMP.
Is it possible to clone paintings such as the Mission at Noon, Lance Ng (PaintingMission2x1) which also has another DDS underlay with a greyed-out image of the painting (paintingMission2x1__0x79656471ed323eee)? Would that greyed-out underlay image also need to be changed? And if so, how? This DDS image (paintingMission2x1__0x79656471ed323eee) does not seem to appear in either Paint.NET or GIMP.
#10
22nd Feb 2010 at 11:36 PM
22nd Feb 2010 at 11:36 PM
Posts: 1,740
Thanks: 107797 in 53 Posts
I think that's the specular image. It determines the shine, in this case for the frame and the paint. You would need to edit this, probably by painting that area with black. If not, you'd have the original painting's shine. I don't know why they don't open right in your graphic programs.
OM: Great tutorial. I linked mine to this one
OM: Great tutorial. I linked mine to this one
"Part of being a mesher is being persistent through your own confusedness" - HystericalParoxysm
| (• ◡•)| (❍ᴥ❍ʋ) [◕ ‿ ◕]
| (• ◡•)| (❍ᴥ❍ʋ) [◕ ‿ ◕]
#11
23rd Feb 2010 at 12:10 AM
23rd Feb 2010 at 12:10 AM
Posts: 2,932
Thanks: 15574 in 28 Posts
cmo is right and that IMG the one named paintingMission2x1__0x79656471ed323eee, is the Specular.
In PSP it looks like this:

To use this painting you're going to have to keep the alpha in place and you may have to change the greyscale part of the IMG where the painting is. The easiest way to do that is to select a grey from the rest of the image that is somewhere in the middle between the brightest and the darkest and just fill over the greyscale mission painting image with that. An example you could use to give you an idea of what I mean is the last IMG in that package, the greyscale one named: paintingMission2x1__0x79656471ed323ef0. If you look at that one the IMG is basically the same as the Specular except the painting image on it is solid grey. I would use a similar but lighter grey to change the Specular with.
You may not need to do that however. I would first just try cloning and changing the painting as I do any other and then if the image portion had strange shadows on it in-game I would alter the Specular. It may be that this Specular is only going to provide shadows for the frame part. Since you aren't changing the frame you don't need to worry about changing the Specular for that part of the painting.
I hope that makes sense and that you'll post again if you try it and run into problems.
Thanks for linking my tutorial cmo and for the kind words. I should have thought to do that with yours...especially once Leesester mentioned it. I'm going to do it now
In PSP it looks like this:
To use this painting you're going to have to keep the alpha in place and you may have to change the greyscale part of the IMG where the painting is. The easiest way to do that is to select a grey from the rest of the image that is somewhere in the middle between the brightest and the darkest and just fill over the greyscale mission painting image with that. An example you could use to give you an idea of what I mean is the last IMG in that package, the greyscale one named: paintingMission2x1__0x79656471ed323ef0. If you look at that one the IMG is basically the same as the Specular except the painting image on it is solid grey. I would use a similar but lighter grey to change the Specular with.
You may not need to do that however. I would first just try cloning and changing the painting as I do any other and then if the image portion had strange shadows on it in-game I would alter the Specular. It may be that this Specular is only going to provide shadows for the frame part. Since you aren't changing the frame you don't need to worry about changing the Specular for that part of the painting.
I hope that makes sense and that you'll post again if you try it and run into problems.
Thanks for linking my tutorial cmo and for the kind words. I should have thought to do that with yours...especially once Leesester mentioned it. I'm going to do it now
#12
28th Apr 2010 at 2:15 AM
28th Apr 2010 at 2:15 AM
Posts: 39

#13
28th Apr 2010 at 8:59 AM
28th Apr 2010 at 8:59 AM
*DDS-plug-in for GIMP = gimp-dds-win32-2.0.7
http://code.google.com/p/gimp-dds/
To install, extract these files to your GIMP plugins directory.
This directory is usually located at:
C:\Program Files\GIMP-2.0\lib\gimp\2.0\plug-ins
http://code.google.com/p/gimp-dds/
To install, extract these files to your GIMP plugins directory.
This directory is usually located at:
C:\Program Files\GIMP-2.0\lib\gimp\2.0\plug-ins
#14
28th Apr 2010 at 9:52 AM
28th Apr 2010 at 9:52 AM
Posts: 9
Your Step 9. isn't working for me. My S3PE looks confusingly different:

Can anyone help me?
I noticed I have a newer version.
Can anyone help me?
I noticed I have a newer version.
#15
28th Apr 2010 at 10:35 AM
28th Apr 2010 at 10:35 AM
Posts: 11,682
Thanks: 9680 in 11 Posts
Do you see the tickboxes near bottom right of your screenshot? Tick on Names and Tags.
"You can do refraction by raymarching through the depth buffer" (c. Reddeyfish 2017)
"You can do refraction by raymarching through the depth buffer" (c. Reddeyfish 2017)
#16
28th Apr 2010 at 12:53 PM
28th Apr 2010 at 12:53 PM
Posts: 9
I could bash myself. -.-
thx for your hint for Idiots. lol
thx for your hint for Idiots. lol
#17
29th Apr 2010 at 12:16 AM
29th Apr 2010 at 12:16 AM
Posts: 2,932
Thanks: 15574 in 28 Posts
I prefer to think of things of that sort as "tips for those new to s3 meshing"
I should have put a pic of that in the tutorial but my boxes were always ticked off so I didn't think of it. I apologize for that.
I should have put a pic of that in the tutorial but my boxes were always ticked off so I didn't think of it. I apologize for that.
#18
10th May 2010 at 12:27 PM
10th May 2010 at 12:27 PM
Posts: 28
Hi, I followed the steps through this and changed 3 dds files which were the options for a painting. I have viewed the new files and they are as they should be. I have replaced the originals and loaded the package back into game, also clearing my cache files. However, imagine my surprise when I find that the painting in game still has its 3 original texture options ! I repeated the import/strike etc proceedure again, but still only the original textures are showing. What can cause this ? Thanks.
#19
10th May 2010 at 12:55 PM
10th May 2010 at 12:55 PM
Posts: 2,932
Thanks: 15574 in 28 Posts
Hi Marlene I'm confused by what you mean when you say you changed 3 dds files which were the options for a painting. When you open the painting package in S3PE after cloning it with S3OC you should see a list of names. There is only 1 IMG on that list that controls the image of the painting if you have cloned one of the original EA paintings.
What painting are you cloning? Could you post the name of the three dds files you changed? What is import/strike?
I'm confused by what you mean when you say you changed 3 dds files which were the options for a painting. When you open the painting package in S3PE after cloning it with S3OC you should see a list of names. There is only 1 IMG on that list that controls the image of the painting if you have cloned one of the original EA paintings. What painting are you cloning? Could you post the name of the three dds files you changed? What is import/strike?
#20
10th May 2010 at 1:18 PM
10th May 2010 at 1:18 PM
Posts: 28
Hi, Sorry I confused you ): I used a custom painting which has 3 image options, so I replaced all 3 image files. I have just gone back in to the package and this time instead of replacing the image files by importing the new ones, as per the walkthrough, I right clicked on each of the original images and chose the option replace. Back in game there is some advance ! I have one new image which I can use although the image is not centered on the painting. The other 2 new images are appearing as available and I can select them in game but as soon as I click ok, the image jumps back to the original image. Very odd. Clearly the old images are still in the package although they are not being listed. I probably should have started with just a daffodil on a single tile painting ! However, your walkthrough has helped me to understand what is involved with creating new dds files for objects, but clearly there is more to do than just replace them ! Thanks.
#21
10th May 2010 at 1:30 PM
Last edited by orangemittens : 10th May 2010 at 2:03 PM.
10th May 2010 at 1:30 PM
Last edited by orangemittens : 10th May 2010 at 2:03 PM.
Posts: 2,932
Thanks: 15574 in 28 Posts
Did you "fix" the object after copying the package and replacing the images? There are a lot of caches and you may not have emptied them all...so if the object has the same TGI as the original the game may show you the old images.
To make a new painting using a custom mesh with multiple images you would do basically the same thing as you do for a one-image painting:
1. Copy the package of the painting you want to recolor
ETA: Change the name of the painting package to your new painting name
2. Use S3OC to "fix" the package you have renamed (ETA: instructions on that are below in this thread)
3. Open the fixed package in S3PE 4. Export each of the images you want to replace
5. Open the dds in your editor and replace the image
6. Save the dds without changing the name
7. Import the dds images back into the package using S3PE and save
8. Check out painting in-game
#22
10th May 2010 at 1:42 PM
10th May 2010 at 1:42 PM
Posts: 28
Thanks for the reply. s30c isnt very helpful with the fix option. The button is marked start/fix but I havent found anything directly relating to "fixing" It does make sense that the package needs old info clearing out, but there is no obvious button to click ! I am a senior citizen, so probably shouldnt be trying to do any of this and should just stick to knitting ):
#23
10th May 2010 at 1:58 PM
10th May 2010 at 1:58 PM
Posts: 2,932
Thanks: 15574 in 28 Posts
Nah...don't stick to knitting...this is much more fun And don't worry about this being a "seniors" issue...this just isn't easy stuff no matter how old you are.
To fix with s3oc:
Open package with S3OC On the right hand side of the screen near the bottom is a button labeled clone or fix...click that.
Change the catalog name & description/price if you want
Then over on the left hand side near the bottom click the Start button
When the little box pops up giving you the option to click ok just click ok
That's it...the tool has taken care of everything else for you.
The left hand side of the screen should look like this:

with just those boxes checked off. Don't check off the other boxes. And of course, in the unique name slot should go the new name of your package.
I apologize for not mentioning it in my above post, but after you copy the package you should rename it to your new painting name before you open it with S3OC and fix it.
And don't worry about this being a "seniors" issue...this just isn't easy stuff no matter how old you are.To fix with s3oc:
Open package with S3OC On the right hand side of the screen near the bottom is a button labeled clone or fix...click that.
Change the catalog name & description/price if you want
Then over on the left hand side near the bottom click the Start button
When the little box pops up giving you the option to click ok just click ok
That's it...the tool has taken care of everything else for you.
The left hand side of the screen should look like this:
with just those boxes checked off. Don't check off the other boxes. And of course, in the unique name slot should go the new name of your package.
I apologize for not mentioning it in my above post, but after you copy the package you should rename it to your new painting name before you open it with S3OC and fix it.
Test Subject
#24
20th May 2010 at 10:57 PM
Last edited by Corubia : 20th May 2010 at 11:08 PM.
20th May 2010 at 10:57 PM
Last edited by Corubia : 20th May 2010 at 11:08 PM.
Posts: 4
Quote: Originally posted by Inge Jones
| Do you see the tickboxes near bottom right of your screenshot? Tick on Names and Tags. |
Thank you. That helps sooo much. To bad *I* didn't see it
Quote: Originally posted by MarleneJ
| Thanks for the reply. s30c isnt very helpful with the fix option. The button is marked start/fix but I havent found anything directly relating to "fixing" It does make sense that the package needs old info clearing out, but there is no obvious button to click ! I am a senior citizen, so probably shouldnt be trying to do any of this and should just stick to knitting ): |
If I maybe so forward to comment on your comment. I think its great that your doing this. My mom was was in her 60's when she went back to school to pursue an AA in Fine Arts. She showed me that I could do *ANYthing* I wanted to, age be dammed. Never give up!
#25
30th May 2010 at 10:49 PM
30th May 2010 at 10:49 PM
Posts: 1,487
Thanks: 4954 in 26 Posts

That tutorial was so easy to follow and so well illustrated that it made creating a custom painting a breeze. I've never created a custom object before. Wow. Feels good. Thank you so much.
For fellow newbies to modding -- I'd like to share that I had a heck of a time trying to get Gimp to acknowledge the dds files (or the plug-ins for it for that matter--I never did get it working
). I was uninstalling/reinstalling Gimp to start all over again for the 3rd time when I decided to try Paint.net. Wish I had done that sooner. The dds plug-ins are included in paint.net in vers. 3.5.5 that I downloaded and I was able to immediately see, work with, and save the dds file for my custom painting.
Sorry, gotta run...gotta make more paintings...
Who Posted
|
|