Hi there! You are currently browsing as a guest. Why not create an account? Then you get less ads, can thank creators, post feedback, keep a list of your favourites, and more!
Quick Reply
Search this Thread
Forum Resident
Original Poster
#1 Old 6th Jun 2011 at 11:57 PM Last edited by Starfish of Terror : 7th Jun 2011 at 6:59 PM.
Default Edit: Lines on mesh and Extended Manual Edit?
I'm hoping to create a set of Harry Potter-esque wizard's robes for TS3, and I think a great basis would be to work from the Grim Reaper's robes. The only problem is, I don't know how to extract his robes from the game! I know somebody already made his robes available in CAS, but even when I open up that package to take a look at it, there's no mesh in there. Does anyone know how I can extract the Grim Reaper's robes? I just need something I can work with in Milkshape!

Edit: I've been working on this mesh -- it's pretty much a Frankenstein using the Grim Reaper's robes and parts of the AM collared shirt mesh. When I combine the parts of the mesh (by using Unimesh Vertex Data Merge), there's a thin line that appears at the seam:
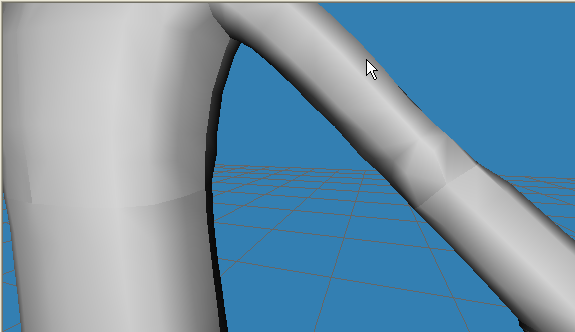

From my Sims 2 creating days, I remember that using Extended Manual Edit and copying the normals over would fix this. The only problem is, it's not working! I can open up Extended Manual Edit and copy all the normals over... but when I press "Accept," it acts like nothing happened, and if I open it again, the normals are the same as before. Extended Manual Edit isn't supported for Milkshape 1.8.5, and I suspect that that's the reason why. I've tried using both Align Normals and Normal Data Merge on each vertex as well, but that doesn't seem to have any effects either. The only thing I've tried that seems to get rid of the line is welding -- and I know that (at least in TS2 meshing) you're not supposed to weld because it can cause problems. Does anyone have any idea how I can fix this?
Advertisement
Née whiterider
retired moderator
#2 Old 7th Jun 2011 at 12:42 AM
Open the extracted robes in CTU instead, then you can use the Extract Meshes button.

What I lack in decorum, I make up for with an absence of tact.
Forum Resident
Original Poster
#3 Old 7th Jun 2011 at 12:53 AM
It seems like the "Extract Meshes" button is greyed out when I open that package in CTU, though -- the "Extract Textures" button works, but it's like it thinks there's no mesh even though the 3D display shows the mesh... it's bizarre!
Née whiterider
retired moderator
#4 Old 7th Jun 2011 at 1:10 AM
Strange - apparently the uploader replaced the meshes, though I can't imagine why. There is a mesh in the file, but only one, which isn't sufficient. But... hey. It doesn't matter. Because we're stupid.

The reaper outfit can be found in CTU, Adult -> Male -> Body, about 2/3 of the way down, underneath the red and white striped pizza delivery boy outfit.

What I lack in decorum, I make up for with an absence of tact.
Instructor
#5 Old 7th Jun 2011 at 1:17 AM
Quote: Originally posted by Starfish of Terror
... it's bizarre!


Not really, there is no point in adding the textures along with the mesh in case what you want is to allow a career outfit to be available in another category, its pointless blotting.

Now if you want to extract mesh in CTU fill this fields

Age:Adult |Gender:Male |Type:Body

Now scroll down until you see the outfit that should be after the police outfit and before the repairman outfit.
Sockpuppet
#6 Old 7th Jun 2011 at 2:21 AM
Quote: Originally posted by whiterider
Strange - apparently the uploader replaced the meshes, though I can't imagine why. There is a mesh in the file, but only one, which isn't sufficient. But... hey. It doesn't matter. Because we're stupid.

The reaper outfit can be found in CTU, Adult -> Male -> Body, about 2/3 of the way down, underneath the red and white striped pizza delivery boy outfit.


I think he only updated the Lod1 mesh with a bigger hoodie.
If you dont include the lower detail lods they still will be linked to the original basegame lod2 and 3
Forum Resident
Original Poster
#7 Old 7th Jun 2011 at 2:32 AM Last edited by Starfish of Terror : 7th Jun 2011 at 6:01 PM.
Face, meet palm. I somehow managed to miss that completely when I was searching for it in CTU! Thank you everyone for helping me find it! <3
Forum Resident
Original Poster
#8 Old 7th Jun 2011 at 6:01 PM
I've been working on this mesh and Milkshape and have run into a new problem, so I edited my first post -- does anyone know how I can fix this seam issue? Thanks so much for all of your help!
Inventor
#9 Old 7th Jun 2011 at 7:13 PM
It looks like you have autosmooth on. Go to tab Groups and uncheck Autosmooth.
Start with a fresh new imported mesh, its extremely difficult to correct a mesh that was imported with autosmooth on.
For me all Unimesh tools work in Milkshape 1.8.5.
Née whiterider
retired moderator
#10 Old 7th Jun 2011 at 8:28 PM
Align normals works for me, but I don't think extended manual edit is a Unimesh tool, is it?

What I lack in decorum, I make up for with an absence of tact.
Inventor
#11 Old 8th Jun 2011 at 7:00 PM
You are right, Extended Manual Edit is a Milkshape Plugins from Demon432 http://www.modthesims.info/showthread.php?t=139859

*msAlignNormals.rar msAlignNormals allows manual per-vertex based smoothing and renormalizing operation.
*ExtendedManualEdit_v106c.rar ExtendedManualEdit is extended version of classic MilkShape's Manual Edit.
Back to top