 Sign in to Mod The Sims
- Site Map >
- Modding and Creation >
- Sims 2 Creation >
- Body Shop >
- Body Shop - Meshing >
- Shirt Connections
- Site Map >
- Modding and Creation >
- Sims 2 Creation >
- Body Shop >
- Body Shop - Meshing >
- Shirt Connections
Replies: 2 (Who?), Viewed: 2663 times.
#1
 12th Mar 2016 at 2:02 PM
12th Mar 2016 at 2:02 PM
Posts: 10,898
Thanks: 5465 in 47 Posts
I finally got confident enough in Milkshape to try something new and I ran into something I've never had to do before, so any help would be appreciated.
The shirt in the picture is actually two shirts that I've tried to stick together. Basically like a shoe swap, but instead an arms swap. Now with a shoe swap all I needed to do was align my vertices and normals and everything was fine, but the two shirts don't have the same number of vertices. For example, the ones I've selected in red have no corresponding vertices to match them on the other mesh, so there are holes that you can see in the bottom picture.
Is it possible to create new vertices to match with the extra ones? And if so how would I do it as I've never tried anything like that in Milkshape before?
Thanks for any help!
Advertisement
#2
13th Mar 2016 at 7:59 PM
13th Mar 2016 at 7:59 PM
Yes, you can add extra vertices. I do it all the time. However, I would tell you to check first and make sure that there actually are extra vertices on one of the pieces (sometimes it looks like there are extras, but it's just because they're not quite lined up).
Once you've determined that you need some extra vertices, there are a couple of ways to do it. You can use the Divide Edge command, but I've found that that doesn't always work (because only 2 vertices can be selected when you do that, and some meshes have vertices on top of each other, so when you think you're selecting one, you're actually selecting two... ). The way I usually do it is that I select the one face that's closest to where I want to put my extra vertex. Then, from the "Face" menu, select "Subdivide 3". Your face will get divided into 3 parts, with one new vertex in the middle. Then I select the face closest to the edge where I want to join things up and delete it. Then I move the new vertex into position.
Here's a picture of what it might look like after you've done the "Subdivide 3" command:
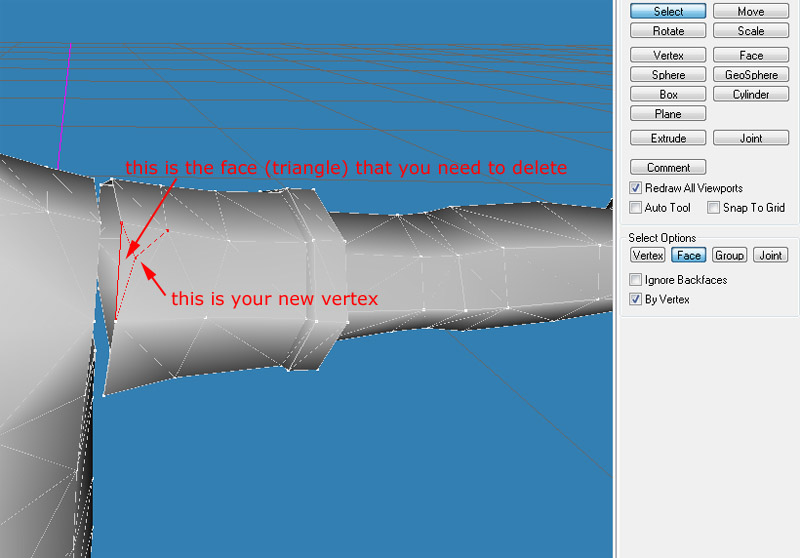
You'll have to assign some bones to your new vertex, but you can do that by copying the bone assignments from the existing vertex that you're matching it up with.
Once you've determined that you need some extra vertices, there are a couple of ways to do it. You can use the Divide Edge command, but I've found that that doesn't always work (because only 2 vertices can be selected when you do that, and some meshes have vertices on top of each other, so when you think you're selecting one, you're actually selecting two...
Here's a picture of what it might look like after you've done the "Subdivide 3" command:
You'll have to assign some bones to your new vertex, but you can do that by copying the bone assignments from the existing vertex that you're matching it up with.
#3
16th Mar 2016 at 4:06 PM
16th Mar 2016 at 4:06 PM
Posts: 10,898
Thanks: 5465 in 47 Posts
I finally managed to work it out. Thank you!
Who Posted
|
|