
 Sign in to Mod The Sims
- Site Map >
- Community >
- Sims Discussion >
- Sims 2 >
- Sims 2 Pictures >
- Discussion of Sims-Specific Photo Techniques
- Site Map >
- Community >
- Sims Discussion >
- Sims 2 >
- Sims 2 Pictures >
- Discussion of Sims-Specific Photo Techniques
 8th Feb 2019 at 11:59 PM
Posts: 2,627
Thanks: 3 in 1 Posts
Over in Stupid/Random Questions, http://www.modthesims.info/showthre...242#post5494242
a few of us were discussing our interest in having a thread for talking about the more technical side of getting great screenshots in Sims 2. There are already lots of great places just to share gameplay pics, but what if you want to get or share advice on more demanding shots for contests, stories, websites, Instagram...?
I don't see this as a place to discuss general photography (composition, framing, exposure, etc), rather we can include links to great tutes and sites on that, but let's use this for more sim-specific topics of technique and content. Perhaps things like...
Which lighting do you like best for fill lights?
How do you find the best poses among so many different poseboxes?
Got any great tricks for using "freeze me?"
How do you deal with disappearing accessories when you freeze a sim?
How do you deal with NPCs being generated while you're shooting?
How do you control which direction the sun comes from?
How do you build sets differently from lots you play?
How to make deco versions of objects for photos that you don't want to function?
How do you deal with the color differences between objects that should look the same?
What are the best camera mods?
How can you tweak your camera mod for greater field of view, slower movement, depth of field...?
Where are the best upgrades for backgrounds or hood deco?
How do you hide things in outdoor shots that you don't want to see?
How do mod things like hanging light fixtures and plants to keep them from fading when you DO want to see them?
How do you use graphic programs for post-processing while still keeping it looking in-game?
How do you deal with weather during a shoot?
Which OMSP can you use for
Certainly, let's post shots here to demonstrate questions and discussion, but (if the mods agree), I'm going to start a second thread for posting pics for individual feedback, so that people can feel comfortable posting a pic and asking for individual advice about a certain shot, like... does this work? how can I make it more...? without feeling they are interrupting a technical discussion in progress here.
9th Feb 2019 at 1:52 AM
Posts: 2,627
Thanks: 3 in 1 Posts
I would love to know what lights people are in love with for certain uses. I'm still just randomly picking lights from the catalog, though I've been partial to a candle and jgwhiteus's colored spots lately. Another thing I'd really like to know is if you have tips on organizing poses to find them more easily. I'm pretty random about that, too. I really haven't used poseboxes much because I have them so disorganized.
What are you guys working on?
 9th Feb 2019 at 2:37 AM
Last edited by PenelopeT : 9th Feb 2019 at 4:52 PM.
9th Feb 2019 at 2:37 AM
Last edited by PenelopeT : 9th Feb 2019 at 4:52 PM.
Posts: 2,337
Thanks: 4868 in 69 Posts
However, on occasion I will take a little longer with posing sims for group pics...especially if I plan on making painting recolors of the images to hang in their homes (which I love doing to make homes feel more lived in). Other than that, my screenshot taking is no fuss, and I do not build sets to take pics (unless it's for a contest of some sort).
The majority of my screenshots are not posed, but are more or less just action shots/simply making use of a sim in motion and me pausing the game to capture the image. When I do take the time to really pose sims with or without using a posebox, my go to is just using game cheats and OMSP's. No freezing sims or anything like that.
Tools and tricks I use and other misc things:
- moveobjects on
- snapobjects on
- SilentLucidity's OMSP's
- Fraps
- Poseboxes (but not on a regular basis)
- Pausing the game
- Squinge's Desperation Interactions Enabled (great whether you're telling a story or not)
- Invisible lighting by Nixed Sims here and here (I like ample lighting on a lot whether I ever plan on taking screenshots or not...so these are perfect for that without having visible fixtures all over the place).
The most fun I've ever had doing posed images was when I was testing out some backdrops I'd made a couple of years ago (pics can be seen at http://modthesims.info/showthread.p...018#post5141018 and http://modthesims.info/showthread.p...337#post5141337. And a just for fun pseudo-storytelling set of pics shown at http://modthesims.info/showthread.p...307#post5190307.
Lastly, a non-posed just making use of game facial expressions and movements set of pics of one of my favorite male sims Edward (that I cloned in SimPE so I can add him to every future 'hood if I want) http://modthesims.info/showthread.p...236#post4987236.
This is all I can think of at the moment. If I remember something not listed, I'll update my post.
 9th Feb 2019 at 12:36 PM
Posts: 638
Thanks: 480 in 1 Posts
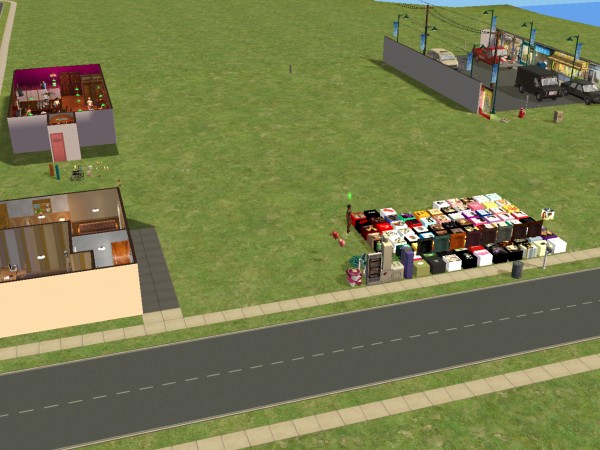
The above picture shows one of my typical picture taking lots. This particular one was used in part of one of my stories. In the lower left is the character's apartment where a number of pictures were taken. Above that is a bar set I built just for pictures for a couple of chapters. In the upper right is a street set only used in part of one chapter. In the lower middle is the conglomeration of pose boxes, pose paintings, and other objects I might use in persuading the characters to appear how I want them. The large open space in the middle is where other more temporary sets were built, used and then razed.
Since I already likely have the pose objects needed on the story lot, the middle area is sometimes used also for contest pictures where I might build a separate set just for that contest and then tear it down once I've taken the pictures for the contest.
For the poseboxes (there's more than 70 on that lot), I have a separate folder with a picture of each posebox "face" followed by pictures of all the poses of that box. It may not be quick viewing as that folder has more than 900 pictures, but at least I can see which poses might best suit my needs for any particular picture with a minimum of trial and error.
One of the most important things for me when taking story or contest pictures is using the shortcut keys (CRTL 4 through 9) to save camera locations. I keep one of the lot's shortcut keys set to an overhead view of the pose boxes (usually CTRL 4) so I can quickly choose a pose box or change facial animations by pressing "4". When I find a shot I like, I also create a shortcut for it (e.g. CNTL 9) so I can return to it with ease by pressing "9". When shooting dialogue between two characters, I will set shortcut keys for over-the-shoulder camera views for each character for the left shoulder and the right shoulder (usually CRTL 5 through 8) so I can quickly move between 4 views of the conversation.
The cheats I use most often for picture taking are:
moveobjects on -- allows selecting and moving objects/Sims that aren't otherwise selectable
boolprop snapobjectstogrid false - allows for placing objects/Sims outside the normal grid
boolprop allow45degreeangleofrotation true -- allows more rotational positioning
showheadlines off -- keeps thought bubbles from showing
slowmotion [speed] -- 0=normal, 8=slowest
All of my Conversions, Creations and Stories may be found here:
HobbesED's Conversions and Creations
My most recently shared items (with pictures) may also be found here:
HobbesED's Dreamwidth
9th Feb 2019 at 12:56 PM
Last edited by simmer22 : 9th Feb 2019 at 1:59 PM.
Posts: 12,912
Thanks: 3 in 1 Posts
| Which lighting do you like best for fill lights? |
I tend to prefer the warm lights (and should say I have a lighting mod that fixes the lights to match the lamps, and the Radiance system). I mostly use the Maxis lights, a mix of ceiling lights for overall lights, a couple of the table lamps for directional or spot light, the flat circular outdoor lamp if I'm taking pics at ground height or need light from below, and I use candles for warm but subtle light - often when taking pictures at night.
| How do you find the best poses among so many different poseboxes? |
I've got too many poseboxes to count, and probably don't use most of them - but I've taken to do screenshots that show which box and pose I've used if I've done a particularly difficult pose combo, or if I find a particularly useful pose, so I remember where to find it if I ever need it again. Lately when I've made poses myself, I've taken pictures in Milkshape for the same purpose, because I don't tend to stick with 10-20 poses (more like 40+ for each box). I also made a rudimentary folder with just posebox pictures on my computer, so I could look through them all when searching for a pose for a picture (but planning to completely reoriganize my poseboxes so I've got all the pictures and boxes neatly sorted by name in just a few folders - my system is currently awful and hasn't been updated in a few years.
| Got any great tricks for using "freeze me?" |
For sims who are difficult to position, I use the "look at me" hack, here: http://www.modthesims.info/download.php?t=268960 (works best with static poses), or I have a sim who's not meant to be in the picture interact with the sims or walking past them. Usually the sim turns to look. This trick is nice when the sims don't react to the "look at me" hack, such as pets, toddlers and infants. I freeze all the other sims, work on one sim at a time, when happy I freeze that sim, and start working on another. That way I get every sim to look in the direction I want them to, either directly into the camera or at some other sim. It makes the picture come more alive when sims look like they're in the moment or that they're interacting with each other. This trick can be combined with the slowmotion cheat, in case it's difficult to pause the game perfectly in normal speed.
And yes, you can freeze infants, toddlers and pets just like other sims, it's just the matter of a simple edit of the Freezer Clock mod. It's relatively easy to modify the mod, but if you're not SimPE-savvy, my personal edit is available here - it's just an edit of the pie menu tick box options. Editing the "look at" mod the same way didn't work, so I'm guessing something more is going on with that one. Most poseboxes can also be edited to allow for more ages, but the poses may not look good or leave younger sims hovering in the air.
| How do you deal with disappearing accessories when you freeze a sim? |
I'll usually position and freeze everyone else until the sim with the accessory does what I want them to do. If that doesn't work, find a non-disappearing accessory they can use instead. This one is neat, because you don't need to go through Change Appearance: http://www.modthesims.info/download.php?t=351524, and it also has poses for the arms that work with most other poses and animations. Using a deco object and OMSPs can also work.
| How do you deal with NPCs being generated while you're shooting? |
I once had several waiters suddenly generating on my residential hospital lot. I realized soon enough that they'd started their own restaurant business in the cafeteria, around the restaurant stove I'd placed there. Removing the stove took rapid care of the business.
If they're just walkbys I'll usually leave them be. If they're annoying pets or start inviting themselves to do funny stuff on the lot, I'll just delete them. There's also mods you can use that don't allow visitors or strays. I have a couple of those, but I keep forgetting I have them. On occasion I'll even let the NPCs be background people.
| How do you build sets differently from lots you play? |
I treat most lots like potential story sets, in that I like houses with big rooms so I don't have to use zooming to take pictures. I don't like using zooming (no more than 1-2 clicks if I absolutely have to) because it looks unnatural.
If I'm using simple sets (which I do on occasion for non-story potoshoots), since indoor and outdoor lights are vastly different, I'll use large 4-wall roms for indoor pictures (sometimes with windows), and not use walls for outdoor pictures unless the lights are difficult to get right.
|
How to make deco versions of objects for photos that you don't want to function? How do you deal with the color differences between objects that should look the same? |
If it's not a problem that they're functional, I'll leave them be. If it is a problem, or if I want to use one part of it but not everything else, all you need to do is to extract the mesh and texture, make a clone of a deco object (possibly tutorial territory if you haven't done it before), and replace the texture and mesh. Possibly do a few other changes as well.
The color difference comes from the TXMT. The easiest way to fix it is to copy over the settings from the object that looks good over to the object you want to fix.
| How do you hide things in outdoor shots that you don't want to see? |
Behind plants, fences or walls, on a top floor, in the basement, in the garage, etc. Basically anywhere you're unlikely to point the camera towards. I usually make sure to have a big enough lot that I have somewhere to hide things like poseboxes without it being an annoyance.
| How do you deal with weather during a shoot? |
Neither of my computers like weather, so unless it's a critical part of the pictures, I leave it out completely. Snow has been the bane of my full game for quite some time, being the leading cause of pink-flashing. So now I have mods that sets the weather at no temperature, no weather, and leave the game in perma-spring. If I need snow for a picture, I sometimes use snowy ground covers and the like, perhaps set the season to winter for the leaves to disappear forrm the trees. Or I'll leave all the weathery pictures for last, when I can just go out of the game if the pink-flashing gets too bad. I'm hoping to get rid of the pink-flashing whenever I get a better computer, though...
My stories: Anna's diary - Memories are forever - Little Fire Burning
14th Feb 2019 at 11:18 PM
Posts: 180
Thanks: 2280 in 14 Posts
I've actually never used a lighting mod or a posebox, even tho I can see the appeal of either one as I'm a HUGE lover of taking pics of my sims. I do have a long history of building specific sets for the shots tho. Often times in the sims normal environment, I can't control enough photo elements to satisfy me like light or this or that wall is in the way, or something nice isn't in the background at this or that specific time I get the sim doing what it is I want, so I just put them on a set lot and get them doing the action I want and then build around them accordingly a photo set and voila. Maybe it's not easiest, but I'd rather do that than knock down or move stuff on their normal lot.
15th Feb 2019 at 2:04 PM
Posts: 1,794
I have Jaydee's poseboxes, but I don't actually use them that much (I'm irked that children can't use them). Instead, I use the Hula Dance & More mod which adds a self-interaction that contains some basic poses and animations. Sometimes, I just play the game and wait until my desired animation plays, then I use mods like the Freezer Clock to freeze Sims and then use the moveObjects, 45allow45DegreeAngleOfRotation, and snapObjectsToGrid false cheats to move Sims into where I want them to be. The slowMotion cheat is also something I use extensively when I need precision in capturing what I want to see.
Because I always pause the game before taking screenshots, I can simply remove any unwanted Sims from the shot using cheats before pressing the shutter. If a Sim walks in the way, they get forcefully removed using the moveObjects cheat. I try to use a few mods as possible these days (most of my mods are bug fixes and annoyance eliminators), so I have very few mods to aid with picture taking. Most of the tricks I use are small things I do in-game or just roll with the limitations (limitations can breed creativity!). I've modded my cameras to remove the "invisible walls" at the edges of lots, but not to expand the field of view, so I just make do with what I have and carefully select what should be in my shots.
I currently use a combination of IrfanView and ShareX to take screenshots. IrfanView is very lightweight and simple to use, while ShareX makes it easy to capture select portions of the screen on the go. Most screenshots that I use for stories, fanon, etc. are taken using IrfanView, but I leave ShareX running to capture screenshots where I want the mouse cursor to be in.
For weather, I use SimWardrobe's Weather Controller to make it rain when I want it to rain, and sunny when I want it to be sunny. For wall decals, I tend to take screenshots with walls up as often as possible; I only use walls cutaway when no other options are available and the corners are too tight for me to be able to position the camera without clipping through walls. Walls down is abominable; I never use it for screenshots I take seriously.
15th Feb 2019 at 2:14 PM
Last edited by simmer22 : 15th Feb 2019 at 2:41 PM.
Posts: 12,912
Thanks: 3 in 1 Posts
http://www.modthesims.info/d/325570 (for more precise heights with posing sims and items)
http://www.modthesims.info/d/317716 (I mostly use the black one if I'm doing group posing, and the angled ones for angled items, objects as accessories, posing, etc.)
And this one for even more precision with angles for poses and items - it's a little smaller than the biggest ones in SL's packs, so they can be used together:
https://www.thesimsresource.com/dow...ngle/id/816644/
I use the Freezer Clock when posing two or more sims, or rather my personal edit of it, adding in use for infants, toddlers and pets.
And the 4th wall options to make sims (child and above) look at the camera, or combined with the TAB mode to make them look in a certain direction: http://www.modthesims.info/download.php?t=268960. I tried making the options available for younger ages and pets, but it didn't work.
For pet, infant and toddler head direction I tend to use "walkbys" - pets or sims of varying heights that walk past the posed sims, who will eventually turn and look at the sim walking past. I usually combine it with the Freezer clock, freezing them when I'm happy with their pose, so I don't acidentally unpause the game and have to do it all over again. Sometimes I combine with the Slowmotion cheat, if it's a particularly hard crowd I'm working with.
I've also used the prop hack by Adele/Decorgal quite a lot:
http://modthesims.info/d/351524
http://www.modthesims.info/download.php?t=351006
I used to get really creative with what I had to work with in regards to pose- and animation boxes, but after I learned how to make poseboxes I'm a little more relaxed in that area. Whenever I need a pose, I can make it. That's probably one of the most useful things I've learned in regards to TS2 photoshooting over the years. I still use a ton of poseboxes by other people (the more specialized ones by Jaydee, Decorgal and trendyHendry, plus a bunch of others. My entire collection is probably in the 500s now...), but it's nice to have the luxury of being able to make that impossble to find pose (baby and hospital poses are in very short supply, for instance). Being able to make objects and CAS items I need also helps.
For screenshots I use Gadwin Printscreen, which saves screenshots to a folder so I don't have to go in and out of an image editor all the time. There are several different prontscreen programs, but this one is my favorite, even though I've had a few issues with it previously. I abandoned the C-button pics a long while ago...
I've got Gunmod's radiance mod, a camera hack (not entirely sure which, but it cuts down clipping, lets me take pictures nearer and further away, etc.), and one of the mods that transitions to sunset/sunup for an hour each twice a day, plus a mod that fixes the ingame lights to more sensible colors and intensities. I installed these a long time ago, so I've gotten quite used to them. So much so that when I installed the game on my laptop I couldn't figure out why the lights were so awful...
My stories: Anna's diary - Memories are forever - Little Fire Burning
22nd Feb 2019 at 10:27 AM
Last edited by jain : 22nd Feb 2019 at 11:16 AM.
Posts: 295

I keep running into a problem with lines on the road between lots and the neighborhood. This is a particularly good example because of the street light. (I wouldn't use this shot for other composition reasons but the line causes problems in general.) I've heard that lighting mods cause the issue, specifically Gunmod's radiance mod. I'll remove it temporarily for specific shots if it's the culprit - I don't run into this sort of shot frequently enough to do without it permanently. Is this true? Do all the lighting mods do the same thing?
22nd Feb 2019 at 12:15 PM
Posts: 12,912
Thanks: 3 in 1 Posts
It's possible some of the neighborhood street lights need an update, too. I'm not sure if lights outside the lot will show properly at night, but I don't think they do. If there are lots next to the one you're playing, maybe try turning on the lights manually and saving at night. Not sure if that helps (I usually avoid night pictures), but worth a try.
My stories: Anna's diary - Memories are forever - Little Fire Burning
22nd Feb 2019 at 12:25 PM
Last edited by Sunrader : 22nd Feb 2019 at 3:48 PM.
Posts: 2,627
Thanks: 3 in 1 Posts
22nd Feb 2019 at 12:37 PM
Posts: 12,912
Thanks: 3 in 1 Posts
It's one of the tricks I use if I need to put something in the picture that's difficult to fix - take 1-3 pictures and blend them together (with cut/paste, eraser/alpha). Using alpha layers for this is a great method, because it's always editable, so if you erase too much you can go back and fix it. I also use layers for everything else.
Placing the light a bit further away from the edge may also help, particularly paired with blending in Photoshop.
My stories: Anna's diary - Memories are forever - Little Fire Burning
22nd Feb 2019 at 3:52 PM
Posts: 2,627
Thanks: 3 in 1 Posts
|
If you take one picture with the light turned on and one with the light off, it may be easier to blend them in Photoshop to get a smoother transition. It's one of the tricks I use if I need to put something in the picture that's difficult to fix - take 1-3 pictures and blend them together (with cut/paste, eraser/alpha). Using alpha layers for this is a great method, because it's always editable, so if you erase too much you can go back and fix it. I also use layers for everything else. Placing the light a bit further away from the edge may also help, particularly paired with blending in Photoshop. |
I'm a Corel girl, but I do have Photoshop. Would you be up for a little tutorial on some layering basics for us? Maybe just a step by step of a blend you've done on one of yours?
22nd Feb 2019 at 4:52 PM
Posts: 7,361
Thanks: 2938 in 27 Posts
I've been learning as I go for years, but it is possible to find helpful tutorials and how-to with proper internet search.
22nd Feb 2019 at 5:23 PM
Last edited by simmer22 : 22nd Feb 2019 at 5:41 PM.
Posts: 12,912
Thanks: 3 in 1 Posts
This one, for instance: https://www.youtube.com/watch?v=iA4SIF0KsDc
Layering works similar in Gimp and several other programs, so once you know how to do it in one program you'll know roughly how to do it in other programs, even though the tools may have different names or placement. It's a very old tool, and I think it's been part of Photoshop from the start, and it's so much used that most programs with similar functions to Photoshop have this option.
The tools you'll need some 90% of the time as a beginner are in the program's visible toolbars, and not in the menu bar at the top. They tend to be somewhat intuitive, so if the picture shows a paint brush or an eraser, chances are that's what they'll behave like. You usually end up using just half of them, and if you can't figure out what they do without trial and error, they're probably not important for the beginner stage. The easiest way is to just open up a document in the program, and start exploring the basic tools. It doesn't hurt the program to experiment a little, and if you accidentally remove a toolbox, there's usually an option for editing the workspace in the menu bar. There are plenty of beginner tutorials on Youtube, and you can find tutorials for most tasks, even things you didn't even know you needed to know.
My stories: Anna's diary - Memories are forever - Little Fire Burning
22nd Feb 2019 at 5:52 PM
Last edited by Sunrader : 22nd Feb 2019 at 6:04 PM.
Posts: 2,627
Thanks: 3 in 1 Posts
| There are a bunch of tutorals over at Youtube. |
Yes, of course, I meant Sims 2 specific, solving a particular Sims 2 screenshot issue, but sure - google and all that. I've used Photoshop a bit, just not enough to be comfortable.
22nd Feb 2019 at 6:01 PM
Last edited by simmer22 : 22nd Feb 2019 at 6:33 PM.
Posts: 12,912
Thanks: 3 in 1 Posts
A few people, particularly TS3/4 players, have put up tutorials for particular end results. Some have even uploaded actions that you can apply to pictures to tget a particular look to them. However, these techniques may not always work for you.
Personally I do very little editing in general. I apply some sharpen (smart-sharpen, the layer version of sharpen) and maybe some adjustments to the colors and light, put on a frame, and that's it. I've saved my most common edits as actions to make it simpler for me, particularly when I do 50+ story pictures in a go. I combine pictures if I can't achieve something by ingame alone, and I occasionally do a little bit more editing, but most of the time it's very basic, and the editing I do is sometimes not even possible to spot unless you do a side by side comparison with the original. I like the plain look of the pictures, and most of the time I can't be bothered to visually style the pictures unless it's for an effect I can't achieve ingame.
My stories: Anna's diary - Memories are forever - Little Fire Burning
22nd Feb 2019 at 6:43 PM
Last edited by jain : 1st Mar 2019 at 11:58 AM.
Posts: 295
I moved her onto the sidewalk (thank you @Sunrader) and used candles I hid under shrubby grassy stuff to light her face. Maybe the light looks like it's coming from the house windows. I hope.
With both of your suggestions I think the shots I was able to get will work for me without processing them in Photoshop this time. I get very views so I'm trying to be realistic and reasonable about how much time I spend on them. I am definitely going to follow up on the tutorials and youtube though - I can do a little bit (filters, erase, fix small things, adjust light and color etc) but would love to have additional tools in my box.
These are some great tips! Again, thank you so much - I would have given up on this without your help.
 22nd Feb 2019 at 7:02 PM
Posts: 2,627
Thanks: 3 in 1 Posts
|
@simmer22 and @Sunrader, I would not have thought of using a larger lot, thank you so much! I ran it through Lot Adjustor, added 10 to the right side which took the lot to the bottom of the hill and started with that. Using a larger lot and moving the streetlight way back from the sidewalk made a huge difference. As soon as I move that light closer to the sidewalk the line and the shadow show up again just as glaringly obvious as before. When I have to deal with lot lines again the first thing I'll do is move the streetlights. I moved her onto the sidewalk (thank you @Sunrader) and used candles I hid under shrubby grassy stuff to light her face. Maybe the light looks like it's coming from the house windows. I hope. |
I think that looks great!
22nd Feb 2019 at 7:13 PM
Last edited by simmer22 : 23rd Feb 2019 at 5:56 PM.
Posts: 12,912
Thanks: 3 in 1 Posts
Just in case anyone is interested, I did a GIF showing how I combined 2 pictures to sort out some problems (I wanted to edit back some details because the pose made the outfits clip), what my editing normally may look like, what I might do if I go "all out" on a picture, and what I'd do some 6 years later when I went back and edited several of the things I didn't fix on the original. The pic is medically themed, and is a somewhat large GIF, so I put it in a spoiler.
The light comes from it being night (a darker, slightly blueish light), and there's no lights in the room except maybe a candle from below (I often use it for warmth and for showing face expressions better, plus it creates awesome warm light at night). The lights come from a window at the back, from the next-door room. Together it created some dramatic lights that I tuned with various photoshop adjustment layers plus a circular dark gradient layer. I wanted to create a sad, calm and intimate mood between a daughter and a mother inside a hospital room at late evening/night, and I think it turned out pretty much as intended.
My stories: Anna's diary - Memories are forever - Little Fire Burning
22nd Feb 2019 at 7:27 PM
Posts: 295
22nd Feb 2019 at 7:46 PM
Posts: 12,912
Thanks: 3 in 1 Posts
If anyone wonders about techniques or editing in my pictures, feel free to ask. I've packed a lot of tricks up my sleeves the past 13 years of playing TS2, and I'm happy to share (if I remember what I did, that is).
My stories: Anna's diary - Memories are forever - Little Fire Burning
22nd Feb 2019 at 11:55 PM
Last edited by Sunrader : 25th Feb 2019 at 12:08 PM.
Posts: 2,627
Thanks: 3 in 1 Posts
|
Thanks, Jain If anyone wonders about techniques or editing in my pictures, feel free to ask. I've packed a lot of tricks up my sleeves the past 13 years of playing TS2, and I'm happy to share (if I remember what I did, that is). |
Very cool. What kept you from getting the mother and daughter in the same shot so that you ended up needing to blend?
23rd Feb 2019 at 10:58 AM
Last edited by simmer22 : 23rd Feb 2019 at 11:43 AM.
Posts: 12,912
Thanks: 3 in 1 Posts
Instead of spending time and energy trying to paint it out, it was much easier to take one picture with the problem present, one without the problem (by removing the girl or the mother from the shot), and cut&paste to make it look right. Spending less than 5 minutes in Photoshop instead of an hour sounds much better to me.
Example below:
My stories: Anna's diary - Memories are forever - Little Fire Burning
25th Feb 2019 at 12:10 PM
Posts: 2,627
Thanks: 3 in 1 Posts
Who Posted
|
|