 Sign in to Mod The Sims
- Site Map >
- Modding and Creation >
- Sims 3 Creation >
- Patterns >
- Which pattern would be the easiest to start with?
- Site Map >
- Modding and Creation >
- Sims 3 Creation >
- Patterns >
- Which pattern would be the easiest to start with?
#1
 9th Jun 2009 at 1:59 AM
9th Jun 2009 at 1:59 AM
Posts: 135
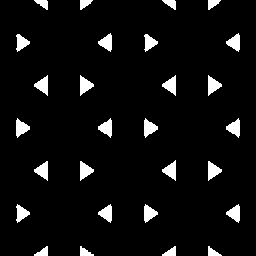
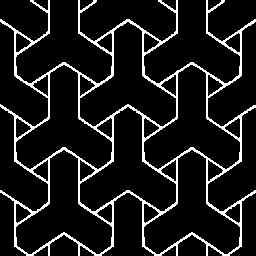
Which pattern do you suggest I start with?

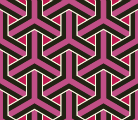
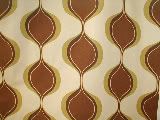
Credit for the patterns go to The Fabric Finder and PatternCooler
EDIT: Re-sized the pictures
Advertisement
#2
9th Jun 2009 at 2:55 AM
9th Jun 2009 at 2:55 AM
Posts: 2,461
Thanks: 1848 in 12 Posts
I'm rather in the same boat you are, so I was thinking for my first test pattern I just might make a pattern with four squares just so I can make sure I am understanding what needs to be done. Then if I don't manage to have epic fail over that, move onto something a bit trickier.
Creating content for TS2 intimidated me for a long time and I discovered in the end it wasn't worth it. After reading everything I could get my hands on today for creating these patterns gives me the feeling my newfound intimidation is justified.
Having said all that, though, I think the one on the top with the straight lines might be the easiest choice. I'm saying that based on the thoughts of having to trace for vector layering. Straight lines are always easiest for that.
#3
9th Jun 2009 at 3:03 AM
9th Jun 2009 at 3:03 AM
Posts: 135
Quote: Originally posted by Misty_2004
|
I'm rather in the same boat you are, so I was thinking for my first test pattern I just might make a pattern with four squares just so I can make sure I am understanding what needs to be done. Then if I don't manage to have epic fail over that, move onto something a bit trickier. Creating content for TS2 intimidated me for a long time and I discovered in the end it wasn't worth it. After reading everything I could get my hands on today for creating these patterns gives me the feeling my newfound intimidation is justified. Having said all that, though, I think the one on the top with the straight lines might be the easiest choice. I'm saying that based on the thoughts of having to trace for vector layering. Straight lines are always easiest for that. |
I always felt the same in regards to creating TS2 custom content; it just wasn't worth it. With the release of TS3, though, I felt it would be best to "hone" whatever designing skills I had.
I was thinking the same thing in regards to vector layering. The first one is more basic, which will probably be easier. But meanwhile, the second one is calling my name... :P
#4
9th Jun 2009 at 3:37 AM
9th Jun 2009 at 3:37 AM
Posts: 2,461
Thanks: 1848 in 12 Posts
Oh, I know what you mean about the second one! I have a bunch of designs I am wanting to convert but I know I had best start at the bottom and work my way up. All of the things I really, really want to do are going to be too complicated for me to start with.
Aww, it was way worth it to me to learn to make TS2 content, especially the few clothes I made because I'm in a minority where taste is concerned and didn't like the photo-skinned stuff and stay away from skank. That doesn't leave a lot of options. Then I made a few object textures but never did finish everything I wanted to finish. I thought perhaps when I started playing TS3 I would still want to make TS2 stuff and I may, but right now I am really wanting to get in on the ground floor of creating for TS3. I started creating for the original game but I learned so much more after I got into making TS2 things but still didn't learn as much as I could have.
My daughter, who has always been better at making things than me, took one look at HP's tutorial and ran in sheer terror.
Aww, it was way worth it to me to learn to make TS2 content, especially the few clothes I made because I'm in a minority where taste is concerned and didn't like the photo-skinned stuff and stay away from skank. That doesn't leave a lot of options.
 Then I made a few object textures but never did finish everything I wanted to finish. I thought perhaps when I started playing TS3 I would still want to make TS2 stuff and I may, but right now I am really wanting to get in on the ground floor of creating for TS3. I started creating for the original game but I learned so much more after I got into making TS2 things but still didn't learn as much as I could have.
My daughter, who has always been better at making things than me, took one look at HP's tutorial and ran in sheer terror.
#5
9th Jun 2009 at 3:41 AM
9th Jun 2009 at 3:41 AM
Posts: 135
Wow! Apparently, the tutorial isn't for the faint of heart. 
#6
9th Jun 2009 at 4:32 AM
9th Jun 2009 at 4:32 AM
Posts: 235
Thanks: 11822 in 11 Posts
Its not nearly so difficult as it sounds. If you want to start with something easy pick a two color pattern. Then just desaturate it and fiddle with the levels until its black and white. You can use that black and white image and a compleatly white layer to make your pattern. Difficulty comes more from the number of colors than from the actual design.
After having done this and retextures for TS2 I would say its much easier to make a TS3 pattern look good. Its just getting your head around the concept. Once you've done that its a breeze.
After having done this and retextures for TS2 I would say its much easier to make a TS3 pattern look good. Its just getting your head around the concept. Once you've done that its a breeze.
#7
9th Jun 2009 at 4:54 AM
9th Jun 2009 at 4:54 AM
Posts: 2,461
Thanks: 1848 in 12 Posts
Thanks, Jane! My problem is going into completely uncharted (for me) territory in Paint Shop Pro when the tutorials are written for PhotoShop and HP's bit about GIMP. I'm reasonably sure I should be able to do this in PSP but just need to figure out how. After reading both tutorials through several times it is starting to make more sense to me. Unfortunately my problem is having absolutely no experience with channels. I tend to learn what I need to know and leave it at that.
Cheezypuff, I thought she'd look at it and dig into it with relish. I think she's got too much other studying and stuff going on right now and this was apparently just the icing on the cake.
Cheezypuff, I thought she'd look at it and dig into it with relish. I think she's got too much other studying and stuff going on right now and this was apparently just the icing on the cake.
#8
9th Jun 2009 at 5:16 AM
9th Jun 2009 at 5:16 AM
Posts: 235
Thanks: 11822 in 11 Posts
I agree that channels seem complicated. Especially when your only experiance of them is in full color images. For TS3 patterns I find it easier to just think of them as a series of alphas (like you would make for a clothing texture in TS2). I think of the channels as simply where I put the alphas so the game understands them.
#9
9th Jun 2009 at 5:19 AM
9th Jun 2009 at 5:19 AM
Posts: 487
Thanks: 29000 in 78 Posts
The top one would be easy - First resize image to 256x256, then use the magic wand tool to select all of the parts that are the same color, fill those white, then inverse your selection and fill the rest black. Do this with each of the colors - brown, pink, purple and white. So you should end up with 4 images:
Then create a new file (256x256 RGB format), and paste each one of those into a seperate channel, like so:

You'll notice that after doing this, the top (RGB) channel is just showing the rest of the channels combined with different colors, showing you each different part of the picture.
Then just save as a DDS, and import using Delphy's wonderful tool.
Then create a new file (256x256 RGB format), and paste each one of those into a seperate channel, like so:
You'll notice that after doing this, the top (RGB) channel is just showing the rest of the channels combined with different colors, showing you each different part of the picture.
Then just save as a DDS, and import using Delphy's wonderful tool.
#10
9th Jun 2009 at 5:21 AM
Last edited by Misty_2004 : 9th Jun 2009 at 5:51 AM.
9th Jun 2009 at 5:21 AM
Last edited by Misty_2004 : 9th Jun 2009 at 5:51 AM.
Posts: 2,461
Thanks: 1848 in 12 Posts
Thinking of them as alphas has helped me a lot too. And one thing that confused me was that HP's tutorial started with vector layers, but then she ended up turning everything into raster layers anyway. Then I was reading your raster layer tutorial and then I was really shaking my head. I know vector layers will result in a much smoother image in most cases.
I know tomorrow or the next day when I look at this all again I'm going to be wondering what all the fuss was about. While I was in the shower it all became so clear to me, then I started re-reading the tutorials and just muddled my brain again.
Low and behold, during the afternoon and evening my daughter had been chewing on this whole thing. She came in a few minutes ago and told me to load up PSP and within five minutes I made a multi-colored test texture which worked perfectly. Now we just need to figure out how to get an alpha channel in there so we can have four colors instead of just three. And shoot, it didn't even take me until tomorrow to be wondering what all the fuss is about. We'll try to write up a tutorial on using PSP and post it later.
I know tomorrow or the next day when I look at this all again I'm going to be wondering what all the fuss was about. While I was in the shower it all became so clear to me, then I started re-reading the tutorials and just muddled my brain again.
Low and behold, during the afternoon and evening my daughter had been chewing on this whole thing. She came in a few minutes ago and told me to load up PSP and within five minutes I made a multi-colored test texture which worked perfectly. Now we just need to figure out how to get an alpha channel in there so we can have four colors instead of just three. And shoot, it didn't even take me until tomorrow to be wondering what all the fuss is about.
We'll try to write up a tutorial on using PSP and post it later.
#11
10th Jun 2009 at 3:26 AM
10th Jun 2009 at 3:26 AM
Posts: 466
Thanks: 9896 in 9 Posts
Looking forward to your tut Misty, I'm using Paint Shop Pro as well and I find HP's tut
very hard to follow.
Thanks so much.
You can find more of my stuff here: http://www.blackpearlsims.com/downloads.php
very hard to follow.
Thanks so much.
You can find more of my stuff here: http://www.blackpearlsims.com/downloads.php
#12
10th Jun 2009 at 11:48 AM
10th Jun 2009 at 11:48 AM
Yes please Misty, I'm using Paint Shop Pro as well, and would love to have a tutorial for it!!
#13
10th Jun 2009 at 9:19 PM
10th Jun 2009 at 9:19 PM
Posts: 135
Quote: Originally posted by Snaitf
|
The top one would be easy - First resize image to 256x256, then use the magic wand tool to select all of the parts that are the same color, fill those white, then inverse your selection and fill the rest black. Do this with each of the colors - brown, pink, purple and white. So you should end up with 4 images: Then just save as a DDS, and import using Delphy's wonderful tool. |
Aaack! Thank you so very much! I was trying to do the pattern last night, and I got extremely frustrated. Turns out I was doing more than I had to!
Again, thanks. You just saved me a lot of grief.

#14
10th Jun 2009 at 10:01 PM
Last edited by cheezypuff121P : 10th Jun 2009 at 10:29 PM.
10th Jun 2009 at 10:01 PM
Last edited by cheezypuff121P : 10th Jun 2009 at 10:29 PM.
Posts: 135
Okay, so I tried doing what you told me to, but as you can probably see there are edges in both the alpha file, the blue file, and the green file that I can't seem to get rid of. I tried selecting it based on color and inverting, but it stayed pretty much the same color. I tried filling it with black paint, but it didn't fill the entire thing. Am I doing something wrong? I'm using GIMP
#15
10th Jun 2009 at 11:07 PM
10th Jun 2009 at 11:07 PM
Posts: 487
Thanks: 29000 in 78 Posts
Quote: Originally posted by cheezypuff121P
| Okay, so I tried doing what you told me to, but as you can probably see there are edges in both the alpha file, the blue file, and the green file that I can't seem to get rid of. I tried selecting it based on color and inverting, but it stayed pretty much the same color. I tried filling it with black paint, but it didn't fill the entire thing. Am I doing something wrong? I'm using GIMP |
At least in photoshop, selecting by color, and selecting using the magic wand actually yield different results. When you select by color, it selects all pixels withing your color range on the whole image, but some pixels are only PARTIALLY selected, and therfore only get PARTIALLY filled when you select fill. Using the magic wand it starts from where click outward, selecting your color range, but the pixels are all COMPLETELY selected, and therefor they get COMPLETELY filled when selecting fill.
This actually caused (causes) me the most frustions when converting existing patterns to be used in game.
I have noticed tho, that after selecting by color, you can fill multiple times to make it more and more filled, took me a while to realize that.
So, basically, what I try to do is select by color the color I want to start with, fill with white, then inverse and fill with black several times, that will leave you with a mostly white pattern, with some darker white which will give your pattern some nice shaddowing effects, but getting rid of the unwated parts.
Every time I try to convert a new pattern, I have to tackle it slightly different, this is basically a "how to get 90% done" approach, the rest is trial-and-error.
#16
10th Jun 2009 at 11:16 PM
10th Jun 2009 at 11:16 PM
Posts: 135
Oh, okay. Do you know if Illustrator CS4 has the magic wand? I can't seem to find it, if it does...
#17
11th Jun 2009 at 12:02 AM
11th Jun 2009 at 12:02 AM
Posts: 487
Thanks: 29000 in 78 Posts
Quote: Originally posted by cheezypuff121P
| Oh, okay. Do you know if Illustrator CS4 has the magic wand? I can't seem to find it, if it does... |
I've never used Illustrator, but a quick google search of "illustrator cs4 magic wand" and I see that it does, but not sure how to find it, shouldn't be that hard...
#18
11th Jun 2009 at 1:49 AM
11th Jun 2009 at 1:49 AM
Posts: 135
Thanks so much! My images got pretty close, if I do say so myself!
I'm ecstatic right now! Again, thanks!
I'm ecstatic right now! Again, thanks!

#19
11th Jun 2009 at 3:42 AM
Last edited by cheezypuff121P : 11th Jun 2009 at 4:00 AM.
11th Jun 2009 at 3:42 AM
Last edited by cheezypuff121P : 11th Jun 2009 at 4:00 AM.
Posts: 135
$#$ #$@!
Okay, NOW the pattern refuses to show in-game. The swatch is grey and the pattern is nonexistent (aka I get a solid pale violet, not the actual pattern).
Any one have any clue(s) how to fix this?
Okay, NOW the pattern refuses to show in-game. The swatch is grey and the pattern is nonexistent (aka I get a solid pale violet, not the actual pattern).
Any one have any clue(s) how to fix this?
#20
11th Jun 2009 at 4:23 AM
11th Jun 2009 at 4:23 AM
Posts: 487
Thanks: 29000 in 78 Posts
Quote: Originally posted by cheezypuff121P
|
$#$ #$@! Okay, NOW the pattern refuses to show in-game. The swatch is grey and the pattern is nonexistent (aka I get a solid pale violet, not the actual pattern). Any one have any clue(s) how to fix this? |
Are you making sure that when you save as a DDS your are saving under the 8.8.8.8 ARGB 32 format?
If that doesn't help, post your finished DDS file here and I'll have a look...
#21
11th Jun 2009 at 4:25 AM
11th Jun 2009 at 4:25 AM
Posts: 135
Quote: Originally posted by Snaitf
| Are you making sure that when you save as a DDS your are saving under the 8.8.8.8 ARGB 32 format? |
HP's tutorial told me to leave the setting on "Default" if I was using GIMP, so that's what I did. If the default setting for GIMP is 8.8.8.8 ARGB 32, then I'm pretty sure I saved the DDS correctly.
I'll try saving it in DDS format again, just in case I did save it the wrong way...
EDIT: The DDS file is in the attachments. Thanks again for sticking with me on this!

Attached files:
| spacer.zip (14.3 KB, 15 downloads) - View custom content | ||||||||||
354349 06-10-09 19:09 spacer.package -------- ------- 354349 1 file |
||||||||||
| Description: DDS file | ||||||||||
#22
11th Jun 2009 at 4:36 AM
11th Jun 2009 at 4:36 AM
Posts: 487
Thanks: 29000 in 78 Posts
Quote: Originally posted by cheezypuff121P
|
HP's tutorial told me to leave the setting on "Default" if I was using GIMP, so that's what I did. If the default setting for GIMP is 8.8.8.8 ARGB 32, then I'm pretty sure I saved the DDS correctly. I'll try saving it in DDS format again, just in case I did save it the wrong way... EDIT: The DDS file is in the attachments. Thanks again for sticking with me on this!
|
Ah, in GIMP you need to save as RG8A8 format, it's one of the drop down boxes that say 'default', find the RG8A8 format and save it as that, HP's tutorial is mistaken about the 'default' part, someone else was having this same problem too...
#23
11th Jun 2009 at 4:51 AM
11th Jun 2009 at 4:51 AM
Posts: 135
Quote: Originally posted by Snaitf
| Ah, in GIMP you need to save as RG8A8 format, it's one of the drop down boxes that say 'default', find the RG8A8 format and save it as that, HP's tutorial is mistaken about the 'default' part, someone else was having this same problem too... |
Oh, okay. I'll try that.
#24
11th Jun 2009 at 5:32 AM
11th Jun 2009 at 5:32 AM
Posts: 135
Okay, well, I'm still having a problem.
In CASt, there's only one editable swatch, and it's the "background" swatch. There's no pattern, and editing any of the other swatches will not make a difference. Basically, the game is looking at my pattern as if it were a solid, not an actual pattern.
Can you take a look at my (re-edited) DDS file and tell me what else I did wrong?
Attached files:
| spacer.zip (14.3 KB, 12 downloads) - View custom content | ||||||||||
354349 06-10-09 21:12 spacer.package -------- ------- 354349 1 file |
||||||||||
| Description: New DDS file saved in RG8A8 format | ||||||||||
#25
11th Jun 2009 at 6:43 AM
11th Jun 2009 at 6:43 AM
Posts: 487
Thanks: 29000 in 78 Posts
Quote: Originally posted by cheezypuff121P
|
Okay, well, I'm still having a problem. In CASt, there's only one editable swatch, and it's the "background" swatch. There's no pattern, and editing any of the other swatches will not make a difference. Basically, the game is looking at my pattern as if it were a solid, not an actual pattern. Can you take a look at my (re-edited) DDS file and tell me what else I did wrong? |
I'll need you post the actual DDS file, not the package file...
Who Posted
|
|