 Sign in to Mod The Sims
- Site Map >
- Modding and Creation >
- Sims 3 Creation >
- Meshing >
- UV map help!!
- Site Map >
- Modding and Creation >
- Sims 3 Creation >
- Meshing >
- UV map help!!
#1
 6th Feb 2010 at 4:05 PM
6th Feb 2010 at 4:05 PM
Posts: 4
I am trying to make a new clock based on the "Alarm Clock Modern" I have done the mesh and got it working in the game however I am having some trouble re doing the UV maps... I have made a new one using UV mapper but when I try to change the _IMG files it repeats on all sides???

This is my first ever try at meshing so I picked something easy... any help would be very much appreciated!
Advertisement
#2
6th Feb 2010 at 4:28 PM
6th Feb 2010 at 4:28 PM
Posts: 1,740
Thanks: 107797 in 53 Posts
Can we see the map? It looks like you may have everything mapped to the same area.
"Part of being a mesher is being persistent through your own confusedness" - HystericalParoxysm
| (• ◡•)| (❍ᴥ❍ʋ) [◕ ‿ ◕]
| (• ◡•)| (❍ᴥ❍ʋ) [◕ ‿ ◕]
#3
6th Feb 2010 at 4:32 PM
6th Feb 2010 at 4:32 PM
Posts: 4
Quote: Originally posted by cmomoney
| Can we see the map? It looks like you may have everything mapped to the same area. |
Sure
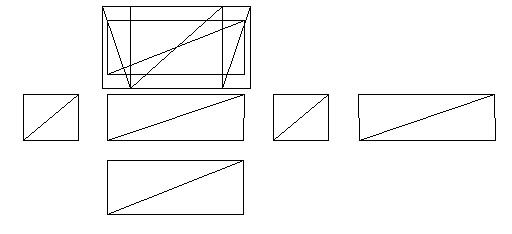
I am just thinking I think I exported as OBJ did the UV but did not reopen in milkshape could this be the problem? I am just using the _IMG files as they are for now as I am not sure how to use the image from UV mapper
#4
6th Feb 2010 at 4:43 PM
6th Feb 2010 at 4:43 PM
Posts: 2,932
Thanks: 15574 in 28 Posts
If you did not map the object to match your IMG then that definitely could be your problem. A quick way to check how your object is actually mapped is to open the Texture Coordinator Editor in Milkshape after applying the IMG to your object as a Material. You should see lines outlining where the edges of your object's parts are lying on the IMG. If they're all sitting in the same place then you need to remap them to the part of the IMG you want them on.
#5
6th Feb 2010 at 6:49 PM
6th Feb 2010 at 6:49 PM
Posts: 4,419
Thanks: 2483 in 21 Posts
If you started with a box(as mesh) all sides are welded.
You need to regroup each side of the box, uvmap the parts seperate and then regroup the meshparts back again(done in Milkshape)
You need to regroup each side of the box, uvmap the parts seperate and then regroup the meshparts back again(done in Milkshape)
#6
8th Feb 2010 at 11:33 AM
8th Feb 2010 at 11:33 AM
Posts: 4
Brilliant I fixed it! HOWEVER I after I export as a .obj then UV map and import the joints are gone?! what do I need to do to fix this?
#7
8th Feb 2010 at 12:08 PM
8th Feb 2010 at 12:08 PM
Posts: 11,006
Thanks: 422952 in 1121 Posts
You need to reassign the joints in the "Joints" tab. Look at the original file to see what belongs to which joint, then select that part in your edited file, select the appropriate joint in the list and click "Assign". Repeat for all of the other joints.
Also, when you export and reimport an .obj, check that your groups are still intact (with the right names, in the right order – same as in the original file).
Stuff for TS2 · TS3 · TS4 | Please do not PM me with technical questions – we have Create forums for that.
In the kingdom of the blind, do as the Romans do.
#8
8th Feb 2010 at 12:48 PM
8th Feb 2010 at 12:48 PM
Posts: 2,932
Thanks: 15574 in 28 Posts
For objects without animations, to assign joints, just go to the Joints tab in Milkshape, click the SelUnassigned button (you'll see all unassigned joints in your object turn red), and then click the Assign button.
The only object I've made to date that required figuring out which joint goes to what is a bed. The steps above will definitely be ok to use for your clock and will work for just about any other object too (chairs, tables, etc).
The only object I've made to date that required figuring out which joint goes to what is a bed. The steps above will definitely be ok to use for your clock and will work for just about any other object too (chairs, tables, etc).
#9
8th Feb 2010 at 1:12 PM
8th Feb 2010 at 1:12 PM
Posts: 4
thanks guys I have fixed this now  just one more thing though...
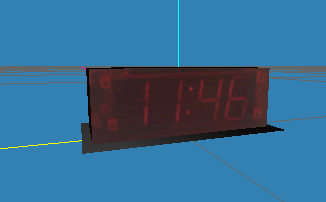
This is my new UV map (for now it needs to be made better) since I own the clock I used some pictures for the mapping.
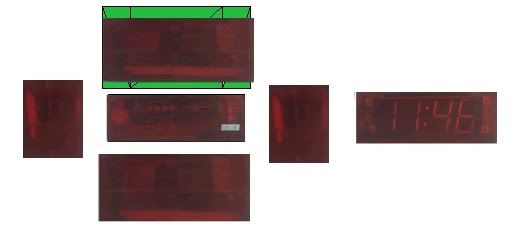
And it looks really good in Milkshape! (YAY!)
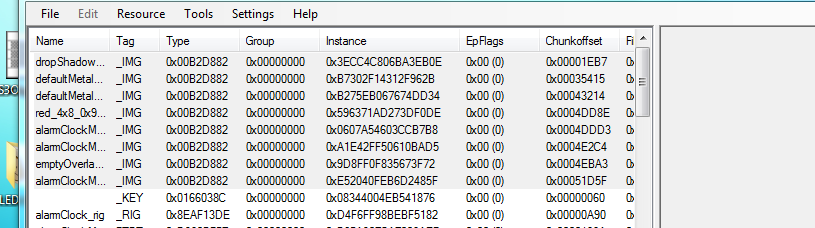
But now I need to get the new UV map on to the package... but S3PE shows that it has LOADS of files I don't know what to do to change them since they are all very small in size so my new UV map wont fit straight over them...
Thanks again guys sorry for all the questions..
This is my new UV map (for now it needs to be made better) since I own the clock I used some pictures for the mapping.
And it looks really good in Milkshape! (YAY!)
But now I need to get the new UV map on to the package... but S3PE shows that it has LOADS of files I don't know what to do to change them since they are all very small in size so my new UV map wont fit straight over them...
Thanks again guys sorry for all the questions..
#10
8th Feb 2010 at 1:28 PM
8th Feb 2010 at 1:28 PM
Posts: 2,932
Thanks: 15574 in 28 Posts
Have you taken a look at one of the Sims 3 meshing tutorials? EllaCharm wrote a very comprehensive one and it goes over changing the IMG's.  Take a look at that and see if it helps. If I recall correctly her tutorial is nicely illustrated as well.
And to clarify my above post, most objects (those without animations like beds have) have only a single joint. When that is the case you can just click the SelUnassigned button and then click Assign to take care of the missing joints.
 Take a look at that and see if it helps. If I recall correctly her tutorial is nicely illustrated as well.
And to clarify my above post, most objects (those without animations like beds have) have only a single joint. When that is the case you can just click the SelUnassigned button and then click Assign to take care of the missing joints.
Test Subject
#11
11th Feb 2010 at 6:05 AM
11th Feb 2010 at 6:05 AM
Posts: 13
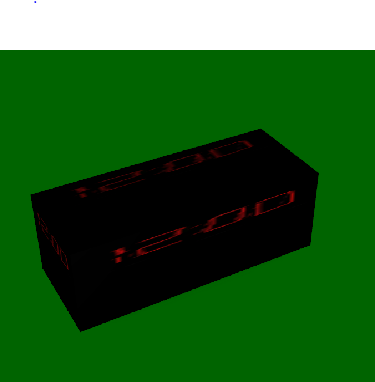
May someone help me please? I made some objects to sims3, and they are shows correctly in game, but i cant retexture them. I followed a tutorial about uv mapping and texturing, but im doing something wrong, because the items shows up in game, like in picture above:

#12
11th Feb 2010 at 7:12 AM
11th Feb 2010 at 7:12 AM
Posts: 231
Thanks: 402 in 1 Posts
I can only guess that you did the UV in Milkshape, but didn't change any of the .dds files?
Test Subject
#13
11th Feb 2010 at 7:38 AM
11th Feb 2010 at 7:38 AM
Posts: 13
I made uv map by uvmapper also changed dds-s, follow the instructions in this tutorial
Also seen thousends of videos about uv mapping and texturing on youtube, and find many tutorials on goolge, but can't figure out texturing and mapping. Maybe im stupid for that, but if someone can tell me, how i have to do it step by step or just link some more tutorials, that would be nice
Also seen thousends of videos about uv mapping and texturing on youtube, and find many tutorials on goolge, but can't figure out texturing and mapping. Maybe im stupid for that, but if someone can tell me, how i have to do it step by step or just link some more tutorials, that would be nice
#14
11th Feb 2010 at 11:42 AM
11th Feb 2010 at 11:42 AM
Posts: 2,932
Thanks: 15574 in 28 Posts
Have you tried the meshing tutorial by Ellacharm? Hers is written specifically for beginners with no experience in meshing at all. You can find it here:
http://www.modthesims.info/showthre...t=375349&page=1
If I were new to meshing that's the tutorial I would start with because it is very detailed and is illustrated. I would give that one a try and use it to make the same object Ella has in the tutorial.
http://www.modthesims.info/showthre...t=375349&page=1
If I were new to meshing that's the tutorial I would start with because it is very detailed and is illustrated. I would give that one a try and use it to make the same object Ella has in the tutorial.
Test Subject
#15
11th Feb 2010 at 1:54 PM
11th Feb 2010 at 1:54 PM
Posts: 13
but its just meshing, not texturing. I think my meshes are fine, so that tutorial doesnt help, but ill give it a try, thanks anyway
What im looking for, something like creating uv map, making textures by photoshop or corel paint shop pro, how to make shinyness, alpha etc for a custom mesh, without using TSR Workshop, cuz that isnt running correctly on my pc
What im looking for, something like creating uv map, making textures by photoshop or corel paint shop pro, how to make shinyness, alpha etc for a custom mesh, without using TSR Workshop, cuz that isnt running correctly on my pc
#16
11th Feb 2010 at 1:57 PM
11th Feb 2010 at 1:57 PM
Posts: 11,006
Thanks: 422952 in 1121 Posts
jimmyjoint, I believe it would be helpful if you'd post screenshots of
- your UV map
- your colour channels
- your texture
From the in-game pic I can only tell that something seems to have gone haywire between those, but not what.
Also, what did you clone them from? Not all EA objects have recolourable channels; if you tried to add them that could easily have gone wrong too.
Stuff for TS2 · TS3 · TS4 | Please do not PM me with technical questions – we have Create forums for that.
In the kingdom of the blind, do as the Romans do.
#17
12th Feb 2010 at 12:50 AM
12th Feb 2010 at 12:50 AM
Posts: 2,932
Thanks: 15574 in 28 Posts
The tutorial goes all through the texturing process but it uses LithUnwrap I think not the program you're using. Sorry...I thought it was using UVMapper.
From your pics it looks like the counter type object has several of its faces mapped over the same area of your map and so they are all coming out having the exact same appearance in the game. The fact that it's not recolorable though suggests there is some other problem as well.
The chair looks like it might have one of several issues going on...I'm imagining that you weren't planning on the legs being invisible like that?
Anyway, as PB said, post some pics or, better yet, just post the packages so someone can take a look at what you've got there and see what the problems are.
Also, if you've tried many tutorials on using UVMapper and still don't get it you might consider trying to learn to map with Milkshape instead. It's actually pretty easy to learn to map with Milkshape although it may not have all the bells and whistles UVMapper has.
Test Subject
#18
12th Feb 2010 at 1:11 AM
12th Feb 2010 at 1:11 AM
Posts: 13
thanks for the tutorial, what u gave me, thats what im looking for, so i do that now step by step. If my objects will work, if i do them like in this tutorial, ill use milkshape instead of uvmapper. Just after seeing about 500 tutorials, whit different technics, I have photoshop, corel, gimp, pain.net, milkshape, 3dsmax, uvmapper, tsrworkshop, but can create any object, cuz the tutorials not detailed enough for a newbie user, its a little bit confused. But this one looks good. About the chairs missing leg, i just didnt created yet, first i went to see, how looks the textures, but sadly same like on counter. Nvm, ill done the table in the tutorial, after I hope, Ill learn some new technics about making items. THanks again
#19
12th Feb 2010 at 1:19 AM
Last edited by orangemittens : 12th Feb 2010 at 2:45 AM.
12th Feb 2010 at 1:19 AM
Last edited by orangemittens : 12th Feb 2010 at 2:45 AM.
Posts: 2,932
Thanks: 15574 in 28 Posts
The EllaCharm tutorial uses LithUnwrap not Milkshape to map. I've never used it so I can't say how easy it is to learn although EC's tutorial makes it seem do-able.
Trust me, I can sincerely sympathize with finding mapping a difficult thing to learn. It was what held me back from making things to share too. I do all my mapping in Milkshape because it was the first one I could "get" after a lot of struggle with UVMapper. Plus, it has the advantage of letting me do my meshing and mapping all in one place which is nice.
Good luck to you with the tutorial and post again if things don't work out. Stick with it. If you can learn to mesh objects like the ones you've created you can learn to map them also
eta: I made a tutorial about texture mapping with Milkshape which is pretty easy. It is not about how to deal with Sims 3...only about the basic technique of mapping with Milkshape. It's here:
http://jaue.com/om/OM_TextureMappingwithMilkshape.rar
Post questions if you have any if you try it.
Test Subject
#20
12th Feb 2010 at 6:09 AM
12th Feb 2010 at 6:09 AM
Posts: 13
oh Man, i cant figured out this uvmapping/texturing procedure. I checked the uvmapping by milkshape tutorial. I understand how it works. But I need the texture for item first, after can mapped the item on it. But how can i create the texture, if i cant see the items parts? oh my, im going mad
#21
12th Feb 2010 at 7:35 AM
12th Feb 2010 at 7:35 AM
Posts: 11,006
Thanks: 422952 in 1121 Posts
You don't need a texture to make a UV map – in TS3 the materials are mapped onto items, not the other way around. The first thing you do is the mesh, then the UV map, then the colour channels and the shadow texture (using the UV map as a basis).
You could use a test texture, like a checkerboard pattern or diagonal stripes, to be able to see whether things are distorted or at the wrong scale .. but for an object that already has a UV map (like old EA objects) you could just as well use a blank white picture, since those maps will most likely be OK (you may have to rearrange them, but not start from scratch).
Stuff for TS2 · TS3 · TS4 | Please do not PM me with technical questions – we have Create forums for that.
In the kingdom of the blind, do as the Romans do.
#22
12th Feb 2010 at 11:46 AM
12th Feb 2010 at 11:46 AM
Posts: 2,932
Thanks: 15574 in 28 Posts
One thing that may help is to select an easy Sims 3 object to start out with. Something like a table with a single color choice. Clone it and export all its important parts just as in the EllaCharm tutorial. This would include the MLODs, MODL, greyscale IMG, Specular IMG, and the solid red IMG.
After decompling the object import it into Milkshape. Select the Groups tab and then select your object's group (the table itself, not the shadow). You should see it turn from being outlined in white to being outlined in red. Now go to the Materials tab. Click the New button and then the <none> button. Navigate to where you have put the IMG's you exported for your object and select one. Then click Assign. You will see the EA IMG applied to the table.
Now open the Texture Coordinator Editor. Make sure the group you have assigned the texture to is selected. You should see all the parts of the Sims 3 object outlined on the IMG.
This is the map for the Sims 3 object laid out on the IMG.
As PB said, it can be helpful to make a test pattern to see how the map is causing patterns to show on the object. So, for testing purposes, take a pattern like a checkerboard or polkadots and make a png of it that is the exact same size as the EA IMG you've applied to your Sims 3 table.
Go back to the Materials tab and click the same <none> box you clicked before (although now it will have the name of the EA IMG in it instead of the word none). Navigate to where you put your test png and select that test png. Now you'll see your new pattern applied to the table.
And this is what happens in the game. The game takes the map and uses that to decide how to apply the in-game patterns to the object.
Play around with the Sims 3 table you've imported into Milkshape. Try making it bigger and smaller. Change its dimensions. As you do that you'll notice how the pattern on the table changes too. If you change the dimensions the pattern will become distorted. And this is where changing the map comes in. You can make changes to the map using the TCE so that the map once again matches the object's shape and the pattern is applied without distortion.
This is what you're gonna need to do for a new object that you make. Your going to want to apply the test material to your object and then fiddle with the map until the test pattern is applied onto your object without distortion. Then you're going to make changes to the EA IMG's (or just apply your new IMG's over the EA ones, or just rename your new dds to have the same name as the EA one you intend for it to replace) so that instead of having EA's shadows applied to your new object you have your shadows applied to your object. That's really it for a single color item like a table. Remember, your final IMG should be a dds and *not* the png you're using for testing.
Try that first. Make a very simple table and use it to replace the EA table. Apply your test pattern to your table and fix your object's map in the TCE so that the pattern is being applied without distortion.
Now apply the EA shadow (greyscale) IMG onto your table instead. Notice how the EA IMG causes patches to appear on your table. Change the EA IMG so that the patches aren't there anymore. Save the EA IMG and reimport it along with your MLOD's and MODL. If you still see patches on your object in the game you're going to have to edit your Specular also.
Counters, in spite of being boxy objects, are not as easy as they might seem. Steer away from choosing a counter as your first object. I would also suggest steering clear of using a Sims 2 object as the first one you try also. Mapping those can be a little bit tricky if you're just starting out.
Hope that helps.
Test Subject
#23
13th Feb 2010 at 1:11 AM
13th Feb 2010 at 1:11 AM
Posts: 13
Thx for all the info, but i played hundreds time before with boxes tables, and simple item in all of my editor, its really bored now. Nvm, iwe done it. Remapped the object using milkshape. I like too, if i dont need different programs to every step, so leaved lithunwrap. the counter show textures correctly ingame, and i changed the itemshadows as well. Here is my next problem
How can i convert my new shadowtexture to a specular one?
And another, when i place my object anywhere in game, it looks good, but if i take it again with hand tool, it turns back into the default object, what i cloned.
How can i convert my new shadowtexture to a specular one?
And another, when i place my object anywhere in game, it looks good, but if i take it again with hand tool, it turns back into the default object, what i cloned.
#24
13th Feb 2010 at 1:25 AM
13th Feb 2010 at 1:25 AM
Posts: 2,932
Thanks: 15574 in 28 Posts
Are you wanting to change the Specular because even though your shadow map is working there are still patches on the counter item that you've made?
To make the Specular I usually use my shadowmap and convert it to how the Specular should be. To convert the shadowmap to the Specular I just lighten it up until it seems about as bright as the original Specular is. There may be a better way but that's how I do it.
I then make sure the alpha is still in place and is all black for the Specular. Then I overwrite the EA Specular with it and import that into S3PE and save.
Did the mapping with Milkshape work for you? Did the process I posted above work for you? Please post what you used and the result so that others who are trying to learn can learn from your findings.
Before you put your new object into the game did you clear the caches? If it isn't that it may be some issue related to counters which is an object I've not worked with before. I suggested a simple table because counters have given even experienced meshers Sims 3-related difficulties. I'm not sure what those difficulties are since I've never cloned one and tried to replace it with my own mesh.
Test Subject
#25
13th Feb 2010 at 1:54 PM
13th Feb 2010 at 1:54 PM
Posts: 13
I made some changes but still some problems with my object
I cant figure out what i made wrong. Yesterday i made the specular, the counter was shiny in game, but a litle bit too. today i changed specular map, but its not show on object now. Also some dishes cut off the front of the counter, and still if i pick it up with hand tool, that turn back to the cloned one. Here is the package, that would be nice, if u have enough time, would check it, whats wrong with it

I cant figure out what i made wrong. Yesterday i made the specular, the counter was shiny in game, but a litle bit too. today i changed specular map, but its not show on object now. Also some dishes cut off the front of the counter, and still if i pick it up with hand tool, that turn back to the cloned one. Here is the package, that would be nice, if u have enough time, would check it, whats wrong with it
Attached files:
| sim3tria_CounterAbstraktSuite_fixed_exported.rar (1.18 MB, 9 downloads) - View custom content | ||||||||||
                  Size   Packed Ratio  Date   Time     Attr      CRC   Meth Ver
-------------------------------------------------------------------------------
 sim3tria_CounterAbstraktSuite_fixed_exported.package
               1512492  1234552  81% 13-02-10 14:35  .....A.   9C8867B9 m3f 2.9
-------------------------------------------------------------------------------
    1          1512492  1234552  81%
|
||||||||||
Who Posted
|
|