Hi there! You are currently browsing as a guest. Why not create an account? Then you get less ads, can thank creators, post feedback, keep a list of your favourites, and more!
Quick Reply
Search this Thread
Test Subject
Original Poster
#1 Old 18th Aug 2009 at 5:41 PM
Default Texture not working properly :(
Hi

I created a flat box shape from the Dragon? sculpture, the mesh is working fine, but when the texture goes on, it looks like this:


When it should look like this:


Any help would be hugely appreciated
Advertisement
Forum Resident
#2 Old 18th Aug 2009 at 7:00 PM
It looks like it's getting stretched/distorted.
When you imported the texture onto your mesh, did you ''Import'' or did you ''Build DXT''?

Nacho average teen.
Other Stuff By Me.
Top Secret Researcher
#3 Old 18th Aug 2009 at 8:49 PM
It is too dark for me to see, but if it is being stretched, then your mapping is the problem. Mapping things to avoid distortion can be challenging. In UV-Mapper Pro, selecting "scale results" on the map options is a good start. Using <CTRL>b to import the texture will also help you get the results you want. Some people use a specially designed texture that makes distortions very obvious.

If you use a different mapping program, perhaps it has similar functionality.

Retired from the Sims world. Please continue to enjoy my creations. Thank you to everyone who helped -- by either giving me the tools and knowledge to create or by encouraging me & downloading my creations. The Sims community is the BEST!
Test Subject
Original Poster
#4 Old 18th Aug 2009 at 10:37 PM
DJ Music - I tried both, but got the same result.

bluetexasbonnie - it's not being stretched, but it's sort of doubled over, sort of like if someone had put a mirror in the middle :\ I'll try what you said anyway though, thanks
Top Secret Researcher
#5 Old 18th Aug 2009 at 10:49 PM
Devon --that means there is a 'mismatch' between your mapping and your texture. You can either alter the mapping, or alter the texture, or (and more than likely the best) is to change both of them.

Retired from the Sims world. Please continue to enjoy my creations. Thank you to everyone who helped -- by either giving me the tools and knowledge to create or by encouraging me & downloading my creations. The Sims community is the BEST!
Test Subject
Original Poster
#6 Old 18th Aug 2009 at 10:57 PM
Does it mean anything that when I load it in UV Mapper, I get a pop-up saying 'The model you have loaded contains out of range UV coordinate data, would you like to correct this?' ?
Test Subject
Original Poster
#7 Old 18th Aug 2009 at 11:17 PM
Quote: Originally posted by bluetexasbonnie
Devon --that means there is a 'mismatch' between your mapping and your texture. You can either alter the mapping, or alter the texture, or (and more than likely the best) is to change both of them.


Erm, how do I go about doing that? I'm kind of new to all this, as you can probably tell :P
Top Secret Researcher
#8 Old 19th Aug 2009 at 12:34 AM
Good mapping is a real art, IMO. The only program I know is UV-Mapper. If you post your texture and mesh, I can probably fix it up and show you what I did, more easily than I can tell you.

Retired from the Sims world. Please continue to enjoy my creations. Thank you to everyone who helped -- by either giving me the tools and knowledge to create or by encouraging me & downloading my creations. The Sims community is the BEST!
Test Subject
Original Poster
#9 Old 19th Aug 2009 at 2:04 PM
Quote: Originally posted by bluetexasbonnie
Good mapping is a real art, IMO. The only program I know is UV-Mapper. If you post your texture and mesh, I can probably fix it up and show you what I did, more easily than I can tell you.


How do I post my mesh? Sorry to ask so many stupid questions, but I really am new to this :P
Forum Resident
#10 Old 19th Aug 2009 at 2:30 PM
Reply > Manage Attachments > Upload your mesh.

Nacho average teen.
Other Stuff By Me.
Test Subject
Original Poster
#11 Old 19th Aug 2009 at 2:51 PM
Sorry for the triple post, but it doesn't seem to want to attach to the post, I'm clicking 'Save Attachment Descriptions' like mad but it isn't working!
Top Secret Researcher
#12 Old 20th Aug 2009 at 3:12 AM
Devon sent me his files by email, since he was having trouble with attachments. I sent the reworked package, mesh & texture back to him by email.

****
Here is what I did.

In addition to remapping, I also reworked the texture some ....

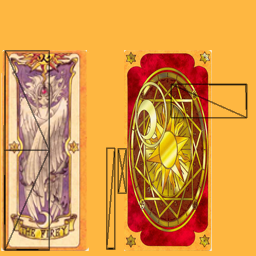
1. Here is your original texture with the original mapping laid over it.


As you can see, the texture and the map don't correspond. For instance, the front of the card mapping does not cover the whole of the picture you want on the front. What isn't so obvious at first glance is that the front of the card is actually made up of 8 polys. The mapping has been set up so that the texture image is mirrored on the second half of the card -- which is very efficient if things are always going to be symmetrical. Not so great for your plan.

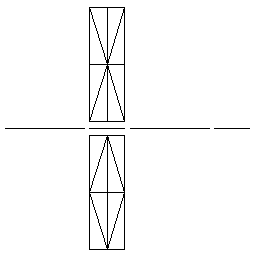
2. I opened UV-Mapper and told it to map as a box, separating front & back, and also scaling the result.

This (after altering the size to mostly fill the texture) is what that looked like:


This was where it became obvious why your front image appeared mirrored. I used this mapping, and rearranged where the individual pieces sat on texture. The front went over the 'front' part of the texture, the back on the back and the edges were moved to the top.

3. Next, I resized the map sections to match the texture. The proportions of the mesh did NOT match the proportions of your card images -- but it wasn't so far off that the distortion became too obvious.

In trying to balance the edges and center things up on the front & back images, it quickly became apparent that a bit of tweaking of the texture would make this so much finer.

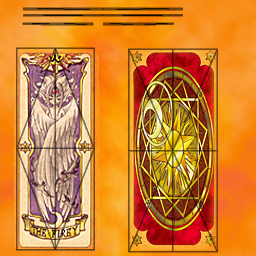
I eliminated the bits of white around the edge of the card graphics, added a background that better blended with the card edge and moved the front over a bit to give more room.

Here is what the final texture looked like with the mapping laid over it.


***
Does that make any sense??

***
Just as a side note, this same shape could have been made with half the polys -- 12 instead of 24. Your object is extremely low poly, but it could have easily been even lower by using a basic box as your beginning shape.
Screenshots

Retired from the Sims world. Please continue to enjoy my creations. Thank you to everyone who helped -- by either giving me the tools and knowledge to create or by encouraging me & downloading my creations. The Sims community is the BEST!
Test Subject
Original Poster
#13 Old 20th Aug 2009 at 8:53 AM
Thank you very very very much It makes a bit of sense, I'll read through it again a few times and try and work it out a bit more

PS - it's she, not he :P
Forum Resident
#14 Old 20th Aug 2009 at 12:06 PM
Instead of doing it as a box, Could you also have done it as Planar > Y and split it? Would that have the same result?

Nacho average teen.
Other Stuff By Me.
Top Secret Researcher
#15 Old 20th Aug 2009 at 12:42 PM
Hi girlfriend Devon! Sorry about the gender mixup. The only other Devon I know is a guy.

DJ -- You are right that two planes (only 4 polys!) would have worked. I'm guessing that there are a few views where having actual thin edges gives a better effect -- but there can't be many.

Retired from the Sims world. Please continue to enjoy my creations. Thank you to everyone who helped -- by either giving me the tools and knowledge to create or by encouraging me & downloading my creations. The Sims community is the BEST!
Test Subject
Original Poster
#16 Old 20th Aug 2009 at 6:39 PM
That's fine

What are polys, by the way?
Top Secret Researcher
#17 Old 20th Aug 2009 at 6:56 PM
Polys, in reference to sim meshes, are the little triangular faces that make up the mesh. The more polys an object has, the more graphic resources it requires for the game to run.

Retired from the Sims world. Please continue to enjoy my creations. Thank you to everyone who helped -- by either giving me the tools and knowledge to create or by encouraging me & downloading my creations. The Sims community is the BEST!
Test Subject
Original Poster
#18 Old 20th Aug 2009 at 7:31 PM
Ahh, I get what you mean now. Thanks! :D
Test Subject
Original Poster
#19 Old 20th Aug 2009 at 9:56 PM
One last question, how do you change the object's category?

Edit: Never mind, found it now - as soon as I posted this!
Top Secret Researcher
#20 Old 20th Aug 2009 at 10:52 PM
Good, because I don't know. I always clone something from the desired category as my starting point.

Retired from the Sims world. Please continue to enjoy my creations. Thank you to everyone who helped -- by either giving me the tools and knowledge to create or by encouraging me & downloading my creations. The Sims community is the BEST!
Forum Resident
#21 Old 21st Aug 2009 at 11:47 AM
Bluetexas, It's in Object Data.
Object Data > Catalog Sort. Then choose where you want it to go.

Nacho average teen.
Other Stuff By Me.
Top Secret Researcher
#22 Old 21st Aug 2009 at 12:44 PM
Thanks. Never know when I'll need info.

Retired from the Sims world. Please continue to enjoy my creations. Thank you to everyone who helped -- by either giving me the tools and knowledge to create or by encouraging me & downloading my creations. The Sims community is the BEST!
Scholar
#23 Old 21st Aug 2009 at 3:59 PM
Bluetexasbonnie, that was the clearest explanation of UV mapping in general that I've ever seen. I think (and I may be able to prove it in a bit) that I could use it as an example for doing a beginning project of my own.
Top Secret Researcher
#24 Old 21st Aug 2009 at 4:35 PM
Thank you Lucy. I hope your project comes out well.

Retired from the Sims world. Please continue to enjoy my creations. Thank you to everyone who helped -- by either giving me the tools and knowledge to create or by encouraging me & downloading my creations. The Sims community is the BEST!
Test Subject
Original Poster
#25 Old 21st Aug 2009 at 5:03 PM
Quote:
This was where it became obvious why your front image appeared mirrored. I used this mapping, and rearranged where the individual pieces sat on texture. The front went over the 'front' part of the texture, the back on the back and the edges were moved to the top.


After reading it through a few times, the only bit I don't get is this part - how did you get from the 4 lines and two boxes on the top and bottom, to the UV map you sent me?

I hope your project turns out OK as well, Lucy
Page 1 of 2
Back to top