 Sign in to Mod The Sims
- Site Map >
- Modding and Creation >
- Sims 3 Creation >
- Meshing >
- General/Other - TESTERS WANTED: AnimTool, updated V05 (03/07/2011)
- Site Map >
- Modding and Creation >
- Sims 3 Creation >
- Meshing >
- General/Other - TESTERS WANTED: AnimTool, updated V05 (03/07/2011)
 28th Jul 2010 at 1:19 AM
Posts: 38
28th Jul 2010 at 2:46 AM
Last edited by jtravers88 : 28th Jul 2010 at 4:09 AM.
Posts: 159
Thanks: 17 in 1 Posts
| There seems to have been little interest in animating TS3. No one posted any bug reports, so either no one found any, or no one completed enough work to find them. I am suspecting theory #2 is the applicable one, because surely there is something I missed in there. |
Hello everyone.
Ok I'm removing the original post that was in this position. Originally I was reporting things that don't need to waste anyone's time, particularly Wes.
This tool looks very promising. I'm excited. Great job Wes.
28th Jul 2010 at 3:07 AM
Posts: 38
28th Jul 2010 at 4:01 AM
Posts: 159
Thanks: 17 in 1 Posts
| jtravers88, if you are getting an Error 2 its probably because you don't have the original a_dance_med_posAHipsShake.animation file in the same directory that you are attempting to export the SMD to. According to the AnimProgramNotes your new output clip is 'inserted' into the existing clip instead of cutting a brand new file. Try that. |
Yea I just started overwriting the original smd from MS, keeping the original name, instead of using my own naming convention and I no longer get the error when the anim tool loads the smd and makes the anim file. I edited and changed my last post after your response. Thanks.
Also... in response, I did have the original in the same directory when I was getting the error.
28th Jul 2010 at 5:33 AM
Posts: 2,832
Thanks: 6613 in 20 Posts
| I don't have that original animation however, this is completely new from scratch. How is that supposed to work? Can I just take any random animation file and use that? |
There is more in the CLIP file than just the animation action, the converter just copies the other parts over and uses them in the new CLIP file. However, the export function replaces ALL of the action in the CLIP file with your frames from your SMD.
None of those other parts are easily editable nor is there any way to tuck them into the process with this tool. I wouldn't say just a random animation, because there is data related to animations involving objects that is not editable (actor/slot pairs). So if you were making an animation involving the rubber ducky and inserted it into a dance animation, the rubber ducky info is lost.
Pick a similar activity. If it is a two-party animation, rework a two-party one (as opposed to individual activity). You don't have to have the frames that were imported from a game animation to start with. But they do need to be stuffed into the 'shell' of a game CLIP file, because that is the only way the converter knows how to do it.
<* Wes *>
If you like to say what you think, be sure you know which to do first.
28th Jul 2010 at 6:44 AM
Last edited by Cosmas : 28th Jul 2010 at 7:09 AM.
Posts: 38
EDIT: Taking another hard look at your first post I think I get the workflow now. I need to create my object and its animations, then set it up in Smooth Jazz, then programmatically make it 'interactive'. Then create new animations for the Sim (essentially copied from some starting pose), then set those up in Smooth Jazz. Wow lot of work.
28th Jul 2010 at 7:11 PM
Posts: 2,832
Thanks: 6613 in 20 Posts
We are game 'modders', and thus we have to work in the framework that was already invented. Making a replacement is pretty simple, because you just have to replace original game content with some modified content. This is what the tools we have are best suited for. More is possible, but there are more things that need to be done than just shoving a file with new content into a folder. So there is where the need for the Jazz scripting comes into play... somewhere there have to be modifications to the game-play code to cause your new content to be used.
You might break your project into two phases. In the first, replace a game animation with your action and use the ChaosMageX painting to test it. That would essentially be replicating what I show in the initial post. If you are satisfied with the results, then work on the scripting parts to add it as a new animation. That will require you to learn some skills that I have not learned myself. I have studiously avoided learning any of the C# scripting aspects of this game. Or of C# in general. I'm just an old dog, averse to new tricks.

<* Wes *>
If you like to say what you think, be sure you know which to do first.
28th Jul 2010 at 8:58 PM
Posts: 38
28th Jul 2010 at 11:56 PM
Posts: 159
Thanks: 17 in 1 Posts
So I select the elbow, rotate, select everything from the elbow down, copy keyframe. Then move to next frame, paste keyframe to get my last arm move. When I set the keyframe, I deselect 'Operate on selected joints only', then set the keyframe.
When I test ingame, the sim stands up inside the couch for that particular loop. The arm movements are there. But in MS, the animation looks fine, the sim remains seated.
Any ideas? Is there an issue with legs in the process?
Thanks.
29th Jul 2010 at 2:38 AM
Posts: 159
Thanks: 17 in 1 Posts
But alas, after making a few arm moves, ingame the sim now is partially bent at the knee, but the feet are in the correct position. An improvement from standing straight up in the couch.
29th Jul 2010 at 4:16 AM
Last edited by jtravers88 : 29th Jul 2010 at 5:09 AM.
Posts: 159
Thanks: 17 in 1 Posts
I'm scratchin my head trying to figure out where the offsets came from in the rig file. ? They don't match up with either the cursor locs on the m3sd joint centers, or the data in the granny viewer.
How were these offsets for each joint derived? Or in more general terms, how was the rig file created?
Edit: Ok with some fiddlin around I'm assuming that the values in the rig file come from the 'skeleton time 0' in the smd created after loading all the geoms to make the m3sd model. Does that make sense?
When using the GEOM plugin, I believe I have the correct files extracted for the ambottomnude, to start my own m3sd file. However, the GEOM plugin creates a popup saying the bone file can't be found and a default will be used. The skcon file does not have the same name as the geom file. What is the plugin looking for as a name for the BONE (skcon) file?
29th Jul 2010 at 5:57 AM
Posts: 2,832
Thanks: 6613 in 20 Posts
|
I've downloaded the Granny viewer and I'm looking at the dataview of the aurig.gr2. I'm also looking at the m3sd in MS and the rig text file. I'm scratchin my head trying to figure out where the offsets came from in the rig file. ? They don't match up with either the cursor locs on the m3sd joint centers, or the data in the granny viewer. How were these offsets for each joint derived? Or in more general terms, how was the rig file created? |
Painstakingly.
The origin of the values is from the Granny Viewer. However, the rotation values used in the rig file follow the layout of the SMD standard, which is Z-up (all converted from quaternions to euler angles). So that is part of why they "don't follow" what you see in MilkShape. If you built a skeleton just like you see it in the rigfile, it would be lying on it's back, feet toward you. The converter swaps the Y and Z values for all unparented joints, and then rotates them +90 on X. That stands the model up when imported into MilkShape. Since all the animation values are parent relative, when the parent is rotated, everything else follows.
|
Edit: Ok with some fiddlin around I'm assuming that the values in the rig file come from the 'skeleton time 0' in the smd created after loading all the geoms to make the m3sd model. Does that make sense? When using the GEOM plugin, I believe I have the correct files extracted for the ambottomnude, to start my own m3sd file. However, the GEOM plugin creates a popup saying the bone file can't be found and a default will be used. The skcon file does not have the same name as the geom file. What is the plugin looking for as a name for the BONE (skcon) file? |
The 'bone file' is referenced by the GEOM via a TGI value. If you look in the group comments you will see a line like:
TGIRef03: 00AE6C67 002FA9BB 00000000 5830AB0C
While it isn't always Ref03, the 00AE6C67 is the BONE chunk type, the other three values are Group, instance high and instance low.
Find and extract that chunk using Postal or S3PE, place it in the same directory as the GEOM file using the naming convention S3PE uses, and the importer will find it. In the above example the proper filename would be:
S3_00AE6C67_002FA9BB_000000005830AB0C_BONE.skcon
[actually, only the first part and the extension need to be right, the importer uses pattern matching to try to find it, so the extra human readable stuff on the S3PE names will be OK].
The BONE file usually has only small location differences from the defaults I hardcoded into the importer... but the child skeleton is, of course, widely different.
For best results building your own whole-body rig, import mine and delete all of the mesh, then import your parts one at a time overtop that skeleton. The GEOM importer should bring in everything, including the skin weights, and leave the joints untouched. I think there is something special about the skeleton, but what I did escapes me at the moment... it has been about a year since I did it, at my age that is an eternity for my memory.
Oh, I remember something else... all the edges of the face will need to have the vertices moved slightly to get it to match the hair and neck. There is only one face, broken into many parts, and the game uses some undetermined magic to make that face fit all sims. I just moved the verts to the neck and hair edges.
I have one other comment in answer to another question. The game engine uses overlays, but I only provided one rigfile which has all of the joints in it. In the SMD file if there is a joint in frame 0, that will be applied, so hence your model was standing.
To make a true overlay, strip the unwanted joints from the rig file. For that reason, you will see that instead of an index, I used a parent name string. The converter will only generate frames in the CLIP file for the joints it finds in the rigfile, it will ignore any names that are missing (by design). For deleting all of the lower half sim bones, you need to make the lowest joint (maybe Spine0 or Spine1) "unparented" (all joints must either be that or have a parent that is defined before being referenced). I think I detailed that in the notes somewhere. Even though you only set keyframes for the selected joints, using the full rigfile (that I distributed) caused the converter to create frame 0 positions/rotations for all of the joints.
I would image the exporter EA used probably respected something like "export selected", but my converter is nowhere near as sophisticated as Maya and the Granny package are. However, with a little work on the rigfile you should be able to strip the unwanted joints. If I might suggest, think of each animation as a project of its own, put it in its own directory with its own custom rigfile... that is the idea I had when designing it, because it looks for that rigfile name in the same directory that the SMD file is in. That way, you won't have a bunch of conflicts between a rigfile you modified for an arm animation with one for a whole body animation.
If you like to say what you think, be sure you know which to do first.
29th Jul 2010 at 12:58 PM
Posts: 159
Thanks: 17 in 1 Posts
|
Painstakingly. However, with a little work on the rigfile you should be able to strip the unwanted joints. If I might suggest, think of each animation as a project of its own, put it in its own directory with its own custom rigfile... |
I was trying this, but I didn't 'unparent' anything, and therefore received an error doing smd --> clip using the modified rig file. I would rather use work already completed than convert values to get the models oriented correctly. phew! I remember from sims 2 that importing into maya left the object sitting on its side.
The only reason to pursue another 'full' rigfile would be to determine if something else is missing from the granny joints provided. Since your rig left my sim standing, and (i forget his name) the second rig was a bit better with world joints, I thought I might uncover something.
But I think I would rather modify the rig for now. Any references for learning this stuff beyond the sims web resources? I have maya 6, I'm a software developer (albeit web), I understand the basics of animation and file layout. maybe I can help.
And I'll complete a m3sd with skcon info you relayed so I can say I've done it. But converting all those granny values, hmm... Maybe I'll just try to spot a missing joint.
29th Jul 2010 at 6:39 PM
Posts: 2,832
Thanks: 6613 in 20 Posts
I created the whole 'unparented' thing as an easier way to specify the hierarchy. Otherwise, the layout is the same as the 'time 0' part of an SMD file. In the SMD file, unparented joints have an index of -1 for the parent index. So here, "unparented" is the equivalent of -1. But by matching names, instead of numbers, if you delete a joint, you don't have to go through and reindex everything. You do have to know and understand the general concept of a skeletal hierarchy, but it appears you are well-attuned to that.
I reviewed the source code involved in the SMD->CLIP conversion while typing this... and as I related before, the converter actually only rotates and modifies values in unparented joints (to reset the model to Z-up). The rest of the position/rotation values are used just as they come from the rigfile (for time 0) and the SMD file (for the frames). There is a lot of reformatting work done, because of the file layout and data compression required to get everything squeezed back into the CLIP file, but if you later want to try some experiments that may help, since you can see and change values in SMD files with any text editor.
I know that a better anim exporter for SMD for Maya could be written in MEL script, and while I am up to my ears in MEL right now, it has nothing to do with Sims 3... well, a little tangentially, I am working on replicating a version of my BoneTool because I just cannot get the results I want easily enough from anything I have found for skinning in Maya.
<* Wes *>
If you like to say what you think, be sure you know which to do first.
30th Jul 2010 at 12:07 AM
Last edited by jtravers88 : 30th Jul 2010 at 12:51 AM.
Posts: 159
Thanks: 17 in 1 Posts
For instance, the x value for the right wrist for your rig is 0.00. The x value for the right wrist for my rig is -.099. This would represent the difference in the value for the wrist as compared to it's parent, the forearm on the x axis.
But there IS a difference in the x value between these two joints for both models, so I don't understand why your value is 0.00.
When I have MS create an smd for yours, the value is 0, when I do it for mine, it's -.099. Meshers is also 0.
Edit: Put a different way... If I stand on a grid and point down the x axis, there is a difference in the x position of my wrist and my forearm. Why is MS calculating that difference and putting into the smd for my model, but putting 0 in the smd for yours?
Edit 2: I just read an entry you made above about doing something special to the skeleton a year ago. That probably explains what I'm struggling with here. Although it wouldn't explain why Mesher used skcons to create his skeleton and gets your results (alot of zeroes) with these displacements.
30th Jul 2010 at 5:53 AM
Posts: 2,832
Thanks: 6613 in 20 Posts
More of what I remember now was that I had some issues in the head bones, one of the eyes, perhaps. I think I recalculated a position/rotation that animated correctly, but varies from the granny rig. I think the main trunk joints are pretty well in line with the standard rig.
The real importance of the rig file is that the game will play back animations based on that rig, and we cannot really alter it, even if we could, then we would have all the game animations playing incorrectly. It is so typical of game modding... a lot of effort goes into replicating things well enough to interwork with the game models. It would be so much easier if I had one of their original .ma files to work from. But we'll never get that, just a pipe dream.
I will try to think if I have any unreleased materials that would be helpful, but I don't think I do.
Also, you posted this query:
| Ok with some fiddlin around I'm assuming that the values in the rig file come from the 'skeleton time 0' in the smd created after loading all the geoms to make the m3sd model. Does that make sense? |
What happens is the exact opposite. The time 0 values get created from the values in the rigfile. The real importance of the mesh model skeleton is that it be close enough to the game one such that arm rotations (for example) would match those of the game. If the shoulder is in a different position, then a rotation of +10X will have the hand at a different spot than what it appeared to be in in MilkShape. Differences like that will cascade moving down a hierarchy.
If you like to say what you think, be sure you know which to do first.
30th Jul 2010 at 6:26 PM
Posts: 1,740
Thanks: 107805 in 53 Posts
| (• ◡•)| (❍ᴥ❍ʋ) [◕ ‿ ◕]
31st Jul 2010 at 4:46 AM
Posts: 2,832
Thanks: 6613 in 20 Posts
If you like to say what you think, be sure you know which to do first.
31st Jul 2010 at 4:59 PM
Posts: 1,740
Thanks: 107805 in 53 Posts
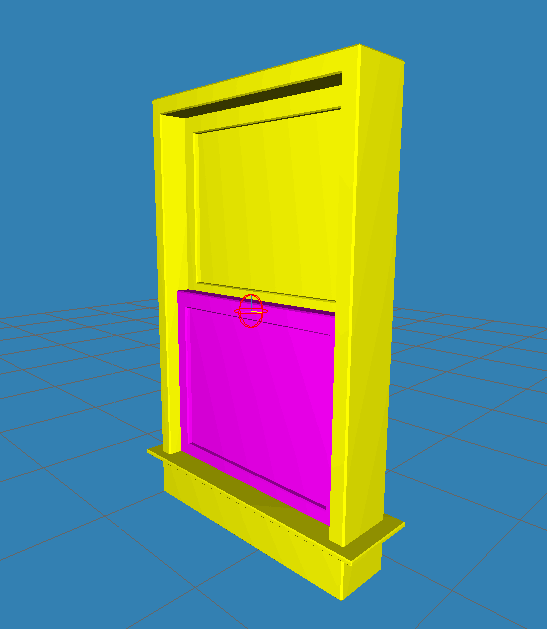
) and made a CLIP and a class with an interaction to call it. The animation is from a dresser and it works in-game. But the dressers have a bone for the drawer, which is what I'm moving in the animation, and the window doesn't have this bone. I can add the bone to the _RIG (or just use the dresser _RIG), but how can I assign the mesh part that supposed to move to the new bone? The dresser mlod doesn't have enough groups and the window only has one bone.
| (• ◡•)| (❍ᴥ❍ʋ) [◕ ‿ ◕]
31st Jul 2010 at 6:49 PM
Posts: 2,832
Thanks: 6613 in 20 Posts
You need to make the new joint in MilkShape, either with the click or ascii method, as well as altering your RIG file or using the dresser RIG. I think you mean you did or can do that. To complete the job:
Go to the main panel, choose select, choose joint and select the root (old) joint. Choose vertex and shift-select (shift adds to the selection rather than starting a new one) all of the vertices that stay still (you can reverse the order if desired). Go to the joints panel and click on "Assign".
Back to the main panel and select the new joint, then shift-select the vertices that move. In the joints panel, click on "Assign".
[Alternately, for step two, you could select the new joint by double-clicking on the name in the joints panel, then clicking on "SelUnassigned" and then click on "Assign".]
You should now be able to go to the main panel, click on the big "Anim" button (lower-right corner), select the new joint, click on move, and click drag up and down to open and close your window (manually). If something that should move doesn't, or vice-versa, you have it assigned to the wrong joint. Select these vertices, select the right joint for them, and click on "Assign" again, which will alter their assignment.
After you test, remember to turn "Anim" off, or you will probably have trouble exporting (besides a warning, the export will occur with the mesh in the animated position). When you turn "Anim" off, the mesh should revert to the original design form (often called the "bind pose").
I hope this is what you were asking this time.
If you like to say what you think, be sure you know which to do first.
31st Jul 2010 at 9:10 PM
Posts: 1,740
Thanks: 107805 in 53 Posts
I guess my question is, if I've done all this, the moving parts should be assigned to the new bone in-game?
| (• ◡•)| (❍ᴥ❍ʋ) [◕ ‿ ◕]
31st Jul 2010 at 10:13 PM
Posts: 2,832
Thanks: 6613 in 20 Posts
That is an area of game modding that I have not explored for Sims 3. But from your picture, it is pretty evident that you are not making any mistakes in modeling it. Any issues have to be related to the joint names, or scripting or some other linkage.
Sorry to cast you out with the bears and wolves at this point...
<* Wes *>
If you like to say what you think, be sure you know which to do first.
31st Jul 2010 at 10:24 PM
Posts: 1,740
Thanks: 107805 in 53 Posts
| (• ◡•)| (❍ᴥ❍ʋ) [◕ ‿ ◕]
31st Jul 2010 at 11:29 PM
Posts: 2,932
Thanks: 15576 in 28 Posts

Sweet window Cmo
 1st Aug 2010 at 4:47 PM
Posts: 159
Thanks: 17 in 1 Posts
|
-0.099 is just under a tenth of a meter, almost 4 inches. That is not far enough to stretch from the wrist back to either the mid-forearm or the elbow. I cannot remember if the standard rig is using a roll joint on the forearm or not. So there is a sanity check that seems to indicate that you are missing something here. Although the Sims 3 rig is in a pose with the arms more angled than the old-school "T" pose. |
My model has arms out at the same angle as yours. An angled pose. Either way, the value is not 0. MS is calculating 0 for yours and -.099 for mine. I don't know what I could be missing but yes I might be insane for trying this
.
Who Posted
|
|