 Sign in to Mod The Sims
- Site Map >
- Modding and Creation >
- Sims 3 Creation >
- Tutorials >
- Object Creation - Tutorial: Creating Paintings with Multiple Images
- Site Map >
- Modding and Creation >
- Sims 3 Creation >
- Tutorials >
- Object Creation - Tutorial: Creating Paintings with Multiple Images
 10th Nov 2009 at 3:34 AM
Last edited by cmomoney : 30th Sep 2013 at 9:07 AM.
10th Nov 2009 at 3:34 AM
Last edited by cmomoney : 30th Sep 2013 at 9:07 AM.
Posts: 1,740
Thanks: 107801 in 53 Posts
There is a much easier way to way and a tool to do this. See this tutorial: http://dino.drealm.info/den/denforu...php?topic=681.0
This tutorial will show you how to add multiple images to a cloned painting, so you can have one frame with a selection of different paintings. This assumes you already know how to change the image in a painting. If not, try Meshing - General - Tutorial: Change EA Painting Image - For Those New to S3 Object Modification by orangemittens before attempting this tutorial.
What you need:
* S3PE
* S3OC
* Graphic editing software with appropriate DDS plugins
* FNV hash generator (S3pe has its own, under Tools)
Let's start
We will be using the car painting.
1. Clone the car painting and open the clone in S3pe. Select the overlay image (PaintingCars_o) and export it. Close S3PE for now.
2. Open the image in you graphic program and edit. Save with the same name BUT use a FNV generator and change the sixteen digit number in the name (instance number).
|
You just plug-in some text - anything with your creator name would ensure its uniqueness, click on Calculate button and then paste the string it came up with to the designated field you need to edit. Compare the length you'd need to use with other packages to see which to copy. |
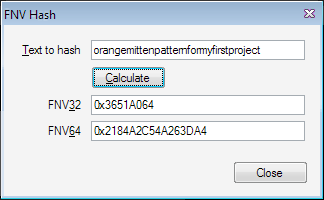
In our case, use the FNV64
Repeat this step for each painting.
3. Open S3PE again, and import your edited painting files. Select the PaintingCars_OBJD, and click the GRID button. Select "Materials" and click the little square that appears on the right.
4. Now select the first material ([0]Material) and select "TGIBlocks" and click the little square that appears on the right (see previous pic). In the TGI Block List Editor, Select the _IMG with the same instance number as the original paintings image (5th in the list).
On the right, change the instance number to the instance number of your first painting's image and click "SAVE". Select the second material, and do the same, replacing the original instance number with the instance number of your second painting. Repeat this step on the third material using your third painting's instance number. Click "OK" and "COMMIT".
5. Save your package, renumber in S3oc, install, and test in-game.
Thanks to Orangemittens (for the idea) and the creators of all the TS3 modding tools/programs.
Feeling confident? Try part 2 of this tutorial.

Cmo
| (• ◡•)| (❍ᴥ❍ʋ) [◕ ‿ ◕]
Thanks
10th Nov 2009 at 11:44 AM
Last edited by orangemittens : 10th Nov 2009 at 12:01 PM.
Posts: 2,932
Thanks: 15574 in 28 Posts
For all the blondes in the crowd (like me...lol) the FNV generator in the S3PE tool Cmo mentioned is under the Tools button at the top and is called FNV Hash. You just type in the name you want to call the painting image in the "text to hash" line and click the calculate button. Then when the numbers pop up in the line below pick the longer number as the hash you will use...it's the one in the FNV64 line. Just highlight that number with your mouse and hit ctrl C to copy it. Then click ctrl V to just paste it right into the Instance Line of your Resource Details box when you import your IMG.
Ellacharm taught me this and she kindly posted pics of how to do it in Cmo's original thread about all of this here:
http://www.modthesims.info/showthre...t=375638&page=2
(Also, you don't have to thank me Cmo...this was all your doing and your work.)
OM
10th Nov 2009 at 4:47 PM
Posts: 1,740
Thanks: 107801 in 53 Posts
| (Also, you don't have to thank me Cmo...this was all your doing and your work.) |
| (• ◡•)| (❍ᴥ❍ʋ) [◕ ‿ ◕]
11th Nov 2009 at 12:02 AM
Posts: 291
Thanks: 11531 in 41 Posts

I'm blonde ! I'm blonde !!
… Therefore, I will give this tutorial a try as soon as possible. (…Because of course, that's a logical chain of events).
If blonde OM can do it, then so can I.

Thank you Cmomoney !
11th Nov 2009 at 1:50 AM
Last edited by orangemittens : 11th Nov 2009 at 11:19 PM.
Reason: Just saw HT's post
Posts: 2,932
Thanks: 15574 in 28 Posts
Lol HT...that's Blondie to you.
OM
 3rd May 2010 at 8:38 PM
I am Ghost. My husband is sidneydoj. I post, he downloads, and I wanted to keep my post count.
Group for Avatar Makers* Funny Stories *2017 Yearbook
4th May 2010 at 1:00 AM
Posts: 2,932
Thanks: 15574 in 28 Posts
 27th May 2010 at 2:17 AM
Posts: 3
29th May 2010 at 8:04 PM
Posts: 1,740
Thanks: 107801 in 53 Posts
| (• ◡•)| (❍ᴥ❍ʋ) [◕ ‿ ◕]
1st Jun 2010 at 12:44 AM
Posts: 3
1st Jun 2010 at 2:51 AM
Posts: 1,740
Thanks: 107801 in 53 Posts
| (• ◡•)| (❍ᴥ❍ʋ) [◕ ‿ ◕]
2nd Jun 2010 at 3:53 PM
Posts: 3
2nd Jun 2010 at 5:19 PM
Posts: 1,740
Thanks: 107801 in 53 Posts
| (• ◡•)| (❍ᴥ❍ʋ) [◕ ‿ ◕]
15th Jul 2010 at 1:19 AM
Last edited by Plum : 15th Jul 2010 at 4:04 AM.
Posts: 461
Thanks: 19034 in 60 Posts
| In posters like that, the image used is applied in the MLOD. IMO, the easiest way to make a poster w/multiple images would be to move the mesh/images into a painting that already has a material and presets. |
I have no idea what that means. *cry*
Is there a tutorial for that step or shall I just fux around until it works or my head explodes?
I must turn the "goth painting" into a series of Disney princess posters! For great justice!
ETA: Oh damn, I'm even more stupid than I thought; I can't get this to work at all! I can only get it to display the main image. xP
Oh well. Back to being useless.
15th Jul 2010 at 4:19 AM
Posts: 1,740
Thanks: 107801 in 53 Posts
| (• ◡•)| (❍ᴥ❍ʋ) [◕ ‿ ◕]
15th Jul 2010 at 6:54 AM
Posts: 461
Thanks: 19034 in 60 Posts
I open the TGI Block List Editor for each of the "Materials" and I see that list, but I don't see any IMGs with the Instances of the DDS files that I imported. So I just copy/pasted the Instances I made anyway right into that field, but it didn't appear to be the correct thing to do.
I also wanted to put more images than in the original file, so I hit "Copy" a few times to add new Materials and changed the "Unknown3" by +1 since... I dunno, that seemed to be the thing to do.
Regardless, when I loaded it into my game it was showing all nine variations I wanted, but the poster inside of the frame remained the same.
Thanks in advance if you're able to help. If not, thanks for pondering on it at least.
15th Jul 2010 at 11:35 AM
Posts: 2,932
Thanks: 15574 in 28 Posts
The EA paintings with multiple frame choices (multiple materials) have a single image to start (as you know) but a different material for each of the frame choices you see in-game. Each of those material choices is set up so it will reference the same instance of a dds IMG...that is, each is referencing the main image you see when you hang that painting on your wall in-game. Because they all reference the same instance number you see the same IMG in the game.So what you're doing in this tutorial is 1. adding new dds IMG's with unique instance numbers and then 2. opening up each material choice in S3PE so you can change the instance number of the dds IMG it is referencing from the old EA main image to one of the instance numbers you assigned to your new dds IMG's that you added.
So in step four you will not see the new instance numbers of the dds IMG's that you added until you change them manually. The key is changing the right line in the TGI Block List Editor.
To figure out which line that is you need to look at the name of the IMG that has the EA painting image on it that you're trying to change. Find the instance number right before the actual name of the painting as illustrated above in the tutorial in step 2. Write that number down or copy/paste it into a TXT document.
Then, after you've imported your new, renamed IMG's open the TGI Block List Editor and look for the line that has the same instance number as the main EA dds IMG has. This will be the number you have written down. This is the number you need to replace with your new instance number. If you replace any of the other numbers or just add your new one this will not direct the game to look at your dds IMG. It will still be using the line that has the old instance number sitting there unchanged.
I would try that first before moving on to adding new painting images to your package. Once you've successfully done that, copy that package and put the copy away so you can pull it out and try again should something go wrong when you try to add new IMG's to the painting.
As far as hitting copy and adding you were right to change the Unknown 3 number. It's unclear exactly why that didn't work...it could be you didn't change the right instance number and so the game is still looking at the unchanged main dds IMG number. But it also could be that when you changed the Unknown 3 number that this change didn't "take". I had a version of S3PE that, for whatever reason, was not making this change stick. When I updated to the latest QA version that problem went away.
But anyway, try making one change at a time. Get the method for just changing the images down first before trying to add them...that's my advice.
20th Jul 2010 at 5:53 AM
Last edited by Plum : 20th Jul 2010 at 8:09 PM.
Posts: 461
Thanks: 19034 in 60 Posts
Ooooooh, I see. Your explanation helped me better understand what I was doing, so when I went back and read the step I realized I hadn't processed a few important words:
| In the TGI Block List Editor, Select the _IMG with the same instance number as the original paintings image (5th in the list). |
I selected it, then pasted the new instance number. I was a little confused and thought I was looking for my imported instance numbers on that list, and so I suppose I was pasting the new instance numbers into the wrong field. Shame on me.
And copying the material, changing the Unknown 3 by +1 and adding the rest of the instance numbers gave my painting the nine variations I desired.
Thank you so much for your help!
Now lets see if I survive the next tutorial...

ETA: And here is what you helped me with! Thanks again!
1st Aug 2010 at 2:19 AM
Posts: 35
1st Aug 2010 at 3:07 AM
Posts: 2,932
Thanks: 15574 in 28 Posts
1st Aug 2010 at 3:24 AM
Posts: 35
1st Aug 2010 at 6:52 AM
Last edited by LoserInc : 2nd Aug 2010 at 1:34 AM.
Posts: 35
***edit***
nope, I didn't. thought I did. For some reason, the same picture shows up in every frame. I think I may finally give up on this

***edit edit***
Found the problem. When using the FNV hash, I was copying those numbers to notepad to paste into the block editor thing. I did not realize that when I imported them into S3PE that those numbers changed. *whew* so, yeah, I DID IT!!!!
8th Aug 2010 at 6:50 PM
Posts: 2
8th Aug 2010 at 6:59 PM
Posts: 19
Thanks: 187 in 1 Posts
I tried importing them at once and simply clicked ok not changing any of the settings of the Import files pop-up boxed, followed the rest of the tutorial and saved, although again I am not sure what you mean by renumber in S3oc, so missed that out.
Then tested it in my game - the 3 pictures do show up once placed on a wall, but when viewing the image beforehand (the spinning icon) and when I'm about to put the image on the wall, it only shows up as a wooden frame with no picture on, and so even though once the picture is actually placed the image appears, I can't help but worry that there is some kind of problem/something I haven't done that is causing the image to only show up as a pictureless frame at first.
8th Aug 2010 at 7:01 PM
Posts: 19
Thanks: 187 in 1 Posts
| In step 3, I can't find the OBJD or anything. I imported the pictures and now I'm stuck. I'm using the modern painting, if that has anything to do with it. |
OBJD is under the TAG column like the _IMG files.
If the Tag column doesn't show up, simply drag what looks like the end of the Name column out to the right as though you are making the column wider, the Tag column should appear then.
Who Posted
|
|