 Sign in to Mod The Sims
- Site Map >
- Modding and Creation >
- Sims 3 Creation >
- Tutorials >
- CAS Parts - Tutorial: Creating a color tattoo with GIMP and Tattooinator
- Site Map >
- Modding and Creation >
- Sims 3 Creation >
- Tutorials >
- CAS Parts - Tutorial: Creating a color tattoo with GIMP and Tattooinator
#1
 10th Jul 2010 at 3:30 PM
Last edited by CmarNYC : 16th Jul 2011 at 10:03 PM.
Reason: Link to PsP tutorial, tip on blurring
10th Jul 2010 at 3:30 PM
Last edited by CmarNYC : 16th Jul 2011 at 10:03 PM.
Reason: Link to PsP tutorial, tip on blurring
10th Jul 2010 at 3:30 PM
Last edited by CmarNYC : 16th Jul 2011 at 10:03 PM.
Reason: Link to PsP tutorial, tip on blurring
GIMP is an excellent free image editor. Get it here: http://www.gimp.org/
And the GIMP plugin you'll need to read/write DDS images: http://registry.gimp.org/node/70
Get Tattooinator here: http://www.modthesims.info/download.php?t=410592 (Grab the 8/13/2010 update to make tattoos compatible with base game as well as Ambitions.)
1. I create a new 512 x 512 image in GIMP, keeping the white background for now.
After pasting the drawing into the image I do a little editing to clean it up and resize it. After the black and white drawing is just the way I want, I do a 'Copy visible' to copy the uncolored drawing for use later. (To be safe, you may want to paste it into a second, temporary 512 x 512 drawing.)

2. Now I use the paintbrush to fill the petals with pure red, the leaves with pure green, and the stems with pure blue. In most cases you should stick with pure colors. You can ensure pure colors by using the 'HTML notation' box in the color selection tool - red = ff0000, green = 00ff00, blue = 0000ff. In most cases red should be your main color, followed by green, followed by blue. Keep in mind these are not intended to be realistic or final colors - you'll pick the actual colors later in the CAS presets.
Don't worry about painting over the black lines - you're going to put them in the alpha channel where they will be layered on top of the image. Just don't color outside the borders of the tattoo into where the skin will show.


3. With the coloring all done, I switch to black and use bucket fill with a high threshold (like 150) to fill the background with black. If you get a white border around your image your threshold isn't high enough.

4. I go to the Layers, Channel, Paths, Undo panel and select the Layers tab. I right-click the Background layer and click 'Add Alpha Channel'. Then I right-click the Background layer again and click 'Add Layer Mask'. In the popup that appears I select 'Transfer Layer's Alpha Channel'. And I right-click the Background layer a third time, and click 'Show Layer Mask'. The image should turn white and you should now have both 'Show Layer Mask' and 'Edit Layer Mask' checked. This procedure sets up a layer that lets me edit my alpha channel separately from the Red, Green, and Blue channels.

5. Now I paste in my original, uncolored line drawing, then click Colors in the menu bar, and Invert. Black and white in the image are reversed. To apply my changes, I right-click the pasted floating selection in the Layers tab and click Anchor Layer.
In the game the mask's white parts will be black (or any other color you assign to the alpha channel) and the black parts will be transparent.

6. Then I right-click the Background layer and click Apply Layer Mask. What was white in the mask disappears and lets the RGB channels show through, and what was black becomes transparency (looks like a checkerboard pattern in GIMP) as the mask is applied to the alpha channel.
The image now looks like a checkerboard with a black and colored outline of the flower.

7. Save your image. If you want to use compression, DXT5 is probably best. You can use DXT3 if you don't have any shading in your Alpha channel. DXT1 will basically just show your alpha channel in black. Be sure to check off 'Generate mipmaps'. (If you need to open the file again, make sure 'Load mipmaps' is NOT checked.)
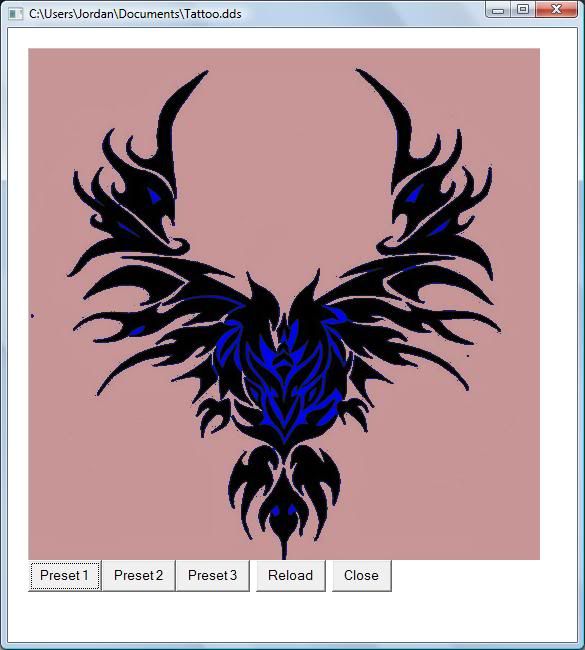
8. Now for Tattooinator. Start it up and fill in a name for your tattoo. Select the DDS image you just saved. Click the Preview Tattoo Image button to see how your tattoo will look in the game and whether you've done anything wrong. If you change your DDS image, click the Reload button to refresh the preview. At this point you can fiddle with the preset colors to get three combinations you like.
Don't forget to click the Enable button for all the channels you want to be recolorable - in this case Red, Green, and Blue. Leaving a color disabled will not affect it in any other way than that it won't be recolorable. In the case of this tattoo, I'm leaving the alpha disabled so the outline will always be black.
When you're satisfied, click the button to make a package.

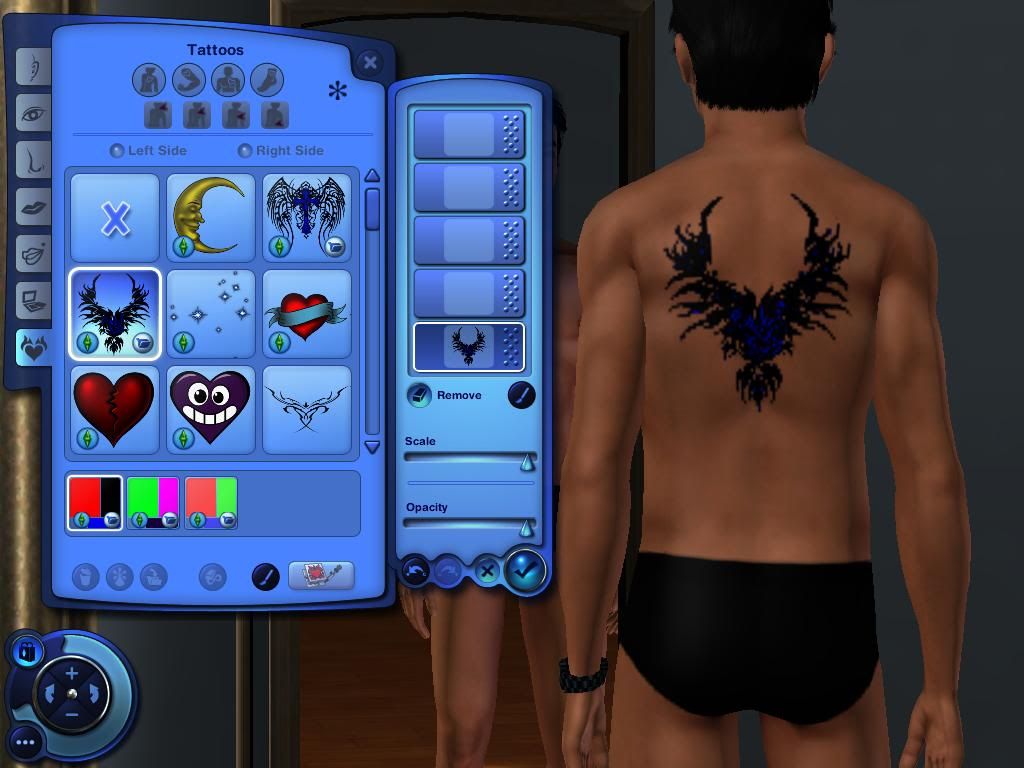
And here's the final tattoo in CAS. It would probably look better with thicker lines, especially at smaller sizes, but this is just an exercise.

You can use your own procedures for creating images as long as you follow these general principles:
The background, where the skin should show, must be pure black.
The alpha channel must be transparent/checkerboard where the colors of the tattoo should show, and black where you want black. It can be shaded for a contouring effect. It can also be used as a fourth color if you wish, in which case the black areas can be made recolorable. In some cases you can invert an image and paste it into the alpha to create shading.
You MUST have an alpha channel or your tattoo will be invisible or all black.
Use areas of pure colors when creating your tattoo. Pasting a photo into a tattoo will not give you the results you expect. (When I tried I got the Mona Lisa with white hair and blue-green skin.)
The Enable buttons in Tattooinator control whether or not a channel is recolorable. This has no other effect on appearance.
For single-color tattoos, it's best to use the Red channel alone - create your tattoo in pure red and erase the entire alpha channel to transparency. Your tattoo will look like a blank checkerboard in GIMP but the Tattooinator previewer will show you your image.
** Edit: *************
WolfoftheNyght has done a great tutorial on making tattoos using Paintshop Pro: http://www.modthesims.info/showthread.php?t=414778
And an additional tip: Applying a blur to your tattoo, especially in the alpha, will reduce staircasing/pixellation at the edges and give you a smoother effect.
** Later edit: ********
Making large areas of your tattoo close to the edges of your image (especially the top) may result in strange lines appearing on the opposite side of the tattoo. You may need to make the tattoo a little smaller to stay away from the edges.
34 users say thanks for this.
(Who?)
Thanks
Advertisement
Test Subject
#2
12th Jul 2010 at 8:19 PM
12th Jul 2010 at 8:19 PM
Posts: 11
Is there a way to have colours in the tattoo not Red, Green or Blue so that they show up as non-recolourable? I have some images I want to make into tattoos but they have more than 4 colours in them. I tried to make 2 of the colours their normal colours, but they ended up completely different in the previewer. I even tried inverting them in case that was the problem, but in the previewer they were completely different again!
Any help would be much appreciated =D
Any help would be much appreciated =D
#3
12th Jul 2010 at 9:16 PM
12th Jul 2010 at 9:16 PM
Quote: Originally posted by Maxthedm
|
Is there a way to have colours in the tattoo not Red, Green or Blue so that they show up as non-recolourable? I have some images I want to make into tattoos but they have more than 4 colours in them. I tried to make 2 of the colours their normal colours, but they ended up completely different in the previewer. I even tried inverting them in case that was the problem, but in the previewer they were completely different again! Any help would be much appreciated =D |
I haven't specifically tried this but probably you can set all four colors to whatever you want them to be and disable them so you get a tattoo with no recolorable channels.
Unfortunately a photo-type range of colors is going to be very difficult to get looking right. What seems to be happening is that the RGBA channels get layered on top of each other, with red on the bottom, then green, blue, and alpha on top. Instead of blending in the usual way, they cover the ones below them. (It's not quite that simple; how much colors blend depends on the intensity of the color in each channel.) This is why pasting a photo just doesn't work, and why graphics-type images with areas of solid color are best. It might be possible to get more than four colors with some trial and error, though.
Do try it in the game too - if you get different results from in the previewer, let me know!
If you could post one of your images and the result in the previewer or game, maybe I could suggest something.
Test Subject
#4
12th Jul 2010 at 11:35 PM
12th Jul 2010 at 11:35 PM
Posts: 7
First off, thanks SO much for this tool!
I've made a boatload of multi colored tattoos with no problem, but now I'm trying to make a single colored tattoo and I'm having some difficulties. I followed the tutorial exactly but when I import the .dds file to the Tattooinator the preview image just displays two halves of color: the Channel B color and the preview background color. What is it that I'm doing wrong?
Thanks in advance!
#5
13th Jul 2010 at 1:15 AM
13th Jul 2010 at 1:15 AM
Posts: 500
Thanks: 1858 in 30 Posts
I am not worthy! I am not worthy!
Seriously. Could you be any cooler?
I so needed this tutorial, and it is very easy to follow. Thank you!!!
Seriously. Could you be any cooler?
I so needed this tutorial, and it is very easy to follow. Thank you!!!
#6
13th Jul 2010 at 4:50 PM
Last edited by CmarNYC : 13th Jul 2010 at 5:01 PM.
13th Jul 2010 at 4:50 PM
Last edited by CmarNYC : 13th Jul 2010 at 5:01 PM.
Fragglerocks: 
I'm not sure what you mean by two halves of color - could you post screenshots of what it's supposed to look like and what you're getting?
For a one-color tattoo with no outline, you can make your tattoo in pure red (blue or green would be okay but traditionally it's red), add the alpha channel, and erase the alpha to background like this:
In the channels tab, deselect the RGB channels so only the alpha is highlighted in blue, and only the alpha will be edited (pic below).
Use the eraser tool to erase the alpha so that the entire image looks like a checkerboard.
Save as usual.

Quote: Originally posted by xleakypumpkin
|
First off, thanks SO much for this tool! I've made a boatload of multi colored tattoos with no problem, but now I'm trying to make a single colored tattoo and I'm having some difficulties. I followed the tutorial exactly but when I import the .dds file to the Tattooinator the preview image just displays two halves of color: the Channel B color and the preview background color. What is it that I'm doing wrong? Thanks in advance! |
I'm not sure what you mean by two halves of color - could you post screenshots of what it's supposed to look like and what you're getting?
For a one-color tattoo with no outline, you can make your tattoo in pure red (blue or green would be okay but traditionally it's red), add the alpha channel, and erase the alpha to background like this:
In the channels tab, deselect the RGB channels so only the alpha is highlighted in blue, and only the alpha will be edited (pic below).
Use the eraser tool to erase the alpha so that the entire image looks like a checkerboard.
Save as usual.
Test Subject
#7
13th Jul 2010 at 6:40 PM
Last edited by xleakypumpkin : 13th Jul 2010 at 7:49 PM.
13th Jul 2010 at 6:40 PM
Last edited by xleakypumpkin : 13th Jul 2010 at 7:49 PM.
Posts: 7
Quote: Originally posted by CmarNYC
|
Fragglerocks: I'm not sure what you mean by two halves of color - could you post screenshots of what it's supposed to look like and what you're getting? For a one-color tattoo with no outline, you can make your tattoo in pure red (blue or green would be okay but traditionally it's red), add the alpha channel, and erase the alpha to background like this: In the channels tab, deselect the RGB channels so only the alpha is highlighted in blue, and only the alpha will be edited (pic below). Use the eraser tool to erase the alpha so that the entire image looks like a checkerboard. Save as usual. |
When I erase the alpha channel, even though the RGB channels are deselected it still edits all four channels (RGB and alpha) and it just shows up blank in the Tattooinator. Sorry for being a pain! But I'm very unfamiliar with Gimp since I'm a Photoshop user, but even in Photoshop I can't get it to work!
EDIT: Nevermind! I got it to work. Thanks!
#8
13th Jul 2010 at 7:52 PM
13th Jul 2010 at 7:52 PM
Quote: Originally posted by xleakypumpkin
|
When I erase the alpha channel, even though the RGB channels are deselected it still edits all four channels (RGB and alpha) and it just shows up blank in the Tattooinator. Sorry for being a pain! But I'm very unfamiliar with Gimp since I'm a Photoshop user, but even in Photoshop I can't get it to work! EDIT: Nevermind! I got it to work. Thanks! |
Great!
I was about to say that you could edit the alpha using a mask and make it all black; when you apply it you'd get the same effect as erasing.
Test Subject
#9
13th Jul 2010 at 11:11 PM
13th Jul 2010 at 11:11 PM
Posts: 4
I have a problem with the tattoos being pixelated on the body when they are in the game. On the preview in tattooinator, the tattoo looks fine and not pixelated but for some reason the tattoo is very pixelated in game. Help please!!! lol
#10
14th Jul 2010 at 3:09 AM
14th Jul 2010 at 3:09 AM
Posts: 500
Thanks: 1858 in 30 Posts
Hi! I'm having a small problem I hope you can help with. It's probably something obvious that I've overlooked, but here goes anyways.
I am stuck on Step 5 because when I right click the layer, Anchor Layer is grayed out and not selectable. I hope you can help! Thanks!
I am stuck on Step 5 because when I right click the layer, Anchor Layer is grayed out and not selectable. I hope you can help! Thanks!
#11
14th Jul 2010 at 3:57 PM
14th Jul 2010 at 3:57 PM
dogafton: Without any pictures it's hard to say, but in general the tats don't look nearly as good in the game as in the previewer, especially if they have fine lines and small details and/or are smaller in size like on the arms. You can try looking at it as a full-back tattoo at maximum size to see what that looks like. If it looks much better, your problem is with the game scaling the tattoo down to a small size. If that doesn't explain it, could you post pictures in the previewer and in the game?
fragglerocks: I get that too when I add text - maybe objects work differently. Anyway, try doing a cut and then paste it right back, and see if you get the 'anchor layer' option.
fragglerocks: I get that too when I add text - maybe objects work differently. Anyway, try doing a cut and then paste it right back, and see if you get the 'anchor layer' option.
Test Subject
#12
14th Jul 2010 at 4:59 PM
14th Jul 2010 at 4:59 PM
Posts: 4
Here is the preview
Here is the in-game
Here is the in-game
#13
14th Jul 2010 at 9:33 PM
14th Jul 2010 at 9:33 PM
Posts: 500
Thanks: 1858 in 30 Posts
Well I did it! Here's my first attempt. I have it at full scale and opacity.
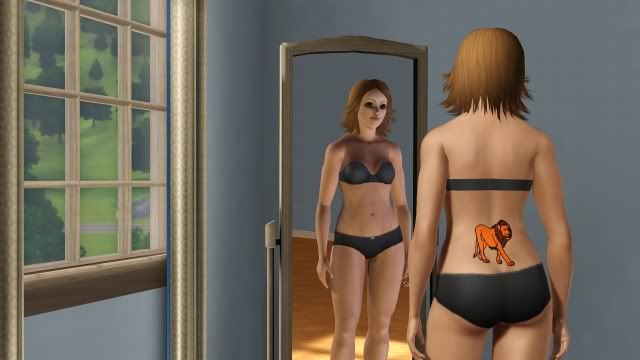
To the previous poster- I made sure I used a high threshold when I used bucket fill. Maybe that will help you?
To the previous poster- I made sure I used a high threshold when I used bucket fill. Maybe that will help you?
Test Subject
#14
14th Jul 2010 at 9:53 PM
14th Jul 2010 at 9:53 PM
Posts: 4
Thanks fragglerocks for the suggestion but it didn't work. 

#15
14th Jul 2010 at 9:57 PM
14th Jul 2010 at 9:57 PM
fragglerocks: Nice, very nice!
dogafton: As Fragglerocks refers to, your tattoo has a lot of spots and artifacting around the edges and those get magnified in the game. You need clean, sharp edges and pure black where the skin should show. My guess is that you're pasting in a grayscale or low res image. If it's grayscale, you could try increasing the contrast in the black and white image, but probably you'll end up fixing the edges by hand.
dogafton: As Fragglerocks refers to, your tattoo has a lot of spots and artifacting around the edges and those get magnified in the game. You need clean, sharp edges and pure black where the skin should show. My guess is that you're pasting in a grayscale or low res image. If it's grayscale, you could try increasing the contrast in the black and white image, but probably you'll end up fixing the edges by hand.
Test Subject
#16
14th Jul 2010 at 10:53 PM
14th Jul 2010 at 10:53 PM
Posts: 28
I feel so stupid now, and I really want this to work, but when I try to preview it in tattooinator, it just says "DDS image dimensions must be 512*512. Please try again" Of course the image size is 512*512, what is wrong?
Sorry to bother you, but this is just so great so I really want to make it work :P
Sorry to bother you, but this is just so great so I really want to make it work :P
#17
14th Jul 2010 at 11:32 PM
14th Jul 2010 at 11:32 PM
In the top of the GIMP image window, does it say 512 x 512?
Test Subject
#18
14th Jul 2010 at 11:44 PM
14th Jul 2010 at 11:44 PM
Posts: 28
Yes, it does
#19
15th Jul 2010 at 12:09 AM
15th Jul 2010 at 12:09 AM
The previewer reads the dimensions right from the .dds file so that's very strange. Can you upload your image file here or pm me a link so I can take a look at it?
Forum Resident
#20
15th Jul 2010 at 1:47 AM
Last edited by ShortyBoo : 15th Jul 2010 at 3:28 AM.
15th Jul 2010 at 1:47 AM
Last edited by ShortyBoo : 15th Jul 2010 at 3:28 AM.
Posts: 831
I was going to try this out (even though I'm much more comfortable with Photoshop) but when I went to the link to get the DDS plug in, I couldn't find any download link there. Do I have to register to that site to download or something?
EDIT: Ok, I figured it out. I think NoScript was messing with the page.
EDIT: Ok, I figured it out. I think NoScript was messing with the page.
Test Subject
#21
15th Jul 2010 at 11:42 AM
15th Jul 2010 at 11:42 AM
Posts: 15
this is awsome, but im more familiar with photoshop, i got so far with photoshop and failed lol (i was ok up till the adding alpha channles) is there a tutorial for that?
~Simsoholic since 2000~
#22
15th Jul 2010 at 12:57 PM
15th Jul 2010 at 12:57 PM
I don't know of a Photoshop tutorial for tattoos yet. There are some for clothing and it's a very similar process.
Test Subject
#23
15th Jul 2010 at 4:24 PM
15th Jul 2010 at 4:24 PM
Posts: 28
I figured it out, I don't now what, but obviously I did something wrong... I've got the tattoo in the game now, but can't get into the "Advanced mode" (If that's what it's called in english?) for the tattoo I made. Can't change scale or opacity... What am I doing wrong this time? x)
#24
15th Jul 2010 at 10:41 PM
15th Jul 2010 at 10:41 PM
Does Advanced work for other tattoos? If so, something's still wrong with your tattoo. If not, something's wrong in your game!
Test Subject
#25
15th Jul 2010 at 10:45 PM
15th Jul 2010 at 10:45 PM
Posts: 28
When I use the tattoo it kind of eff up the Advanced for the others, but suddenly it works again... I think I'll just try a few more times and maybe get it right :P
Who Posted
|
|