Hi there! You are currently browsing as a guest. Why not create an account? Then you get less ads, can thank creators, post feedback, keep a list of your favourites, and more!
Sockpuppet
Original Poster
#1 Old 20th Sep 2012 at 11:36 AM Last edited by BloomsBase : 18th Feb 2013 at 10:43 AM.
Default Tutorial, Rigging from scratch
This is a tutorial wich explains a easy way to (re)assigne the boneassignements on a sims 2 mesh.

Wat you need?
*Unimesh sims 2 plugin for Milkshape(http://www.modthesims.info/showthread.php?t=122399)
*TSRW for sims 3(http://www.thesimsresource.com/workshop)
After installing TSRW go to its installation directory and copy the 2 milkshape plugins located in the extra's folder(msTSRWorkshopExport.dll and msTSRWorkshopImport.dll)
Past these 2 in your Milkshape installation folder.(When done you can uninstall slim DX and TSRW if you like)
Note, you dont have to install TSRW if you either do not want to or just can't.
You also can:
Unpack the ZIP, then unpack the EXE.
Look for the 2 following files:
msTSRWorkshopImport.
msTSRWorkshopExport.
*Cmar's Toolkit for sims 3(http://www.modthesims.info/d/481950)

-After creating your new ''frenkensteined'' mesh go to the groupstab and rename the top, bottom or body to group_base
-Export the mesh as WSO file(export/TSRW Object)

Now go look for a existing mesh that has a similar shape to the mesh you created, the more closer that shape is the better the new assignements will be!
(Browse the outfits in bodyshop, clone one that comes closest, make a meshfile and extract its gmdc)

-Import that original mesh in Milkshape and click yes on the quistion''some skinweights do not total 100%, Do you want these corrected?''
-Rename the meshgroup to group_base
-Export the mesh as WSO file(name it referencemesh or something like that)


Open up Toolkit:
-Go to autotools for WSO tab
-in the auto assign bones tab you select your frenkensteined mesh in the
''WSO mesh to modify'' box
-load the reference mesh in the 2nd box
Leave the settings as they are(interpolation and replace all boneassignements ticked).

Save your file

-Start new in Milkshape and import the reference mesh with the unimesh importer
-Import the just saved file from Toolkit under import/TSRW Object.(do NOT import additional joints)
-Fix the meshgroupname(set it back to body, bottom or top)
-Fix the meshcomments
-Delete the reference mesh and export your new mesh with the Unimesh exporter.

NOTE,
After testing this a bit more we had a small bug wich assignes 90% of the mesh to the auskel joint,
Vertice with Auskel Assignements(1 to 4%) can cause deformations.
You can check this when hitting the anim button in Milkshape, alot of verts will drop a little.
To fix this you need to kill the auskel assignements:


-Import the mesh you just created.(as unimesh mesh)
-double click the auskel joint listed in the joint tab, then rename it(any name will do, i used 123456)
-You export as half life smd(reference and boneweights ticked)
-start new and import the reference mesh
-Import the smd file with skeleton and faces ticked(this can take a moment) under half life SMD import
-When hitting the anim button the vertice no longer drops(when done correct)
-Rename the meshgroup to body
-Fix the comments
-Delete the reference mesh
-Export as Unimesh

You can always have a look in Milkshape how the meshparts bend:
Enable ANIM(Window/Show keyframer)
Unhide skeleton from the joint tab
Hit ANIM, bottom right
select(tick joints in select options)
select a joint and choose rotate

Or load a animation file, here are a few:
http://www.insimenator.org/index.php/topic,74621.0.html
-----------------------------------------------------------------------------------------------------------------------------------------
Morphs:
You can use the same process to create the fat and pregnant morph, toolkit can copy morphs aswell.
Create a reference mesh and rename the normal mesh and morphs:
group_base
group_fat
group_special
(wich is the pregnant morph)
Export as WSO

On your custom rename the normal mesh to
group_base
Export as WSO

Open up Toolkit and under ''auto tools for WSO''/''Auto create morphs'' you can import both files.
When done import the file as WSO in MS, fix the names and comments and export as unimesh.
Advertisement
Test Subject
#2 Old 20th Sep 2012 at 1:32 PM
Okay, i tried following every step. But i've got a problem.
First, the reference mesh... must it be from The Sims 3 ? Or The Sims 2 ?
Then, must this reference mesh be already assigned ? (I mean like a base game model from sims 2 which has already everything assigned) ?
Because i tried importing a Female base game model (already assigned) in milkshape, exported it to WSO, but when i try to "autoassign" both mesh in Toolkit, i just get an error which tells me to close or to continue... If i continue, it won't.. continue xD
And if i do it with a reference mesh that has not any joints (for example, an .obj), Toolkit will just tell me the same...
Help ? :p
Sockpuppet
Original Poster
#3 Old 20th Sep 2012 at 1:33 PM
yes, you need a already boneassigned sims 2 mesh as reference mesh
Just took another unassigned mesh and it works like a charm, hopefully others will test this out to make sure.
Upload your mesh if you can not figure it out and ill have a go
Test Subject
#4 Old 20th Sep 2012 at 1:44 PM Last edited by sim2fanyea : 20th Sep 2012 at 1:59 PM.
Okay i've got something now...
But now there's another error message haha !


Edit² : Oh, i tried using another reference mesh directly extracted from game and it worked. Thanks a lot !! =)
Sockpuppet
Original Poster
#5 Old 20th Sep 2012 at 2:10 PM Last edited by BloomsBase : 20th Sep 2012 at 3:12 PM.
i have no problems with your mesh, did you name it to group_base?
I did notice that after reassigning the whole mesh was assigned to 1% auskel wich shouldn't have happened(something that didn't happen on my testmesh)
Have a look at it ingame and see if that 1% messes things up(it did when using the ANIM button in Milkshape)
I did replace the underarm and hands to see if it makes a diffrence
Test Subject
#6 Old 20th Sep 2012 at 2:36 PM
Thanks for trying, but it's okay it worked for me. I just had to fix some little parts that weren't well assigned (The pinky on both hands and the spines 0,1 and 2 ) and it moves good enough now ! Still not as perfect as base mesh haha but it's almost it !
As a reference mesh, i used the female burglar from the base game.
Thanks a lot for this tutorial, it's awesome ! =)
Sockpuppet
Original Poster
#7 Old 20th Sep 2012 at 3:09 PM
i managed to get rid of the auskel joint assignements, animates really nice.
Wanted to upload a avi but its 267mb....lol
if you want the meshfile let me know?
Test Subject
#8 Old 20th Sep 2012 at 3:39 PM
Well, after thinking, i would love to have it, thank you a lot !
Sockpuppet
Original Poster
#9 Old 20th Sep 2012 at 4:21 PM Last edited by BloomsBase : 20th Sep 2012 at 7:28 PM.
Let me know if you have it so i can remove link
Demon Sheep
retired moderator
#10 Old 20th Sep 2012 at 8:06 PM
I just tried this on a teddy bear mesh and it worked wonderfully. So quick and easy! Have no idea how I would've converted this bear without your tutorial, so thanks a zillion! Gonna move this over to the tutorials area for you.

Just one question. Now that the Milkshape plugins are copied over, can I uninstall TSRW? I don't have Sims 3 so would rather uninstall that if it's not needed. And what about the SlimDX Runtime.NET that TSRW installed? Do I need to keep that or can it be uninstalled too (assuming TSRW can be uninstalled)?
Sockpuppet
Original Poster
#11 Old 20th Sep 2012 at 8:37 PM
yes, you can uninstall it.
First i thought uploading the plugins but i better not do that

Bear?, i did something like that for kids once as outfit.
http://www.insimenator.org/index.php/topic,91404.0.html
Demon Sheep
retired moderator
#12 Old 20th Sep 2012 at 8:48 PM
Yeah uploading the plugins here would be easier for folks, but I supposed it would also be stealing. Darnit.

Oh my gosh that bear is SO CUTE! LOL! But I actually made a teddybear object. As you know, the teddybear has bone assignments similar to clothing, so I used this method to turn an .obj mesh (which a friend had exported from Sims 3) into a working Sims 2 teddy bear that animates when played with. So this method works even for objects, not just bodyshop content.
Sockpuppet
Original Poster
#13 Old 20th Sep 2012 at 8:49 PM
Sweet!
And thank you for moving the thread.
Lab Assistant
#14 Old 24th Sep 2012 at 12:45 AM Last edited by Cynnix : 24th Sep 2012 at 10:16 PM.
I found this tutorial when I was downloading Fanseelamb's bear I'm so happy you've made the process easier. It took me ages to get the bones assigned on my TSM to TS2 town crier mesh. The next one I convert I'll use this,Thanks BloomsBase!

ETA...and done! Thanks so much!!!

Sockpuppet
Original Poster
#15 Old 25th Sep 2012 at 11:44 AM
C00l
Lab Assistant
#16 Old 25th Sep 2012 at 5:09 PM
I'm having a problem with a mesh I converted this morning, it had the auskel joint listed. I tried to follow your instructions to fix it but the fixed files crashed the game. I tried importing a previous version of the gmdc into the mesh and that crashed the game too. I rebuilt the mesh packages and used the previous version and the game doesn't crash, but the auskel joint is assigned.
Sockpuppet
Original Poster
#17 Old 25th Sep 2012 at 7:07 PM
make sure you start off with a unedited basegame gmdc in Milkshape before reimporting the smd file back.
other then that i wouldn't know.
I fixed 2 high polygon meshes from sims2fanyea and they worked ok(well, i didn't hear her after )

Also make sure not to forget the comments after the smd import.

I no longer have sims 2 installed so i cant be much of a help there.....
Lab Assistant
#18 Old 25th Sep 2012 at 9:05 PM
Hey Bloom, I tried out the tutorial (thank you so much for it) and for the most part things are lined up except for the arms.

Here's a photo:


The bone assignments on for the TS3 (to TS2) mesh for arms are all screwy. Do I have to manually go in and adjust some of the arm joints, at least until the end of the sleeve where I can attach the TS2 body parts? I also assume I'm suppose to move the arms of the mesh so that they are T shaped.

I hope I'm being clear.
Lab Assistant
#19 Old 25th Sep 2012 at 10:50 PM
Quote:
make sure you start off with a unedited basegame gmdc in Milkshape before reimporting the smd file back. other then that i wouldn't know. I fixed 2 high polygon meshes from sims2fanyea and they worked ok(well, i didn't hear her after ) Also make sure not to forget the comments after the smd import. I no longer have sims 2 installed so i cant be much of a help there.....


Thanks, I got it working in the game aagain, but I'm really having a hard time with this one. I have edited the bone assignments, opened the game and SimPE darn near forty times today 
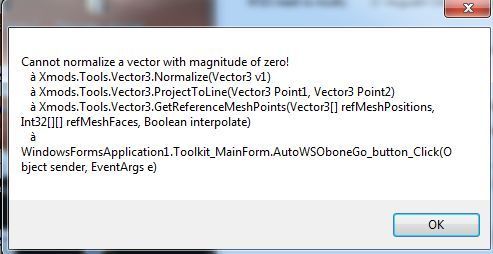
I'm getting various versions of this


this is the best I was able to get it, but I just can't seem to fix it that one little jagged bit won't cooperate with me.

Sockpuppet
Original Poster
#20 Old 25th Sep 2012 at 11:18 PM Last edited by BloomsBase : 25th Sep 2012 at 11:35 PM.
prolly is just one bone assignement, shouldn't be to hard to find?
If you cant figure it out mail it to me and ill check it out tomorrow


I haven't tested it yet but i think you better rename the auskel on the reference mesh.
Then import a basegamemesh in MS, then the one out of toolkit


Always make sure underweighted bones are fixed aswell on the reference mesh before loading it in Toolkit
Those are causing the error(Toolkit assignes them to the auskel and other random joints)
Sockpuppet
Original Poster
#21 Old 25th Sep 2012 at 11:21 PM Last edited by BloomsBase : 25th Sep 2012 at 11:33 PM.
Quote: Originally posted by Wildchild453
Hey Bloom, I tried out the tutorial (thank you so much for it) and for the most part things are lined up except for the arms.

Here's a photo:


The bone assignments on for the TS3 (to TS2) mesh for arms are all screwy. Do I have to manually go in and adjust some of the arm joints, at least until the end of the sleeve where I can attach the TS2 body parts? I also assume I'm suppose to move the arms of the mesh so that they are T shaped.

I hope I'm being clear.


I am not sure wat you are trying to do?
This is a sims 2 tutorial and hasn't anything to do with sims 3 meshes.
Only sims 3 tools are used not meshes.

edit,
oh, your converting sims 3 to sims 2?
The arms you can fix by reading this tutorial: http://www.modthesims.info/showthread.php?t=407561
It is something you do while it still is a GEOM file.(TSRW files wont work, they dont have a proper rig)
The tut is a conversion from sims 2 to sims 3 so the rotation on the arm joints is the opposite then wat is written in the tutorial.
Lab Assistant
#22 Old 26th Sep 2012 at 4:53 PM
Thanks Bloom. I have another question. Do you know why MeshTool would throw this error?


I'm following the same process I did before but when I try to use a new reference mesh that's what I keep getting every time I try to make it start. I extracted a new TS3 .wso and I changed the group name and exported my reference mesh to a .wso but that keeps happening. Any help would be appreciated because it's not making any sense to me.
Sockpuppet
Original Poster
#23 Old 26th Sep 2012 at 8:05 PM
can you upload the files?
Lab Assistant
#24 Old 26th Sep 2012 at 11:23 PM
Here's a link Bloom: http://www.mediafire.com/?5db1sn8jlka4rmb

I can get it to work if I uncheck interpolation
Sockpuppet
Original Poster
#25 Old 27th Sep 2012 at 12:33 AM
lol, thats not going to work.....
how can toolkit copy the assignements if meshes are that diffrent
Page 1 of 2
Back to top