 Sign in to Mod The Sims
- Site Map >
- Modding and Creation >
- Sims 4 Creation >
- Tutorials >
- Other - Using SimRipper meshes and textures in Blender - for Dummies
- Site Map >
- Modding and Creation >
- Sims 4 Creation >
- Tutorials >
- Other - Using SimRipper meshes and textures in Blender - for Dummies
Replies: 10 (Who?), Viewed: 15412 times.
#1
 31st Mar 2020 at 3:40 PM
Last edited by CmarNYC : 31st Mar 2020 at 4:35 PM.
31st Mar 2020 at 3:40 PM
Last edited by CmarNYC : 31st Mar 2020 at 4:35 PM.
31st Mar 2020 at 3:40 PM
Last edited by CmarNYC : 31st Mar 2020 at 4:35 PM.
What this tutorial will do:
- ALL INSTRUCTIONS ARE WRITTEN FOR BLENDER 2.78. Blender versions 2.7x will probably behave the same way, but no guarantees.
- How to import and apply custom normals
- How to import and apply a texture
- How to import and apply an animation
- Bonus: setting up lights so you can actually see something
What it will not do:
- Teach you how to use SimRipper
- Teach you how to use Blender outside of these operations
- I don't know how to do any of this in 2.8x but maybe some kind Blender user will contribute that information
I hope this helps, but I'm pretty much a Blender dummy myself and if anyone has a better way of doing these things please post it in the comments.
Please do not PM me with mod, tutorial, or general modding questions or problems; post them in the thread for the mod or tutorial or post them in the appropriate forum.
Visit my blogs for other Sims content:
Online Sims - general mods for Sims 3
Offline Sims - adult mods for Sims 3 and Sims 4
3 users say thanks for this.
(Who?)
Thanks
Advertisement
#2
31st Mar 2020 at 3:41 PM
Last edited by CmarNYC : 31st Mar 2020 at 4:00 PM.
31st Mar 2020 at 3:41 PM
Last edited by CmarNYC : 31st Mar 2020 at 4:00 PM.
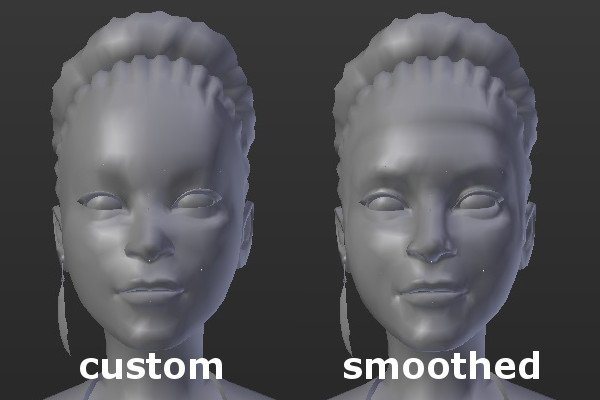
While the Collada DAE format supports normals, Blender doesn't import them for some strange reason and instead smooths the mesh. The result usually looks good, but you lose some shading that was in the EA or CC original mesh. To work around this you can import an obj version of the same mesh and transfer the normals.
1. In SimRipper, export BOTH a DAE mesh and an OBJ mesh. WHEN EXPORTING DAE, UNCHECK THE 'CLEAN DAE' OPTION.
2. In Blender, click File / Import / Collada (default) (.dae) and select the DAE mesh. Then click File / Import / Wavefront (.obj) and select the OBJ mesh. The result may look a little strange because you've got two identical meshes overlapping.
3. Now look in the upper right corner for the Scene listing. Expand the 'rig' by clicking the little + in a circle next to it. You'll see there are two 'Jesminder Bheeda' meshes: the one on the top level is the obj mesh and the one under the rig is the DAE mesh. (The name will be the name of the sim you exported.)
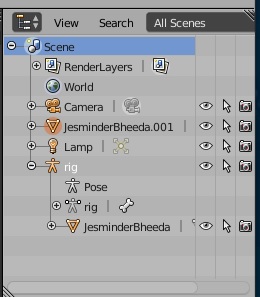
4. If you hide one or the other mesh (click the eye icon) you can see the diffence in shading between custom normals (the obj mesh) and smoothing (the DAE mesh).
5. Select the DAE mesh by clicking on it in the Scene listing. Find the little wrench (Modifiers) icon in the line of icons right under the Scene listing. Click it. You should see an 'Add Modifier' button and a block under it for a modifier which is already there, for the rig/armature. Leave that one alone.
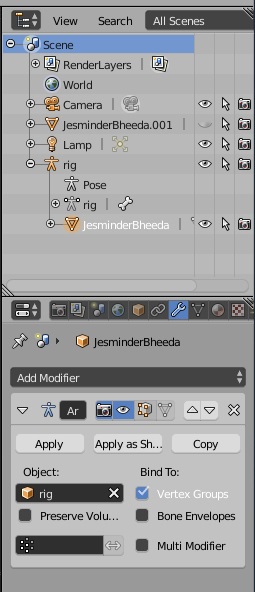
Click 'Add Modifier' and select 'Data Transfer' (You may have to expand the panel to see better.) For 'Source Object' select the obj mesh. Put a check next to 'Face Corner Data' and select Custom Normals. Next to Face Corner Data you have a selection of methods - I have the best luck with 'Topology' but you can experiment.
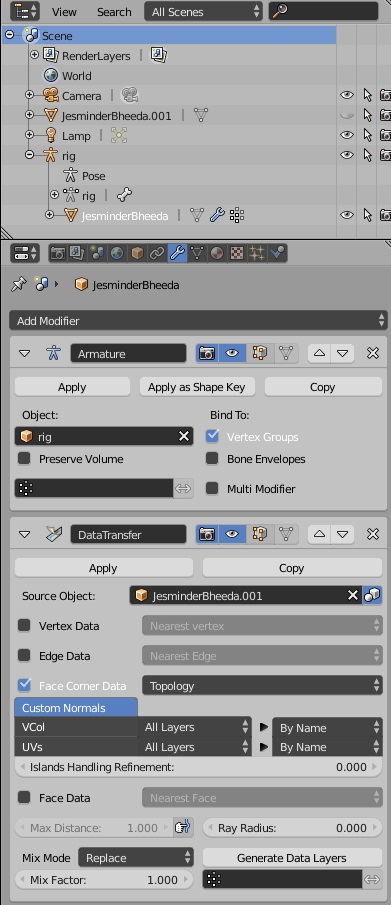
7. Click the triangle (Data) icon next to the wrench/modifier icon. Under 'Normals' put a check for 'Auto Smooth'. Scroll down, and under 'Geometry Data' click the + next to 'Add Custom Split Normals Data'. (It will change to 'Clear Custom Split Normals Data'.) This enables the mesh to accept custom normals.

8. Now go back to the wrench icon and in the data transfer modifier you added before, click the 'Apply' button.
9. Delete the obj mesh, and you're done!
You can also go the other way, and transfer the rig and bone assignments to the obj mesh: http://sims4studio.com/thread/81/we...ransfer-blender
Please do not PM me with mod, tutorial, or general modding questions or problems; post them in the thread for the mod or tutorial or post them in the appropriate forum.
Visit my blogs for other Sims content:
Online Sims - general mods for Sims 3
Offline Sims - adult mods for Sims 3 and Sims 4
#3
31st Mar 2020 at 3:41 PM
Last edited by CmarNYC : 5th Jul 2020 at 5:45 PM.
31st Mar 2020 at 3:41 PM
Last edited by CmarNYC : 5th Jul 2020 at 5:45 PM.
1. With your imported mesh selected, click the sphere (Materials) icon under the Scene listing. Click the + next to 'New' to add a material.
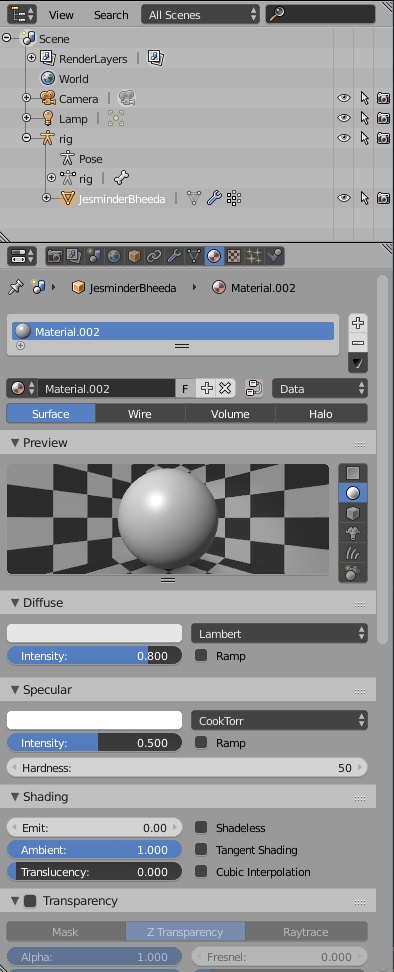
2. Now click the checkerboard (Texture) icon next to the sphere/materials icon. Again, click the + next to 'New' to add a texture.

3. In the settings for the new texture:
- Type should be 'Image or Movie'.
- Under 'Image', click the 'Open' button and select your diffuse texture exported from SimRipper.
- Under 'Mapping', make sure Coordinates are set to 'UV' and right underneath click on the blank next to Map: and select the map ending in -mesh-map-0.
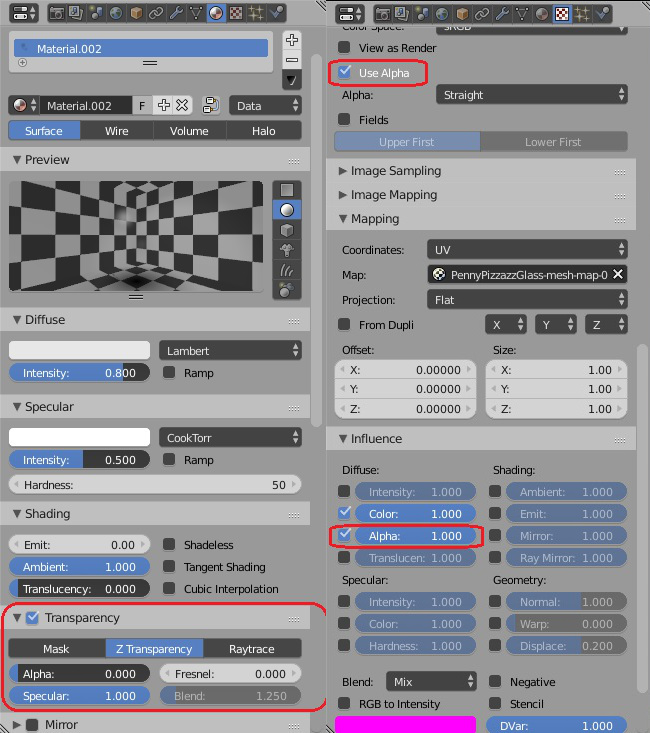
4. If you have a 'glass' mesh, or alpha hair (uses transparency) or any additional mesh that requires transparency:
- First go back to the Materials panel by clicking the sphere/Materials icon. (If you don't Blender may get confused and you could have a completely empty Texture panel.)
- Select the 'glass' or transparency mesh.
- Add a new material as above.
- Click the Texture icon and add a new texture as above.
- Select and open the diffuse 'glass', 'hair', or whatever texture image and set the mapping as above.
- In the Image section make sure Use Alpha is checked.
- Scroll down to the Influence section and check the box next to 'Alpha: 1.000' under Diffuse.
- Go back to the Materials panel, find the Transparency section, check the box next to 'Transparency', and change the number for Alpha to 0.
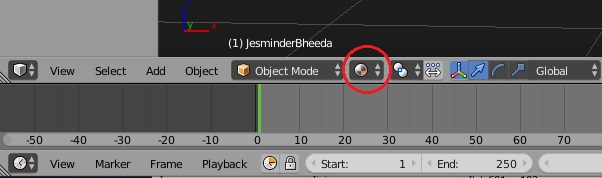
5. Now look in the lower left of the Blender screen. If you click where it says "Object Mode" and change it to "Texture Paint", you should see your sim fully textured. However, this only works for the selected mesh and will not show transparency correctly.

6. In order to use animations and transparent parts, you'll have to go back to Object Mode, click on the icon next to the mode selection and select Material. The texture will be applied but the window will be very dark. See the lighting section later on for how to fix that.
Notes: If you have a sim with alpha transparency 'glass' hair, the hair mesh (and any other transparency parts) will be in a separate mesh. In this case, you have to import and apply the 'glass' texture exported from SimRipper to the 'glass' mesh as explained above.
Please do not PM me with mod, tutorial, or general modding questions or problems; post them in the thread for the mod or tutorial or post them in the appropriate forum.
Visit my blogs for other Sims content:
Online Sims - general mods for Sims 3
Offline Sims - adult mods for Sims 3 and Sims 4
#4
31st Mar 2020 at 3:41 PM
Last edited by CmarNYC : 31st Mar 2020 at 4:19 PM.
31st Mar 2020 at 3:41 PM
Last edited by CmarNYC : 31st Mar 2020 at 4:19 PM.
First, a quick summary of how to export an animation in Sims 4 Studio: (Applies ONLY for TS4 SimRipper meshes.)
- Start S4S, click the Animation button with 'Clip Pack' selected.
- Give the package a name and save it.
- You'll get a screen with the package opened. Click the Studio / Clips tab. In the bottom section, select 'EA Clip'.
- Click the green 'Export' button. You'll get a list of EA animations. Select one and click Export. You'll get a blend with the animation.
1. Back in Blender, select the rig in the Scene listing in the upper right by clicking on it. If the visible joints (tiny lines that look like spots) bother you, hide the rig by clicking the eye next to it.
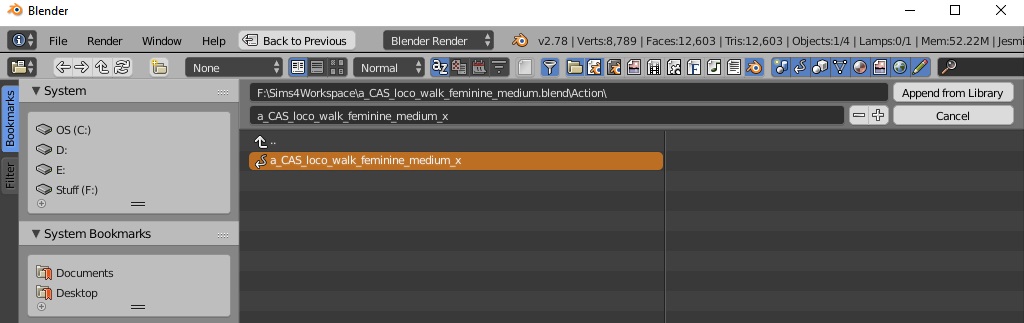
2. To append the animation, click File / Append and select the blend with your animation. You'll get a list of folders. Open 'Action' and select the animation. Click 'Append From Library'.
3. Click the button in the lower left corner of the Blender screen (the bottom row of controls) and select 'Dope Sheet'. Still in the bottom row, where it now says 'Dope Sheet', click and select 'Action Editor'.
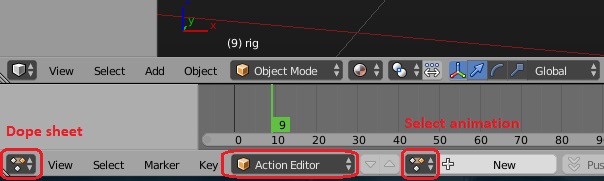
4. Click the button right next to where it now says '+ New' and select the animation.
5. Now you can click that bottom left corner button again and select Timeline, and drag the little green bar or use the playback buttons to move through the animation.
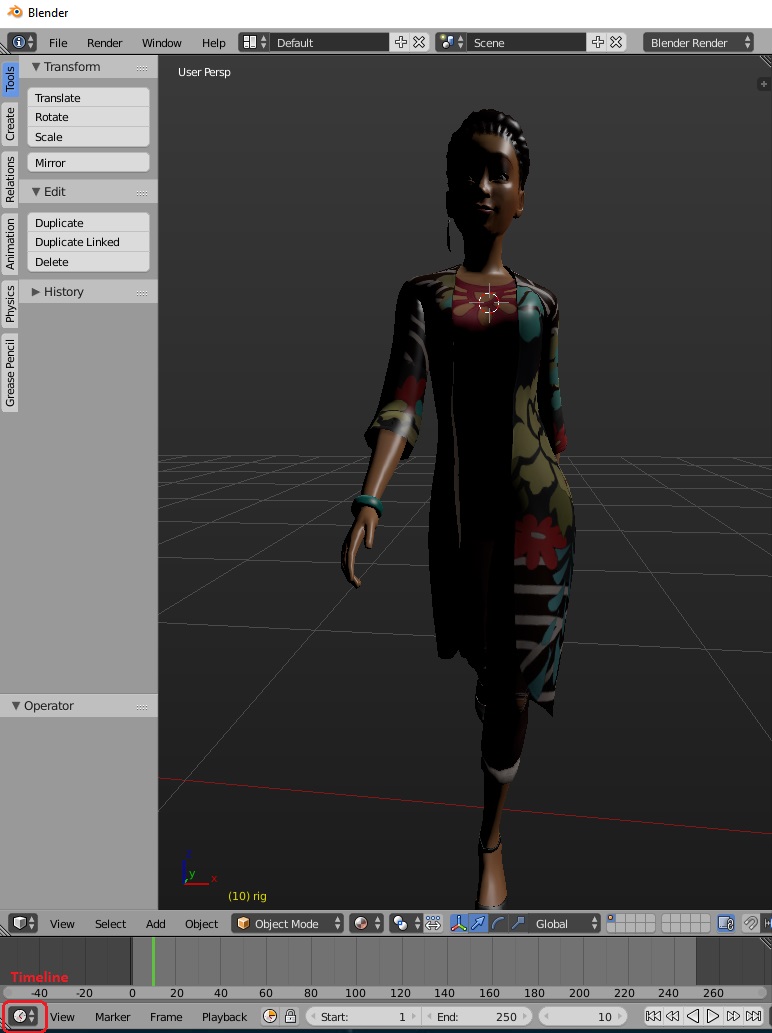
Yes, the scene is very dark. Tips on lighting are in the next section.
Please do not PM me with mod, tutorial, or general modding questions or problems; post them in the thread for the mod or tutorial or post them in the appropriate forum.
Visit my blogs for other Sims content:
Online Sims - general mods for Sims 3
Offline Sims - adult mods for Sims 3 and Sims 4
#5
31st Mar 2020 at 3:42 PM
Last edited by CmarNYC : 31st Mar 2020 at 4:26 PM.
31st Mar 2020 at 3:42 PM
Last edited by CmarNYC : 31st Mar 2020 at 4:26 PM.
Your textured and animated sim is probably looking so dark you can't see much. We need to add lighting.
1. Click on 'Lamp' in the Scene listing in the upper right. In the row of icons right under the Scene section, select the circle (World) icon. Put a check for 'Environmental Lighting'. This will brighten it up considerably.

2. Still with the Lamp selected, in the row of icons under the Scene section click the Data icon. It may look like a dot with rays coming out or it may be some other shape, depending on the lamp mode selected. In the lamp settings that appear underneath, you can try the different lamp types: Point, Sun, Spot, Hemi, or Area. I think Hemi or Sun with Specular unchecked gives the best appearance.
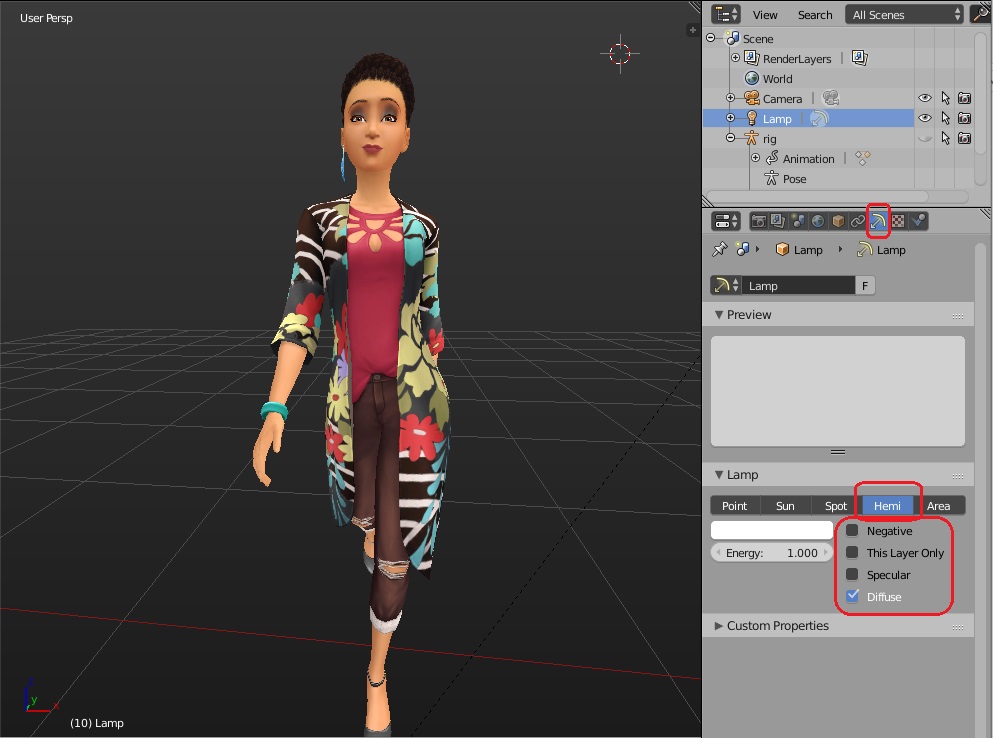
You can also experiment with moving the lamp around: zoom out far enough to see the lamp, which looks like an orange dot. Right-click it and hold to move it, then left-click to drop it in the new location.
Please do not PM me with mod, tutorial, or general modding questions or problems; post them in the thread for the mod or tutorial or post them in the appropriate forum.
Visit my blogs for other Sims content:
Online Sims - general mods for Sims 3
Offline Sims - adult mods for Sims 3 and Sims 4
Test Subject
#6
11th May 2020 at 12:30 PM
11th May 2020 at 12:30 PM
Posts: 7
I don't mean to necropost or anything, but I just wanted to give a HUGE THANK YOU, for not only creating the Sim Ripper, but taking the time to write all of this out.
You've saved me, as well as others a massive headache, that is working our way through Ninjaripper and all of the conversions and mapping required. I've been running around for days trying to find something this simple, to the point and concise. THANK YOU! For real.
You've saved me, as well as others a massive headache, that is working our way through Ninjaripper and all of the conversions and mapping required. I've been running around for days trying to find something this simple, to the point and concise. THANK YOU! For real.
#7
2nd Aug 2020 at 3:55 AM
2nd Aug 2020 at 3:55 AM
Posts: 1,348
Necropost to say this is epic!
Sims are better than us.
Sims are better than us.
#8
26th Aug 2020 at 5:04 PM
26th Aug 2020 at 5:04 PM
Posts: 3,860
Thanks: 8537 in 67 Posts
Very useful Cmar!  The lamp tip is a great one! Personally I always delete all the lamps in the scene, which (depending on which display mode you're on. For Textured it works though) it will sort of give the same views.
 The lamp tip is a great one! Personally I always delete all the lamps in the scene, which (depending on which display mode you're on. For Textured it works though) it will sort of give the same views.
#9
26th Aug 2020 at 6:13 PM
26th Aug 2020 at 6:13 PM
Quote: Originally posted by Lyralei
|
Very useful Cmar! The lamp tip is a great one! Personally I always delete all the lamps in the scene, which (depending on which display mode you're on. For Textured it works though) it will sort of give the same views.
|
Thanks! I have to do some rewriting, so I'll check out your lamp strategy.
Please do not PM me with mod, tutorial, or general modding questions or problems; post them in the thread for the mod or tutorial or post them in the appropriate forum.
Visit my blogs for other Sims content:
Online Sims - general mods for Sims 3
Offline Sims - adult mods for Sims 3 and Sims 4
Test Subject
#10
15th Apr 2023 at 8:44 PM
15th Apr 2023 at 8:44 PM
Posts: 1
Hi! Could steps 1-2 be used in creating clothing for specific body types?
#11
15th Apr 2023 at 9:09 PM
15th Apr 2023 at 9:09 PM
Quote: Originally posted by ultragubgub
| Hi! Could steps 1-2 be used in creating clothing for specific body types? |
I'm not sure what you mean. Clothing should be made for the neutral body and specific body types achieved with morphs.
Please do not PM me with mod, tutorial, or general modding questions or problems; post them in the thread for the mod or tutorial or post them in the appropriate forum.
Visit my blogs for other Sims content:
Online Sims - general mods for Sims 3
Offline Sims - adult mods for Sims 3 and Sims 4
Who Posted
|
|