 Sign in to Mod The Sims
- Site Map >
- Modding and Creation >
- Sims 3 Creation >
- Tutorials >
- CAS Parts - TUTORIAL: Hair Creation Start to Finish (2023)
- Site Map >
- Modding and Creation >
- Sims 3 Creation >
- Tutorials >
- CAS Parts - TUTORIAL: Hair Creation Start to Finish (2023)
Replies: 3 (Who?), Viewed: 1529 times.
#1
 29th May 2023 at 1:23 PM
Last edited by CardinalSims : 19th Dec 2023 at 1:57 AM.
Reason: Added Part 2 Link.
29th May 2023 at 1:23 PM
Last edited by CardinalSims : 19th Dec 2023 at 1:57 AM.
Reason: Added Part 2 Link.
29th May 2023 at 1:23 PM
Last edited by CardinalSims : 19th Dec 2023 at 1:57 AM.
Reason: Added Part 2 Link.
Posts: 482
Thanks: 10 in 2 Posts
TUTORIAL: Hair Creation Start to Finish (2023)
PART ONE: Mesh and Texture Starting PointNO MILKSHAPE OR TSRW REQUIRED. Welcome to enlightenment.
Requirements
Blender 2.8-3.x (tutorial is written with 2.93 )
GEOM Tools
Photoshop + DDS Plugin or GIMP
S3OC
S3PE
SimGeom Editor
MeshToolkit
Process Index
- Import Mesh to Blender
- Add Material Properties
- Remove Unwanted Geometry
- Optimize Texture and UV Map
- Edit Mesh
- Create Underside
- Clone an EA Hair
- Prepare for Export with GEOM Tools
- SimGeom Editor Fix
- Bone Assignment in MTK
The most basic components you will need to create a fully functional (game standard of quality and completion) hair are
- Any Blender compatible mesh saved as .obj, or an existing GEOM
- The texture it is mapped to.
- To trust me that it may be intimidating to learn, but this combination of new and overlooked tools is the easiest to master and provides the most reliable results. The tutorial is only so long to provide all valuable information.
DISCLAIMER:
The only thing this part of the tutorial doesn’t cover is multi-group hair ie Hat Hair. There will be a tutorial on hat hair assembly after this one. Please only use meshes where every piece is hair.
The only thing this part of the tutorial doesn’t cover is multi-group hair ie Hat Hair. There will be a tutorial on hat hair assembly after this one. Please only use meshes where every piece is hair.
Appropriate Mesh Details:
10k Faces/Polygons is the higher limit for playability. You are free to use far denser meshes for your own purposes, just be aware that Sims with high poly CASParts will take noticeably longer to render out of their lower detail meshes. There is an upper limit to vertices that 'explode' meshes when passed. Keep in mind, undersides will near double the polycount.
Appropriate Textures:
Greyscale. DDS format, 1024x1024, DTX5 compression is the standard. TS3 supports scaling, so you can use 512x for performance or 2048 for HD, etc.
I will be explaining this tutorial with RaonJena’s Hair25 for Adult Female (converted to obj, for proof of concept) for a number of reasons.
- Original download completely unavailable with no known archives. Badly in need of saving from being lost to time!
- Poor UV layout.
- Never had morphs.
The basic greyscale texture and your main hair mesh are closely connected and will form the majority of the work that every other stage will cleanly build from. There will be two more parts to this tutorial- creating LODs and Morphs from LOD0 + making a full texture set from the diffuse.
Starting out, create a folder to contain all of your work. Move/Export your mesh and texture to this folder. You can also go ahead and make two sub-folders- EA and New. This will help keep your bearings with all the files that pile up.
Import Mesh to Blender
If you didn’t come here from “Part Zero”, visit TUTORIAL: Prepare Blender 2.8+ for CAS Creation and come back when you have prepared your project template.
Open the prepared .blend file.
File > Import > the .obj or .geom of your mesh.
Add Material Properties
Hairs have unique alpha transparency that means you won’t have an accurate visual of what parts of the mesh are visible without applying the texture first.
Change render mode to Material Preview.
Open the Material Properties tab.
Some meshes will already have a material assigned. Remove this with the minus button.
Click the + New button to add a new material.
Click the dot icon beside Base Colour and select Image Texture. Click Open and import your texture.
Transparent areas will be black.
Scroll down to Alpha. Click the dot icon, and select Image Texture again. The list of options may be so long that you have to scroll up to find it. This time, click the dropdown arrow and pick the same texture.
Scroll down to the Settings menu and change the Blend Mode to Alpha Clip. The parts of your hair that need to be transparent should render properly in viewport now.
Remove Unwanted Geometry
Optional/As Needed.
Switch to Edit Mode.
Existing meshes can have pieces that TS3 doesn’t need and meshes from other games and TS3 geoms will have undersides that need to be removed.
If the mesh has a scalp, accessory, or other unwanted pieces, this is the time to select them using L and Delete > Faces. You can easily select an entire accessory by turning on UV Sync (demonstrated in the prep tutorial) and opening the texture in the UV Editor. Click and drag over the entire accessory portion of the texture to select the geometry mapped to it.
 What is an Underside?
Each mesh is made up of polygons that only have one side. The direction they face is determined by their ‘normals’. Blender shows both sides for your convenience. Games do not render the ‘backface’. You can toggle backfaces in Solid Preview and the Material Properties to see how TS3 would view your mesh.
Because hairs are made up of 2D pieces that are often seen from both sides, a duplicate mesh is created with flipped normals.
If the mesh is going to be altered, this should be removed until the end.
It’s one of the biggest CC bad habits I’ve seen to make major edits to a mesh that has its original underside- especially trying to fix normals! This is where unwanted shadow patches on meshes and LODs come from.
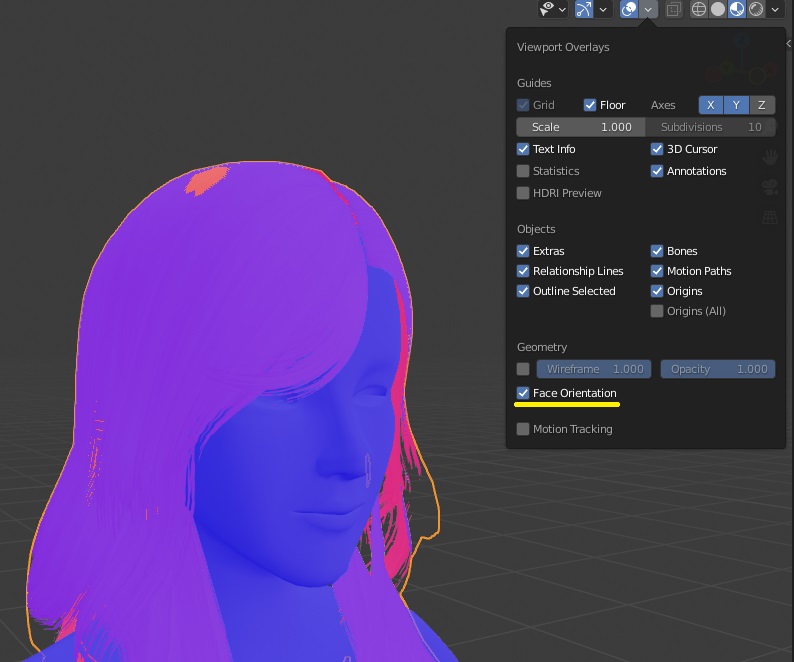
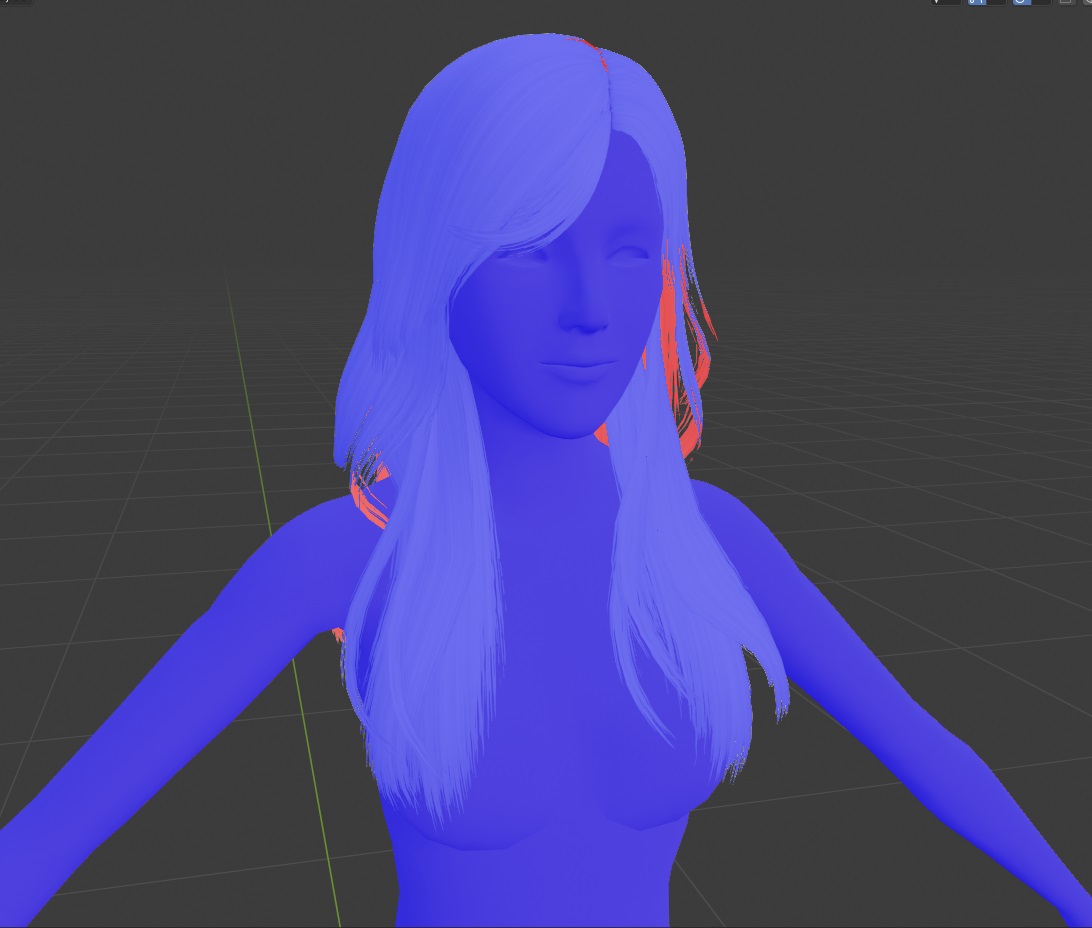
Switch on Face Orientation. Blue is the colour of the side facing out (visible). Red is the colour of the backface.
Magenta and purple faces indicate that a mesh has an underside (both colours in the same place). Blue faces on the inside and outside of the same part is also a sign that an underside mesh is present but scaled down.
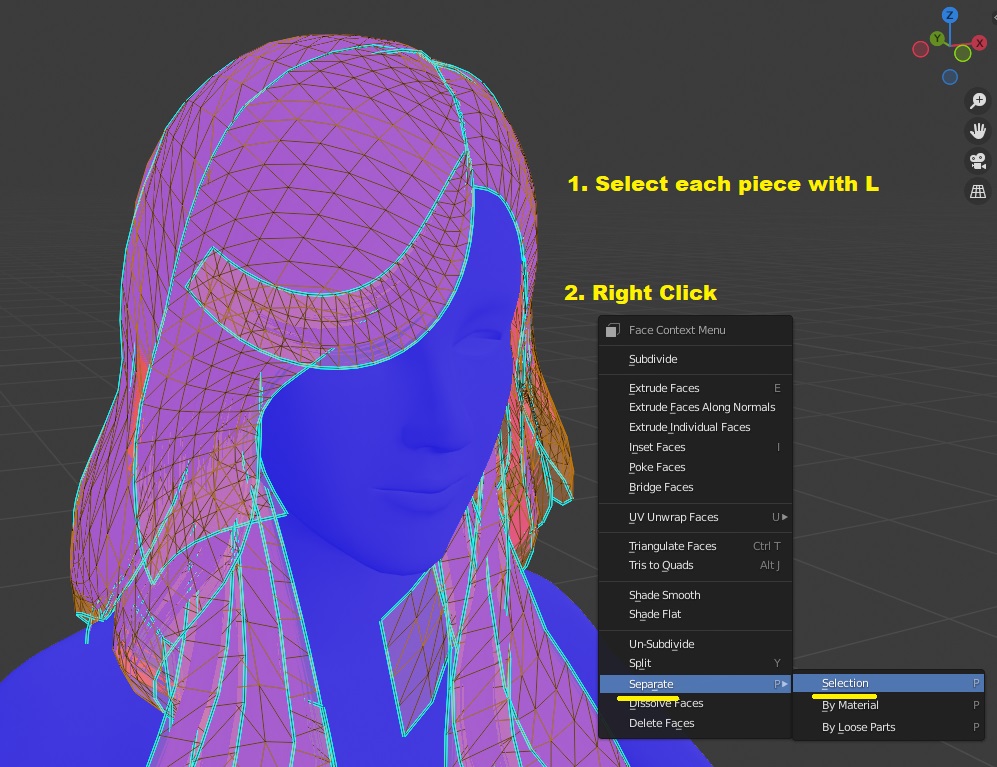
Try to select every part of the mesh with L from the outside. Right click, Separate > by Selection. (Don’t mind the blue outline on my mesh. These are sharp edges that were preserved when I converted the original geom to obj, and it’s fine regardless of whether your mesh has them or not.)
Hide the new object this creates.
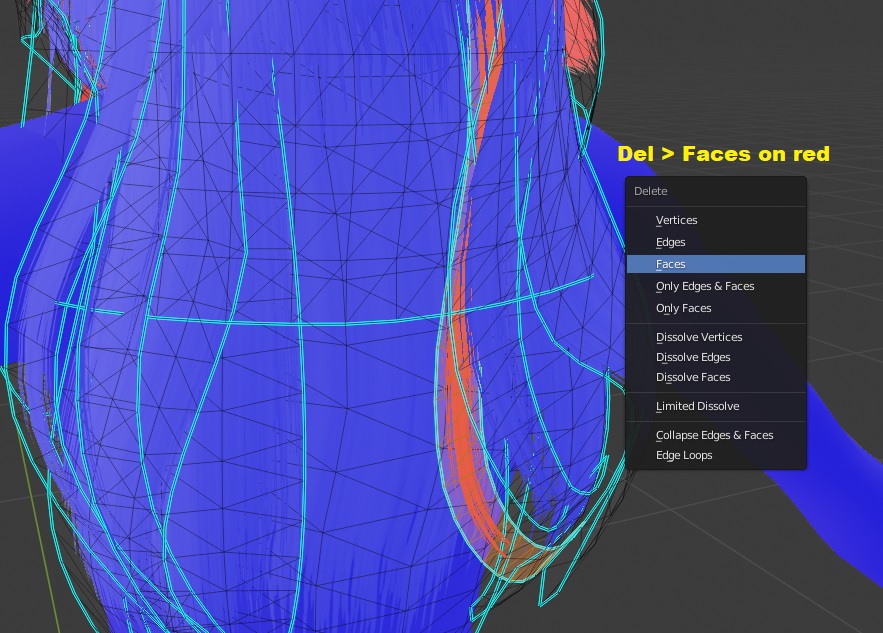
The visible object will either be a majority red or blue.
It might still have some of both, depending on how close the underside was. On the majority blue mesh, select the red parts and Delete > Faces.
On the majority red, select the blue parts and Separate by Selection again.
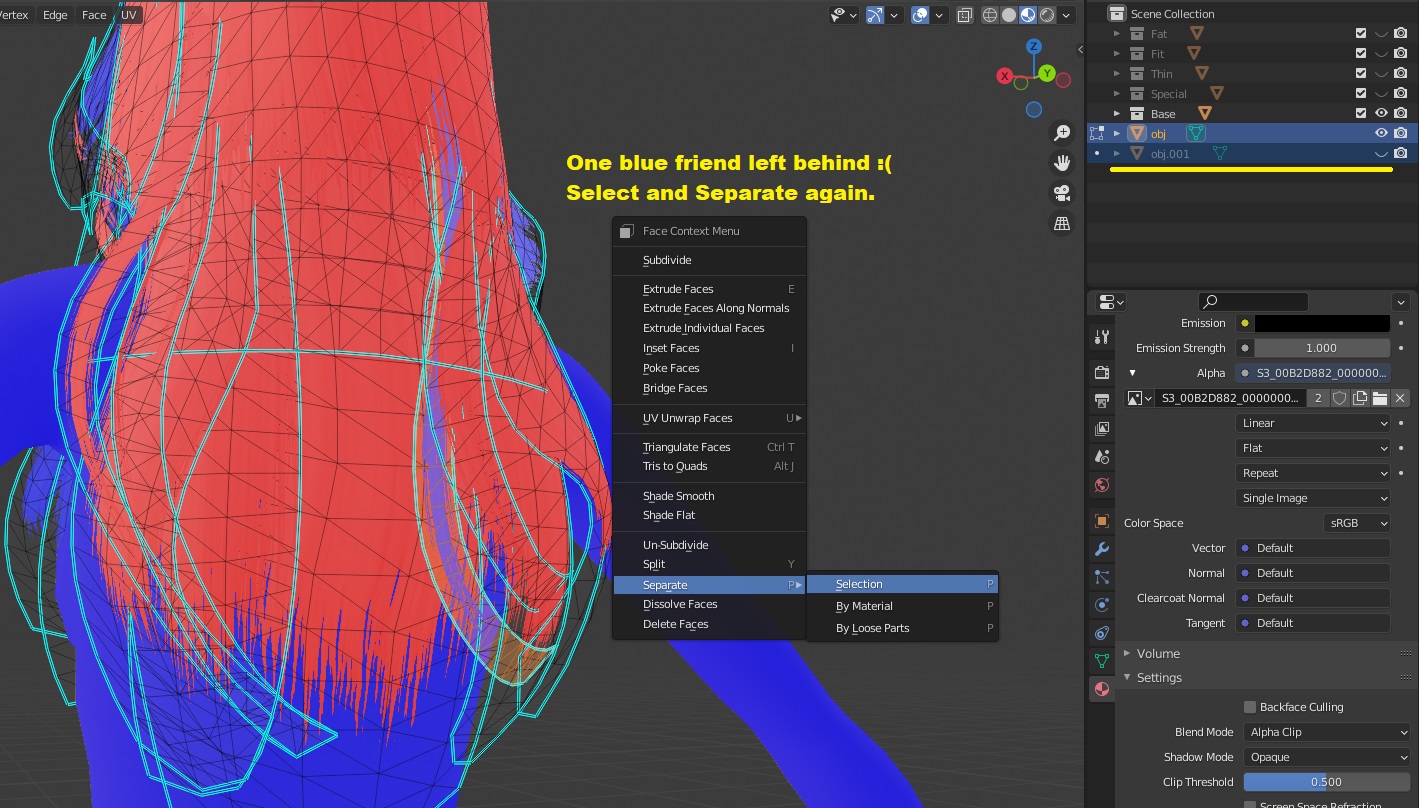
Delete the red mesh.
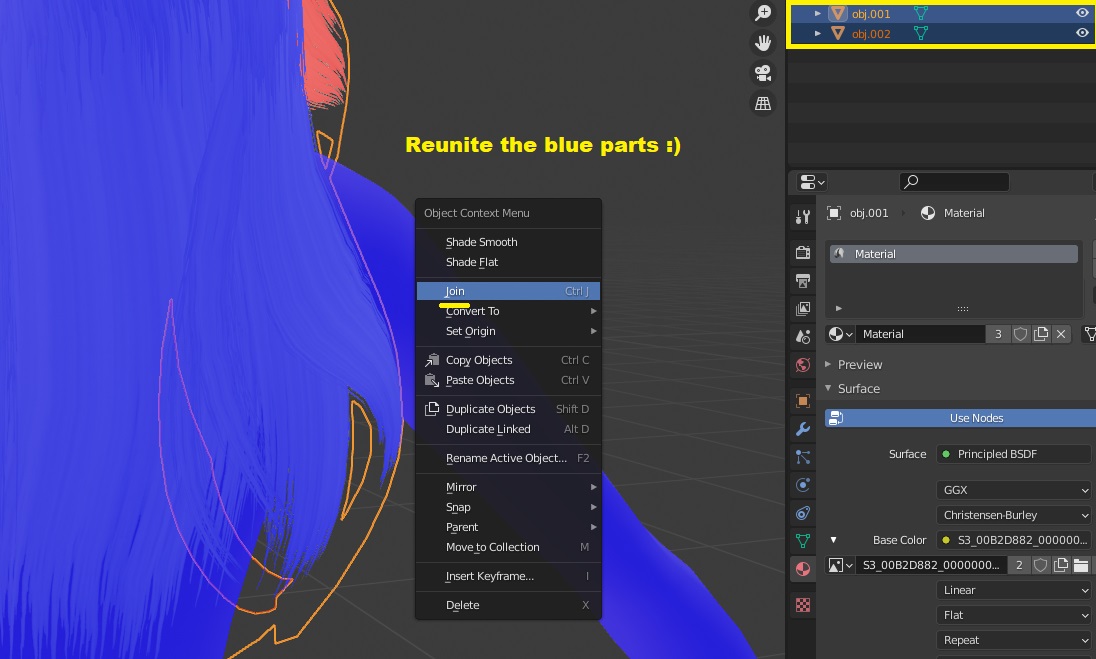
Switch to Object Mode, select both blue meshes, and Right click > Join.
Now you have a one-sided mesh and you can turn off Face Orientation. If your mesh needed any fixes to its normals, this is the time to do it.
This is also the time to reduce polycount if needed. Decimate will not mangle your mesh as badly as it does if it has undersides.
Existing meshes can have pieces that TS3 doesn’t need and meshes from other games and TS3 geoms will have undersides that need to be removed.
If the mesh has a scalp, accessory, or other unwanted pieces, this is the time to select them using L and Delete > Faces. You can easily select an entire accessory by turning on UV Sync (demonstrated in the prep tutorial) and opening the texture in the UV Editor. Click and drag over the entire accessory portion of the texture to select the geometry mapped to it.
What is an Underside?Each mesh is made up of polygons that only have one side. The direction they face is determined by their ‘normals’. Blender shows both sides for your convenience. Games do not render the ‘backface’. You can toggle backfaces in Solid Preview and the Material Properties to see how TS3 would view your mesh.
Because hairs are made up of 2D pieces that are often seen from both sides, a duplicate mesh is created with flipped normals.
If the mesh is going to be altered, this should be removed until the end.
It’s one of the biggest CC bad habits I’ve seen to make major edits to a mesh that has its original underside- especially trying to fix normals! This is where unwanted shadow patches on meshes and LODs come from.
Switch on Face Orientation. Blue is the colour of the side facing out (visible). Red is the colour of the backface.
Magenta and purple faces indicate that a mesh has an underside (both colours in the same place). Blue faces on the inside and outside of the same part is also a sign that an underside mesh is present but scaled down.
Try to select every part of the mesh with L from the outside. Right click, Separate > by Selection. (Don’t mind the blue outline on my mesh. These are sharp edges that were preserved when I converted the original geom to obj, and it’s fine regardless of whether your mesh has them or not.)
Hide the new object this creates.
The visible object will either be a majority red or blue.
It might still have some of both, depending on how close the underside was. On the majority blue mesh, select the red parts and Delete > Faces.
On the majority red, select the blue parts and Separate by Selection again.
Delete the red mesh.
Switch to Object Mode, select both blue meshes, and Right click > Join.
Now you have a one-sided mesh and you can turn off Face Orientation. If your mesh needed any fixes to its normals, this is the time to do it.
This is also the time to reduce polycount if needed. Decimate will not mangle your mesh as badly as it does if it has undersides.
Optimize Texture and UV Map
Optional/As Needed.
In Edit Mode, press A to select all. Turn on UV Sync in the UV Editor.
Select the image dropdown and select your texture.
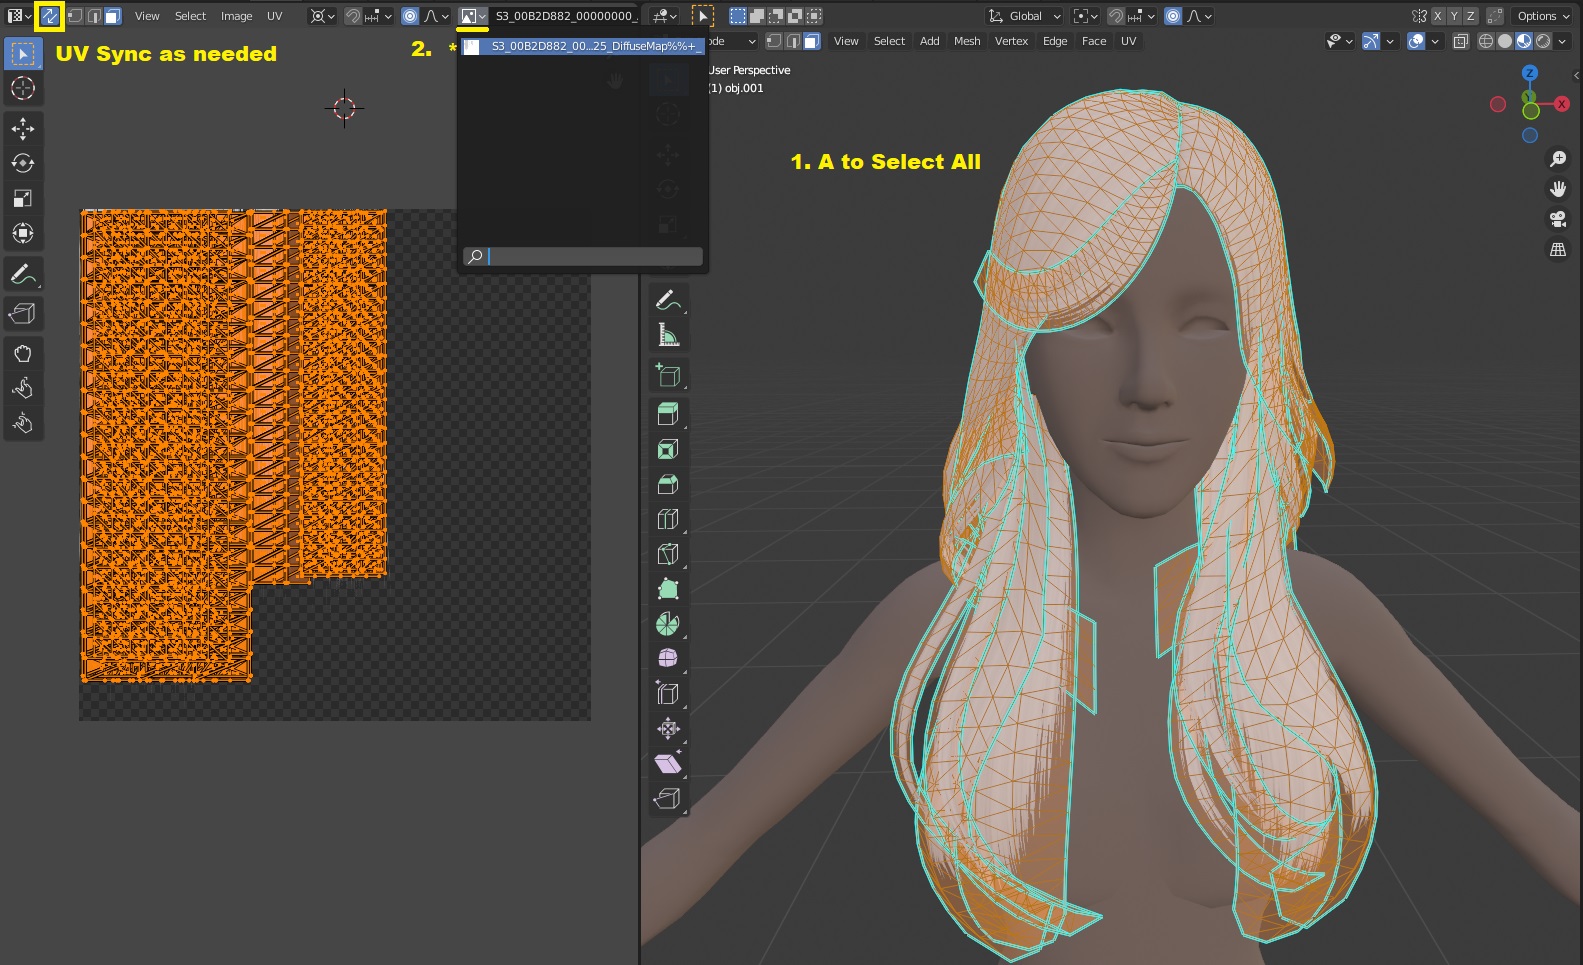
Every mesh can have unique issues to fix here. The goal is to have the UVs neatly fit the 1024x image space. This is also where you can see the existence of unneeded parts, like a scalp mesh under the hair. UVs from other games might be in different resolutions and require scaling on one axis. As you can see on the mesh I’m working with, the UVs don’t fill the space- making the hair lower resolution.
It’s best to make any layout changes in image editing software first and carefully note the percentages you move and scale by to replicate the changes on the UV.
So for this stage of the tutorial, I open the diffuse in Photoshop (with the Nvidia DDS plugin installed).
I understand that not everyone has access to Photoshop so I will write the Part Three texture tutorial with GIMP equivalents. That’s twice the work to include a program I don’t use, so for right now it will just be Photoshop.
Unhide the Alpha channel so you can see what is relevant. The semi-transparent red overlay represents what is NOT visible.
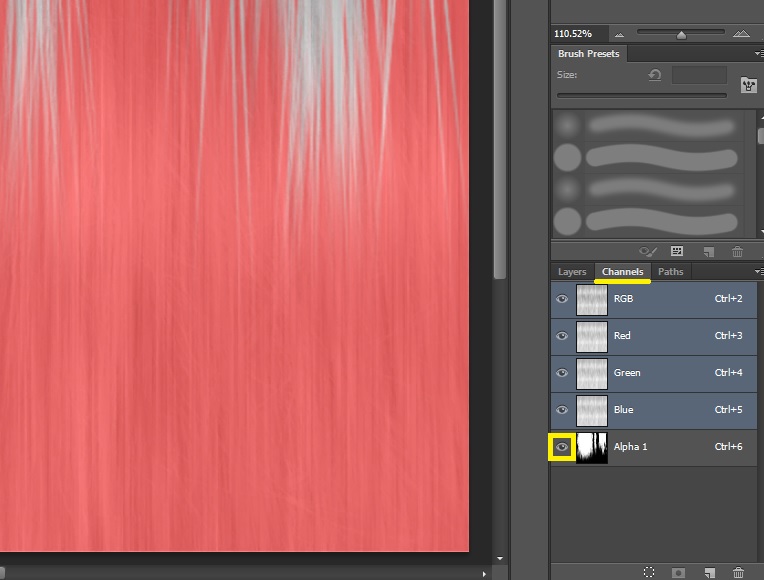
IMPORTANT: Shift+Click the Alpha channel to include it in your edits.
Ctrl+A to select the entire image. Ctrl+T to enter Transform.
I only want to scale in one direction at a time, so choose the side that should remain stationary from the top left before dragging an edge.
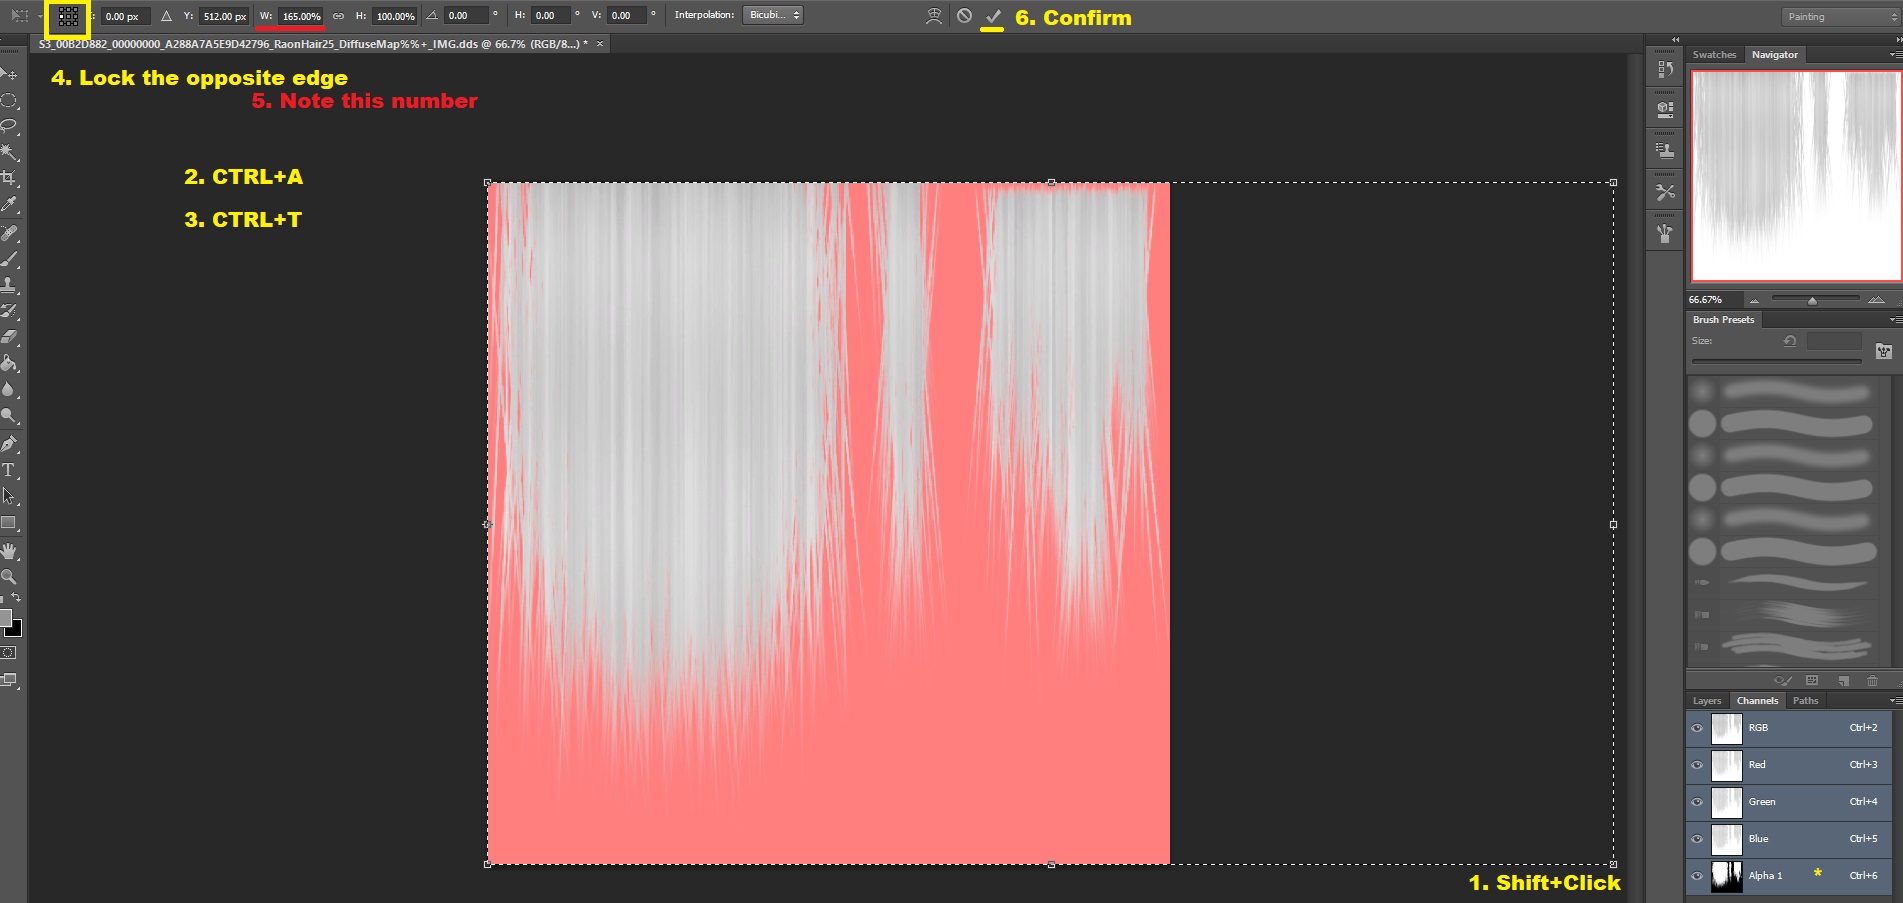
Keep a close eye on the percentage displayed for the transformation by Width or Height and change it to the nearest round number. Take note of the number and direction.
Repeat for each edit.
165% Width translates to a Scale of 1.65 on the X axis in Blender.
105% Height translates to a Scale of 1.05 on the Y axis.
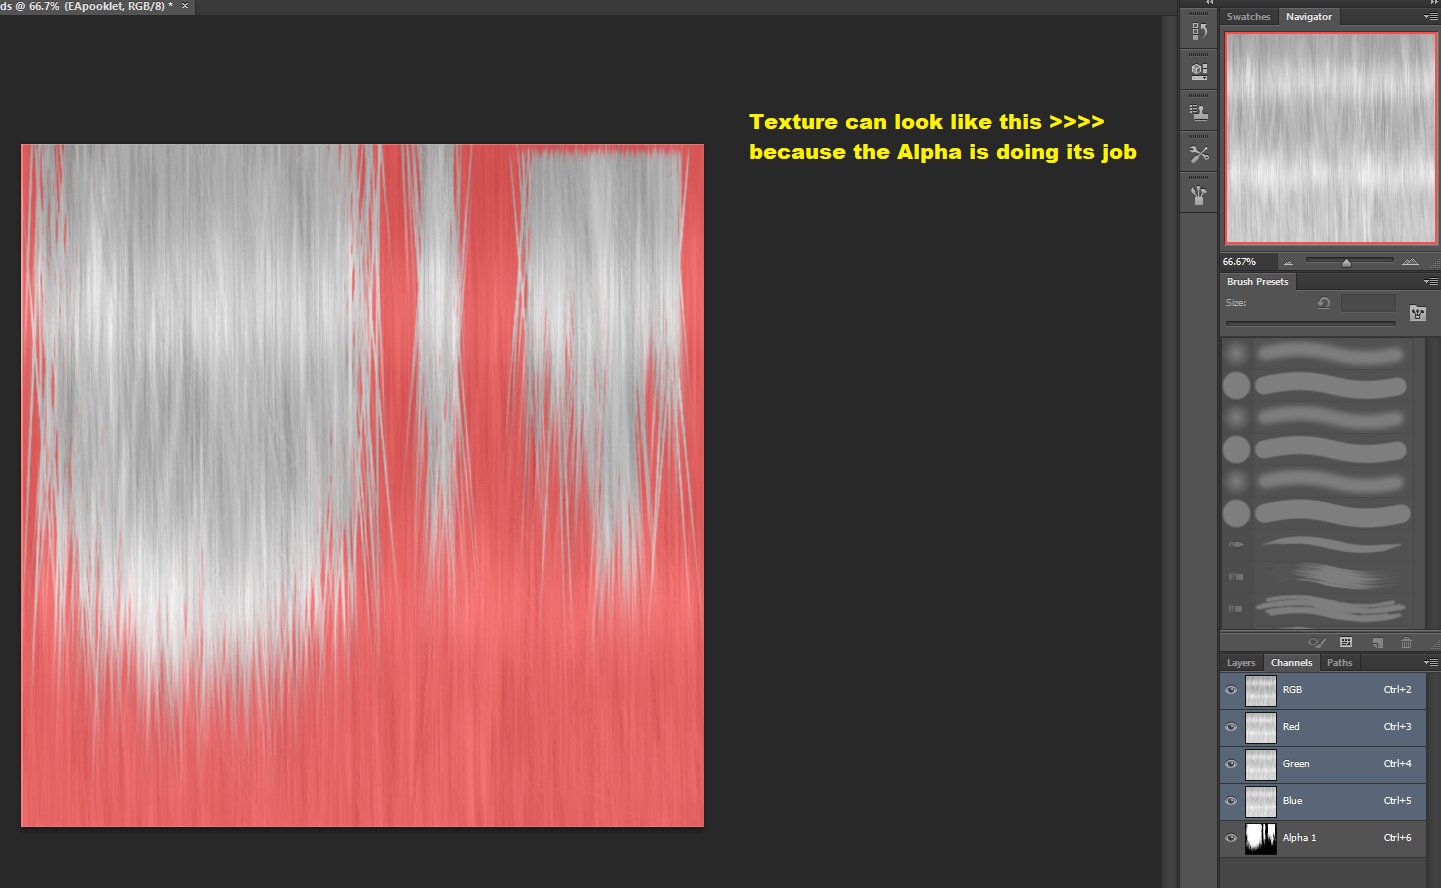
If this is an existing texture you plan to retexture, you can do that now.
Because this one is all straight hair in one row, I can just paste my personal texture blend on top. On hairs with complex texture layouts, you can use the Alpha as reference of how to fit a new texture. More on that in the texture tutorial.
When retexturing, there is NO need to cookie-cutter the texture to be hair shaped or use any editing tricks to perfectly overlay them to the old shapes. The Alpha is ALREADY the cookie-cutter.
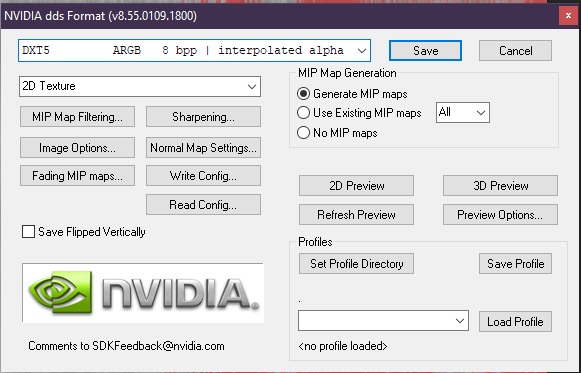
Save (overwrite the original) as DDS. DTX5 compression from the dropdown menu, Generate MIP maps on.
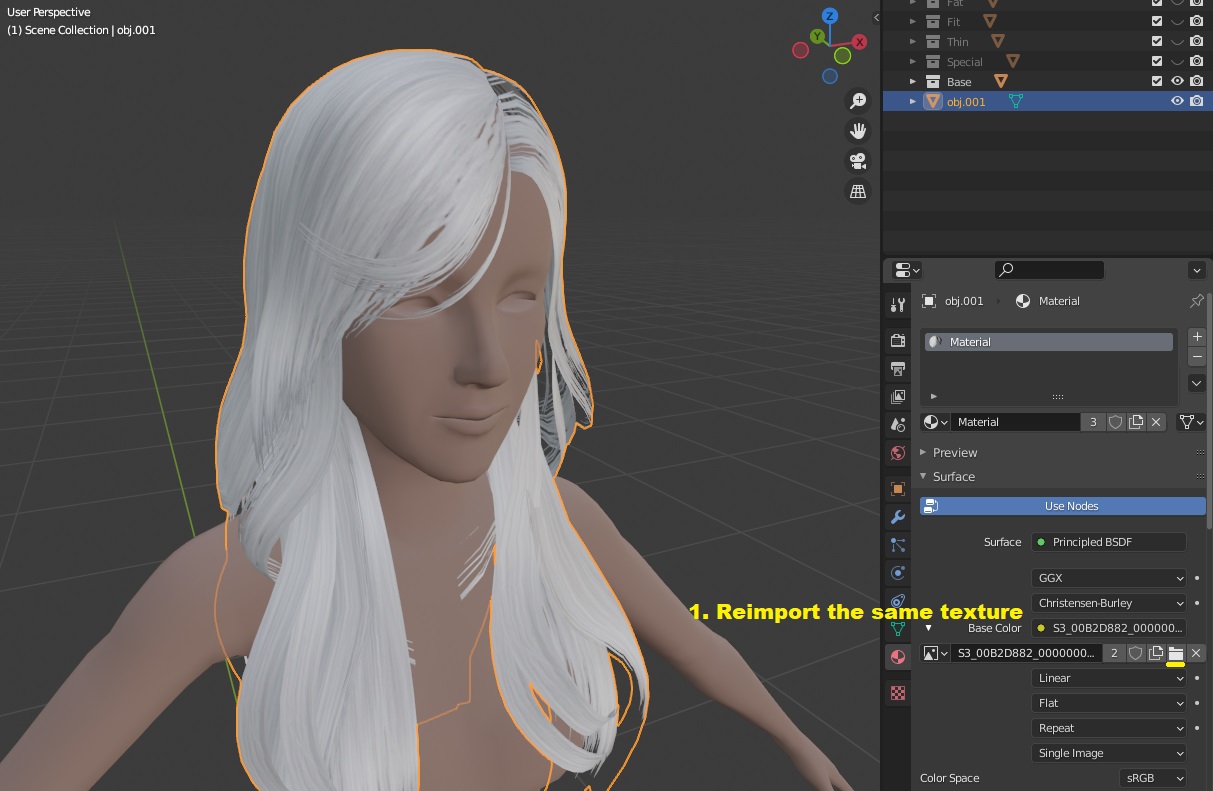
Back to Blender.
Back in the Material Properties, click the folder icon of the Image Texture and select the overwritten texture. It will replace it in all areas it is being used (as the Base Colour, the Alpha, and the UV Editor).
The preview will now have incorrect transparency, because the texture has moved from the UV Map. Time to scale the UVs in all the same ways we scaled the texture.
If you’ve scaled anything in Blender before, you may notice it scales from the center in all directions even when locked to an axis. Because the Photoshop texture was transformed in one direction each time, we need to lock the UV in the same way.
Select the 2D Cursor option in the UV Editor. Click on the edge you want to scale away from. The closer to the nearest part of the UV, the better. I moved mine a tiny bit closer after the screenshot.
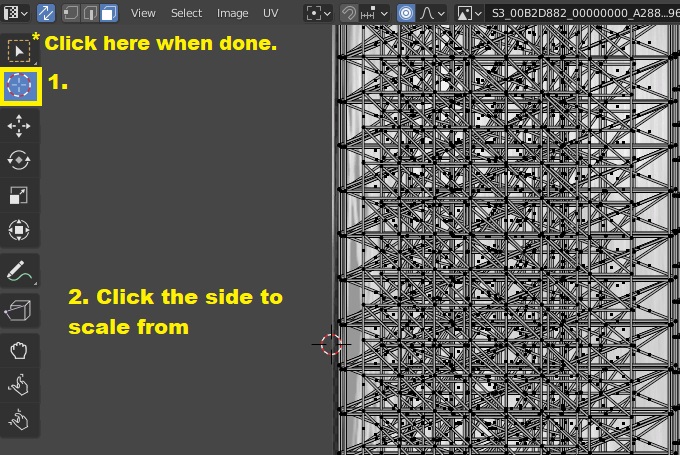
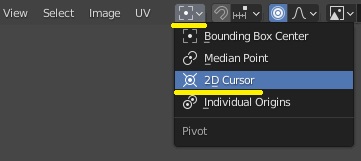
Go back to the Select tool so you don’t move it again. Change the Pivot Point for the UV Editor to the 2D Cursor.
Press A to select all. Scale to the same dimensions noted from Photoshop.
I press S, then X, then 1.65, and Enter.
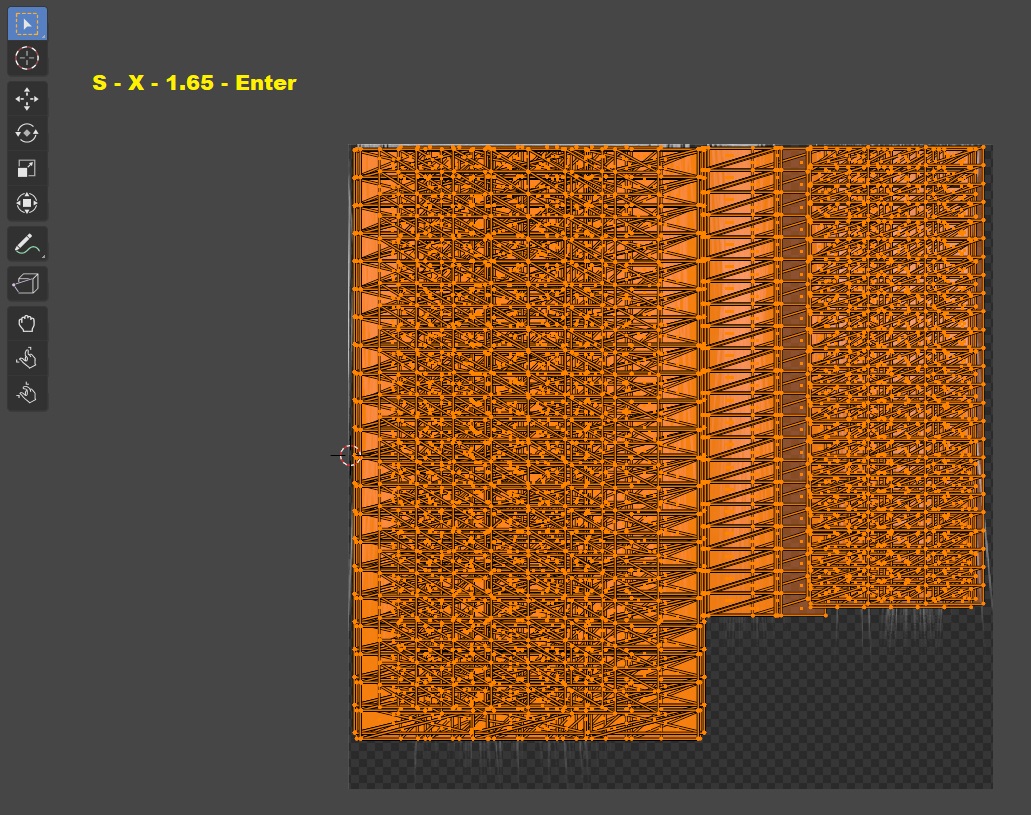
Then I move the 2D cursor to the top edge and Scale on Y, 1.05.
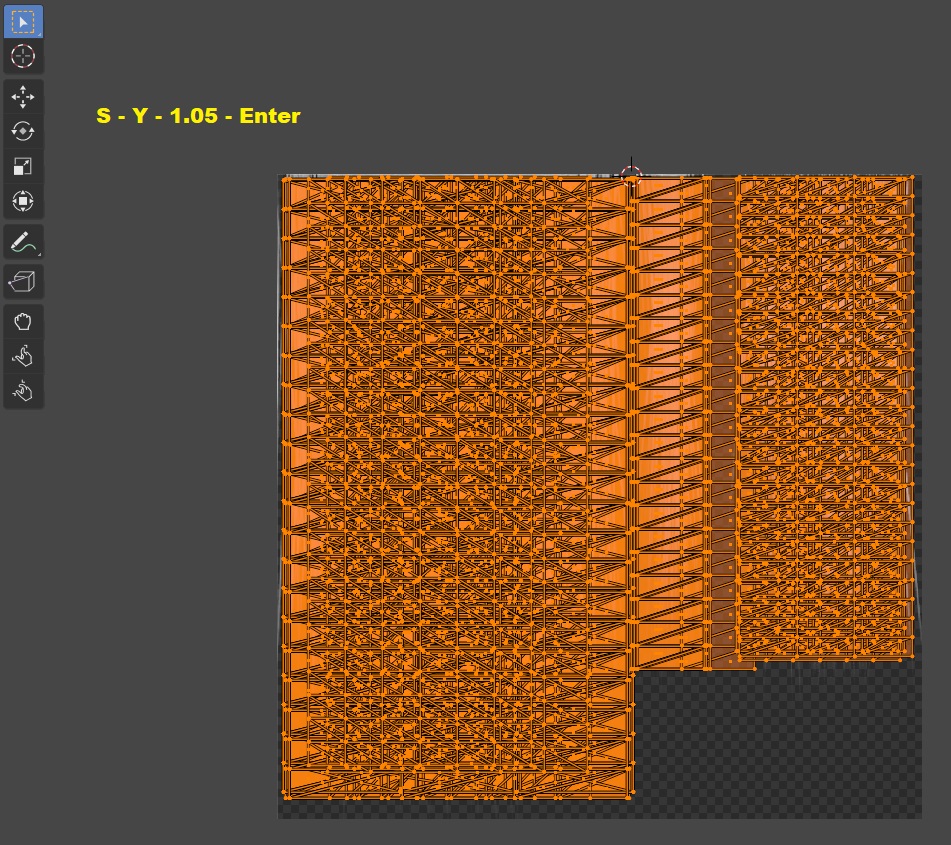
Now the UV fits the texture, and the texture is using as much available space as possible.
Select the image dropdown and select your texture.
Every mesh can have unique issues to fix here. The goal is to have the UVs neatly fit the 1024x image space. This is also where you can see the existence of unneeded parts, like a scalp mesh under the hair. UVs from other games might be in different resolutions and require scaling on one axis. As you can see on the mesh I’m working with, the UVs don’t fill the space- making the hair lower resolution.
It’s best to make any layout changes in image editing software first and carefully note the percentages you move and scale by to replicate the changes on the UV.
So for this stage of the tutorial, I open the diffuse in Photoshop (with the Nvidia DDS plugin installed).
I understand that not everyone has access to Photoshop so I will write the Part Three texture tutorial with GIMP equivalents. That’s twice the work to include a program I don’t use, so for right now it will just be Photoshop.
Unhide the Alpha channel so you can see what is relevant. The semi-transparent red overlay represents what is NOT visible.
IMPORTANT: Shift+Click the Alpha channel to include it in your edits.
Ctrl+A to select the entire image. Ctrl+T to enter Transform.
I only want to scale in one direction at a time, so choose the side that should remain stationary from the top left before dragging an edge.
Keep a close eye on the percentage displayed for the transformation by Width or Height and change it to the nearest round number. Take note of the number and direction.
Repeat for each edit.
165% Width translates to a Scale of 1.65 on the X axis in Blender.
105% Height translates to a Scale of 1.05 on the Y axis.
If this is an existing texture you plan to retexture, you can do that now.
Because this one is all straight hair in one row, I can just paste my personal texture blend on top. On hairs with complex texture layouts, you can use the Alpha as reference of how to fit a new texture. More on that in the texture tutorial.
When retexturing, there is NO need to cookie-cutter the texture to be hair shaped or use any editing tricks to perfectly overlay them to the old shapes. The Alpha is ALREADY the cookie-cutter.
Save (overwrite the original) as DDS. DTX5 compression from the dropdown menu, Generate MIP maps on.
Back to Blender.
Back in the Material Properties, click the folder icon of the Image Texture and select the overwritten texture. It will replace it in all areas it is being used (as the Base Colour, the Alpha, and the UV Editor).
The preview will now have incorrect transparency, because the texture has moved from the UV Map. Time to scale the UVs in all the same ways we scaled the texture.
If you’ve scaled anything in Blender before, you may notice it scales from the center in all directions even when locked to an axis. Because the Photoshop texture was transformed in one direction each time, we need to lock the UV in the same way.
Select the 2D Cursor option in the UV Editor. Click on the edge you want to scale away from. The closer to the nearest part of the UV, the better. I moved mine a tiny bit closer after the screenshot.
Go back to the Select tool so you don’t move it again. Change the Pivot Point for the UV Editor to the 2D Cursor.
Press A to select all. Scale to the same dimensions noted from Photoshop.
I press S, then X, then 1.65, and Enter.
Then I move the 2D cursor to the top edge and Scale on Y, 1.05.
Now the UV fits the texture, and the texture is using as much available space as possible.
Edit Mesh
Now that the ‘troubleshooting’ is taken care of, or if you and a suitable mesh skipped ahead, it is time to make all desired changes to the hair itself. Revisit the setup tutorial for examples of useful Blender tools.
You might start with something like this.
The mesh I am working with is set too close in the back and too far in the front. I’ll also be making smaller edits- making sure the hairline is flush with the scalp, hiding incomplete geometry, and pushing a clipping hairstrand into place.
General Suggestions:
In Edit Mode, utilize the Select Circle (C), Scale (S), Grab (G), X Y and Z, and Proportional Editing to fit the mesh to the TS3 head. Use these tools for the large and obvious changes. Select individual verts to tweak clipping, smooth sharp edges.
If you are making any changes more advanced than scaling, please remove undersides by following the steps in Remove Unwanted Geometry.
Stay alert for stray selections, as selections ‘see’ through inactive objects (ie. the reference body). Toggle X-Ray (Alt Z) to catch orange verts you don’t want.
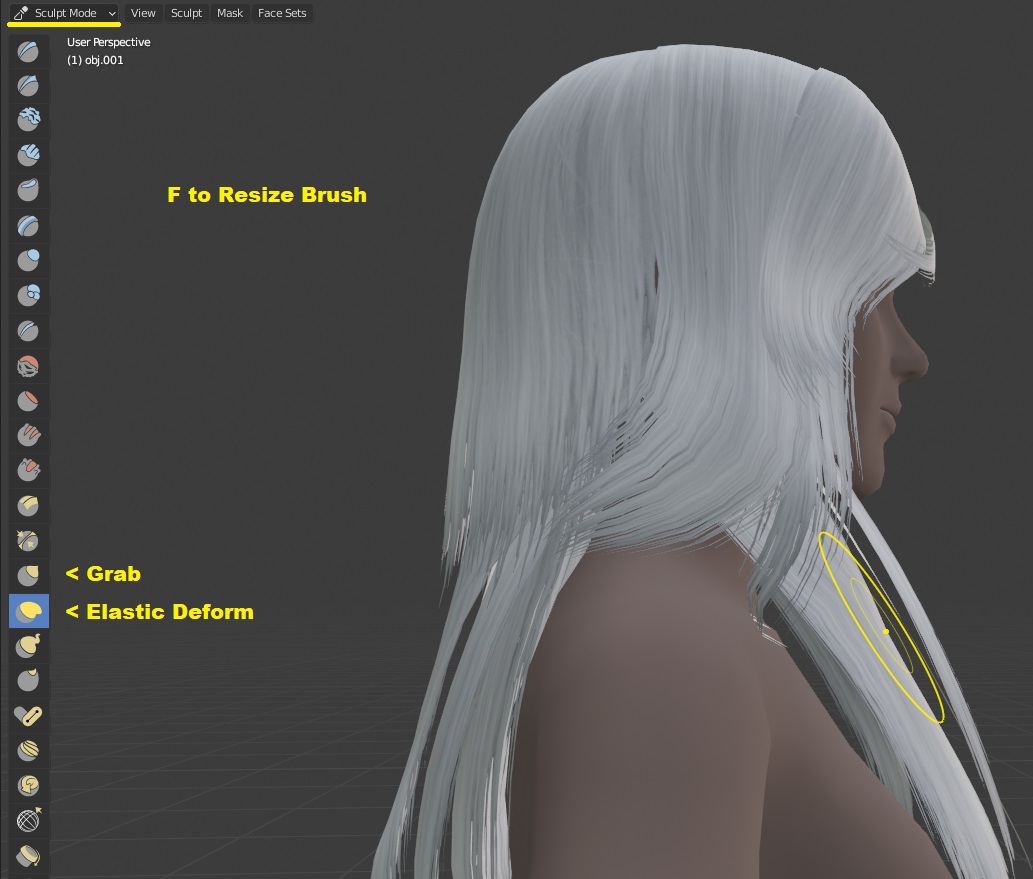
Diagonal sections of mesh, particularly chest-length sections of hair, that need to move in natural gradients will benefit more from being moved in Sculpt Mode with the Elastic Deform tool. Use Grab for sharper movements, and press F to change brush size on the fly by moving your mouse. The default strength is usually fine. Push geometry into place.
If you need to sculpt one part of the mesh separately, select it with L in Edit Mode, right click, Separate > By Selection. When you are done, in Object Mode Ctrl click on both pieces, right click, Join.
Take care not to separate anything less than an entire ‘linked’ piece. Splitting geometry shears vertices and separates normals that require advanced welding and fixes to put back together.
Example:
#1 Piece of Advice
Mess around with a practice mesh with all of the meshing methods ahead that you are unfamiliar with. Really get confident with how each tool controls so you can have a strong point of reference of what to use to change your mesh in the way you want.
I begin in Edit Mode and use the Select Circle to select an arc across the back. This can be a messy/incomplete selection because I will be using Proportional Editing, but I do switch on X-Ray to deselect verts from the front that got caught.
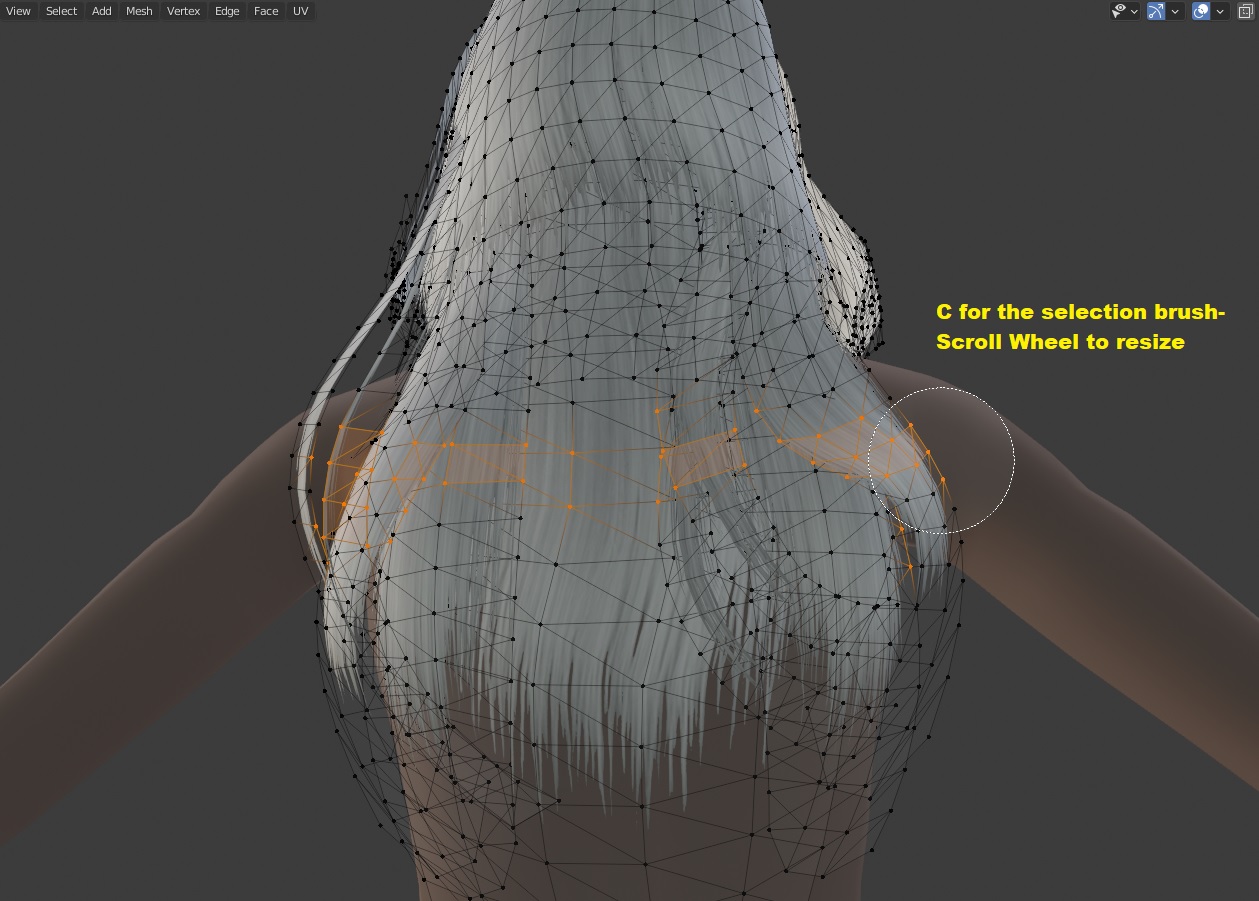
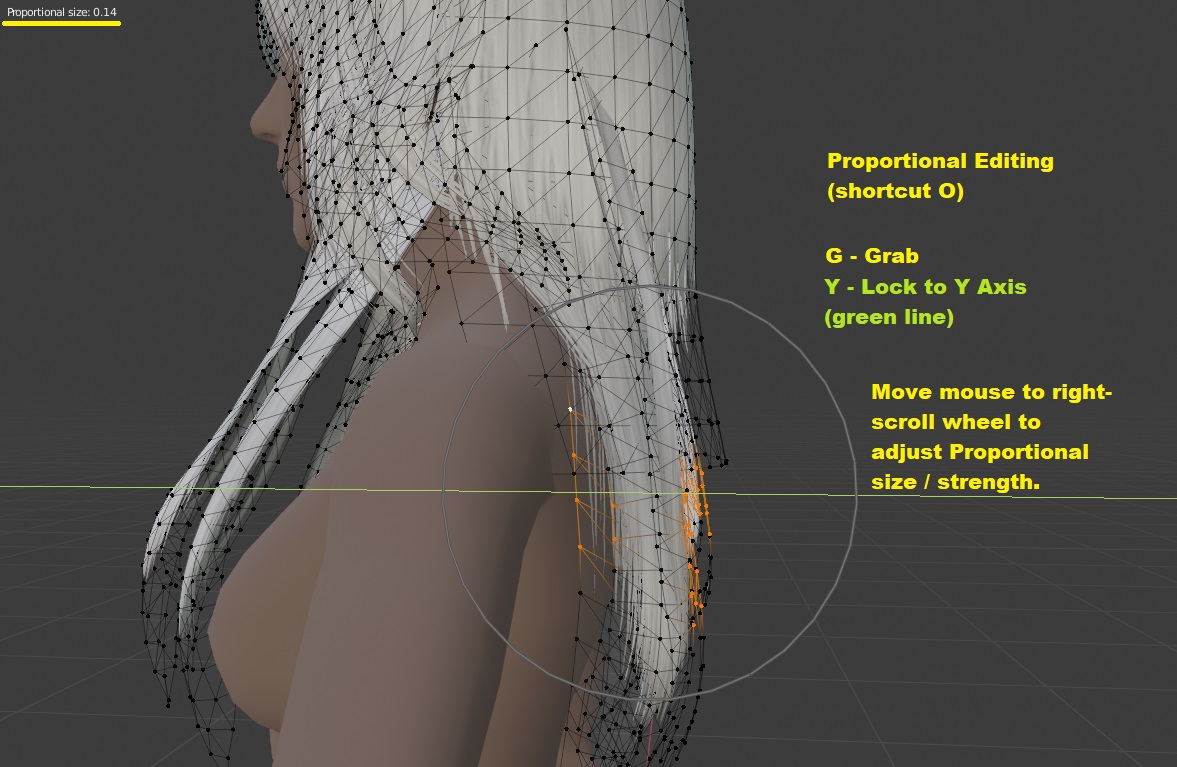
With Proportional Editing on, I use Grab on the Y axis to pull the vertices back and use the scroll wheel to change the Proportional strength until the parts that move look natural. I deselect and select smaller problem areas and repeat the same steps, pushing and pulling until it’s fitting nicely.
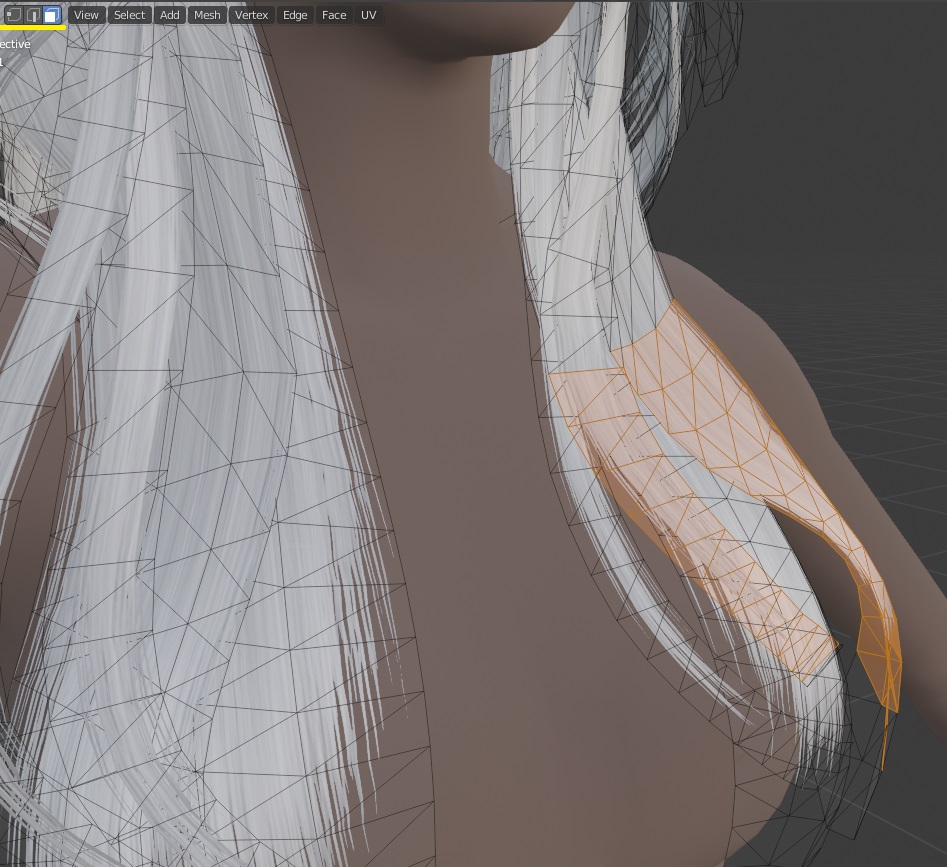
What Will Clip?
When fitting parts of the hair around the body, keep in mind that Sims wear 3D clothes and female sims have a bust slider that hairs do not have a morph for (bone assignments will try their best but it isn’t perfect). It is valuable to decide early which visual inconsistency you dislike more- clipping hair or floating hair- when deciding how ‘flush’ the hair should be to the body.
I switch to Sculpt Mode and use Elastic Deform to refit the ‘floating’ pieces in the front. Several small clicks and drags for smooth reshaping. It is more effective to start at the bottom of the hair strand and work up, as the lower movements tend to have a greater influence. The brush is also relative to the viewport, not the mesh, so you can zoom in or out for it to affect less or more respectively.
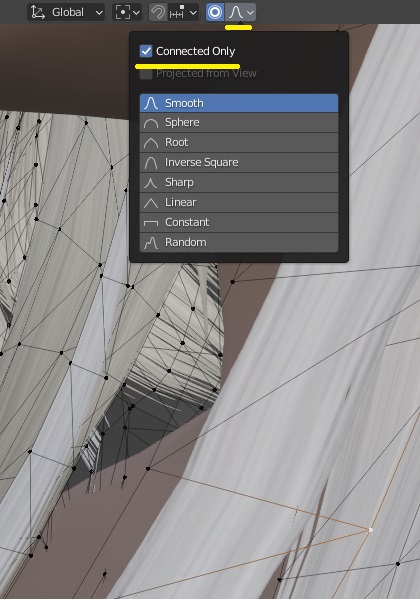
This hair doesn’t just float from the body, but some of its own pieces are set too high from each other. The sculpting tools affect nearby geometry too strongly, so I switch back to Edit Mode and edit them by themselves by changing Proportional Editing to ‘Connected Only’- so that only linked parts are influenced.
I also toggle to Face select for making larger selections-
- and when they still aren’t quite in place, separate to Sculpt independently. Join again when complete.

I also select the entire mesh and scale it down a little bit on the X and Y axes, as well as moving it down on Z to just before the scalp clips through (which I should have done at the beginning).
There’s an angle that some clipping and loose hair pieces can be seen, so I moved the outer pieces to hide it- again using Edit Mode and Proportional Editing, this time on the X axis.
Lastly, there is a hair strand that stands out too much from the way it clips from underneath.
I used connected Proportional Editing to move the pieces, as well as Rotate (R).

Touch up any last clipping with Sculpt Mode.
Mess around with a practice mesh with all of the meshing methods ahead that you are unfamiliar with. Really get confident with how each tool controls so you can have a strong point of reference of what to use to change your mesh in the way you want.
I begin in Edit Mode and use the Select Circle to select an arc across the back. This can be a messy/incomplete selection because I will be using Proportional Editing, but I do switch on X-Ray to deselect verts from the front that got caught.
With Proportional Editing on, I use Grab on the Y axis to pull the vertices back and use the scroll wheel to change the Proportional strength until the parts that move look natural. I deselect and select smaller problem areas and repeat the same steps, pushing and pulling until it’s fitting nicely.
What Will Clip?When fitting parts of the hair around the body, keep in mind that Sims wear 3D clothes and female sims have a bust slider that hairs do not have a morph for (bone assignments will try their best but it isn’t perfect). It is valuable to decide early which visual inconsistency you dislike more- clipping hair or floating hair- when deciding how ‘flush’ the hair should be to the body.
I switch to Sculpt Mode and use Elastic Deform to refit the ‘floating’ pieces in the front. Several small clicks and drags for smooth reshaping. It is more effective to start at the bottom of the hair strand and work up, as the lower movements tend to have a greater influence. The brush is also relative to the viewport, not the mesh, so you can zoom in or out for it to affect less or more respectively.
This hair doesn’t just float from the body, but some of its own pieces are set too high from each other. The sculpting tools affect nearby geometry too strongly, so I switch back to Edit Mode and edit them by themselves by changing Proportional Editing to ‘Connected Only’- so that only linked parts are influenced.
I also toggle to Face select for making larger selections-
- and when they still aren’t quite in place, separate to Sculpt independently. Join again when complete.
I also select the entire mesh and scale it down a little bit on the X and Y axes, as well as moving it down on Z to just before the scalp clips through (which I should have done at the beginning).
There’s an angle that some clipping and loose hair pieces can be seen, so I moved the outer pieces to hide it- again using Edit Mode and Proportional Editing, this time on the X axis.
Lastly, there is a hair strand that stands out too much from the way it clips from underneath.
I used connected Proportional Editing to move the pieces, as well as Rotate (R).
Touch up any last clipping with Sculpt Mode.
If you’re all done, the last thing to check off your list is to switch to Object Mode, select the mesh, Alt + A in the viewport and Apply All Transforms. Repeat on any and all meshes you worked on because if you accidentally made changes in Object Mode (or if you imported an obj) there will be values that aren’t saved until applied.
When you are done and everything looks how you would like it ingame, it is time to make an underside.
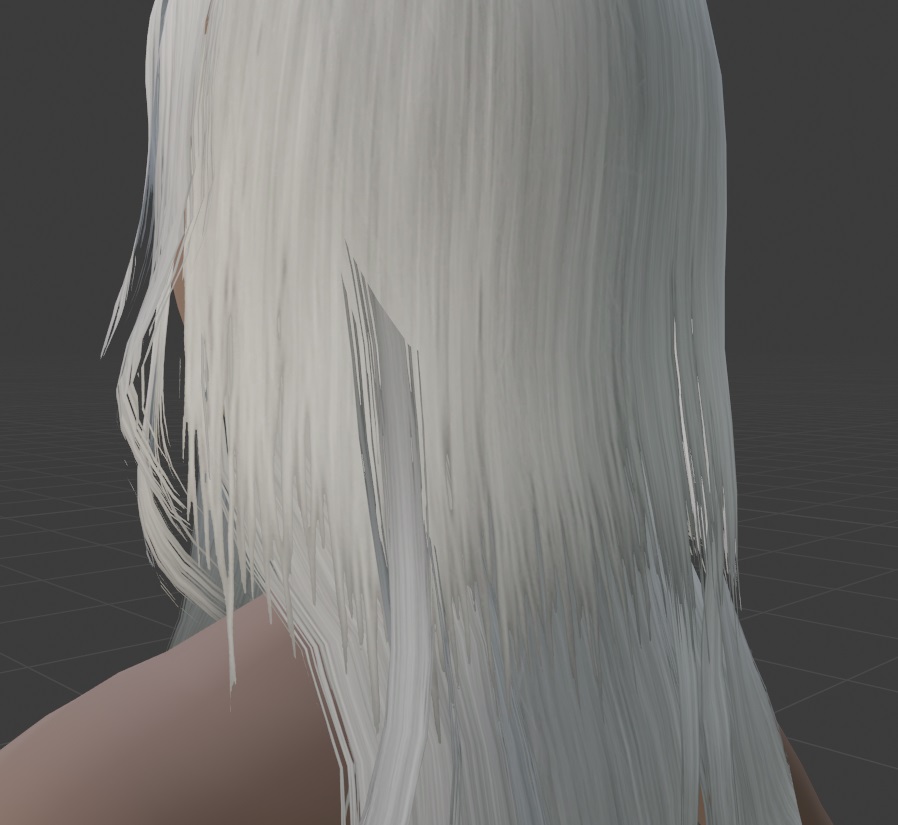
BEFORE
AFTER
Create Underside
If you were working with multiple meshes for any reason, join them with the same technique as above. Turn on Face Orientation to see what is going on.
See Remove Unwanted Geometry section if you don't know what undersides are, or are unsure if your mesh has them already.
Switch to Object Mode. Select your mesh in the hierarchy. CTRL + C then CTRL + V to duplicate.
Hide the first mesh and select the duplicate. Switch to Edit Mode, press A to select all faces. Open the mesh menu, navigate to Normals, and select Flip. This duplicate is now a mirror image for viewing faces from the other side.
Unhide your main mesh. You will notice that the faces are now magenta and purple for both normals existing in the same place. You can leave this as it is, scaling the duplicate is entirely a matter of taste. It can make separating the sides easier in the future to scale the duplicate by 0.999 or whatever value turns the faces blue with no purple flicker, so you might want to do that if you aren’t yet confident in removing undersides.
Object Mode > click both meshes > right click Join.
If there are parts of your mesh where you cannot see the backfaces from any side (on a bun, for example), feel free to select those faces on the underside and delete them.
Take a deep breath and relax- you’re at the biggest milestone in the process. The outright mesh preparation is complete and all that remains is making it game-ready. This is an important stage to remember to save your work, take a break, have a snack and hydrate, and maybe remember that you put your headphones in but didn’t turn on music for the past hour of work.
There are some little finalizations to have your pair of resources ready to move on.
Clone an EA Hair
Open S3OC, select Clone > CAS Part.
When it loads, click the Name header then the EP/SP header to sort.
Scroll down to the hairs for the age and gender you are creating a hair for. For general GEOM reference, it doesn’t matter what one you pick. If you need a reference for bone assignments (ie. your mesh wasn’t a GEOM to begin with) pick a hair of the most similar style, in terms of length and position of the hair. NO HAT HAIR.
I make default replacements, so I’m lucky in always having a specific hair in mind to clone. In this case, afHairLongStraightSidepart.
Click the hair you want to use, then Clone or Fix.
Check Deep Clone. If you want to make a default replacement later, check Include Thumbnail and uncheck Renumber. Click Start and choose your project folder to save it in (I put it in the EA folder).
Open the package with S3PE. Sort by Tag.
Scroll down to the GEOMs and export the LOD0 to the same folder. I name this ‘Reference.simgeom’.
If you don’t have scalp and face textures for your hair yet, you might want to look through the _IMG resources and export those too- but I will go into more detail on that in Part Three.
Prepare for Export with GEOM Tools
Return to Blender and Import the Reference.simgeom into your project. With GEOM Tools installed correctly, the option is both under File > Import and Scene Properties.
Select the reference and Shift+Click your completed hair. In the Scene Properties tab, click Transfer GEOM Data. You can delete the reference.
Select your hair. In the same GEOM Tools, select Recalculate IDs.
Then select Export GEOM. I name this one LOD0 and save it in the New folder of my project.
SimGeom Editor Fix
This section was originally ‘Necessary Milkshape Tweaks’, but I ironed it out of the process last minute.
One chunk of data doesn’t export out of Blender correctly, but that can be fixed with Delphy’s SimGeom Editor.
Open the program. File > Open the Reference.simgeom. File > Export MTNF. I just call it ‘MTNF’.
File > Open your new LOD0. File > Import MTNF.
File > Save.
Most hairs seem to have identical settings, it may be ok to use the same exported MTNF every time.
Assign Bones
Simplified here, you can also do them manually with Weight Paint. Open MeshToolKit, Auto-tools for GEOM, Assign Bones. Pick your LOD0 for the first box.
If you edited an existing hair, you can use the original as the reference (if it’s still for the same age and gender). Otherwise, use the EA hair you cloned.
Click Do Assignments and Save and overwrite your LOD0.
PART ONE COMPLETE
You now have the two most important ‘parent’ files that will expedite the creation of every other resource (LOD0 to all morphs and LODs, the diffuse to the specular, control, and normal map.)
Changelog:
6/06/23 - Images resized where possible, optional sections contained in spoilers, and formatting/spacing improvements.
When it is available, this tutorial will pick up from:
PART TWO: Hair Morphs and LODs from LOD0 in Blender + Final Assembly
7 users say thanks for this.
(Who?)
Thanks
Advertisement
Test Subject
#3
25th Apr 2024 at 4:36 PM
25th Apr 2024 at 4:36 PM
Posts: 7
https://media.discordapp.net/attach...1211&height=681
can you help me with this the mesh looks extremely wonky :/// (i didnt import the fat mesh yet but)
can you help me with this the mesh looks extremely wonky :/// (i didnt import the fat mesh yet but)
#4
Yesterday at 4:53 AM
Yesterday at 4:53 AM
Posts: 482
Thanks: 10 in 2 Posts
Quote: Originally posted by Ard4x
|
can you help me with this the mesh looks extremely wonky :/// (i didnt import the fat mesh yet but) |
Hi there

I'd be glad to take a look and see if I know what happened- if you put the .package in a zip file you can attach it to a reply here, or alternatively upload it somewhere like Google Drive and send me the link.
Scribe of tutorials. Oracle of questions at NRaas. Blog staller at thecardinalsims. Feel free to @ me for input on any TS3/TS4 modding questions.
Who Posted
|
|